Moving between Kali distributions
Overview
There’s a lot of choices for penetration testing distributions. A good list here shows the popular ones, but for me I’ve stuck with Kali for a number of years. Offensive Security maintain this free distribution and they release four updates per year. You can get the latest from here, I use the 64-bit Virtualbox version here.
I like to keep what I’m using up to date, so four times a year I have a new installation to move to. In a Windows world that would be a massive pain, but here in Linuxland it’s pretty simple. This post is what I follow each time to make that transition easy.
First Boot
After importing the ova image from the Kali site in to VirtualBox you might want to tweak a few settings. I usually add more RAM and CPU to the VM to make it more useable. Once that’s done we can do our first boot.
Update Everything
Let’s make sure everything is updated:
┌──(root💀kali)-[~]
└─# apt-get update
Hit:1 http://kali.download/kali kali-rolling InRelease
Reading package lists... Done
I’ve already done mine, you’ll have a wait here if this is your first update. Now update installed packages:
┌──(root💀kali)-[~]
└─# apt-get -y upgrade
Reading package lists... Done
Building dependency tree... Done
Reading state information... Done
Calculating upgrade... Done
0 upgraded, 0 newly installed, 0 to remove and 0 not upgraded.
Again mine is done. You’ll have a lengthy wait here the first time you run it. Now update the distribution:
┌──(root💀kali)-[~]
└─# apt-get dist-upgrade -Vy
Reading package lists... Done
Building dependency tree... Done
Reading state information... Done
Calculating upgrade... Done
0 upgraded, 0 newly installed, 0 to remove and 0 not upgraded.
More waiting for you on first time. Now a quick tidy up:
┌──(root💀kali)-[~]
└─# apt-get autoremove -y
Reading package lists... Done
Building dependency tree... Done
Reading state information... Done
0 upgraded, 0 newly installed, 0 to remove and 0 not upgraded.
Set Timezone
With everything updated I tweak a few things. First timezone, check for yours if you aren’t sure:
┌──(root💀kali)-[~]
└─# timedatectl list-timezones
Africa/Abidjan
Africa/Accra
Africa/Addis_Ababa
Africa/Algiers
<SNIP>
I’m London so change and check:
┌──(root💀kali)-[~]
└─# timedatectl set-timezone Europe/London

┌──(root💀kali)-[~]
└─# timedatectl status
               Local time: Fri 2022-01-14 17:37:35 GMT
           Universal time: Fri 2022-01-14 17:37:35 UTC
                 RTC time: Fri 2022-01-14 17:37:34
                Time zone: Europe/London (GMT, +0000)
System clock synchronized: yes
              NTP service: active
          RTC in local TZ: no
Set Keyboard Layout
Change the default keyboard layout. I switch mine to GB. Check it first:
┌──(root💀kali)-[~]
└─# cat /etc/default/keyboard
# KEYBOARD CONFIGURATION FILE
# Consult the keyboard(5) manual page.
XKBMODEL="pc105"
XKBLAYOUT="us"
XKBVARIANT=""
XKBOPTIONS=""
BACKSPACE="guess"
Use sed to search and replace:
┌──(root💀kali)-[~]
└─# sed -i 's/us/gb/g' /etc/default/keyboard
Check it’s now correct:
┌──(root💀kali)-[~]
└─# cat /etc/default/keyboard
# KEYBOARD CONFIGURATION FILE
# Consult the keyboard(5) manual page.
XKBMODEL="pc105"
XKBLAYOUT="gb"
XKBVARIANT=""
XKBOPTIONS=""
BACKSPACE="guess"
Increase Zsh History
Now increase history size because default is way too small:
┌──(root💀kali)-[~]
└─# sed -i 's/HISTSIZE=1000/HISTSIZE=100000/g' .zshrc; sed -i 's/SAVEHIST=2000/SAVEHIST=200000/g' .zshrc
Silence Firefox
The installed version of Firefox is too noisy so I use this config to silence it. First open Firefox and go to about:profiles:

Copy the path for the root directory, for this install it’s:
/home/kali/.mozilla/firefox/1bhkechk.default-esr
Change directory to that path the download the config and overwrite the default:
┌──(root💀kali)-[~]
└─# cd /home/kali/.mozilla/firefox/1bhkechk.default-esr

┌──(root💀kali)-[/home/kali/.mozilla/firefox/1bhkechk.default-esr]
└─# wget https://gist.githubusercontent.com/puzzlepeaches/afb8d748ce3530def9ccfb55846d6d4b/raw/07c9d21aa2d76733179da05235e440fbf636b718/user.js -O user.js
--2022-01-14 17:49:22--  https://gist.githubusercontent.com/puzzlepeaches/afb8d748ce3530def9ccfb55846d6d4b/raw/07c9d21aa2d76733179da05235e440fbf636b718/user.js
Resolving gist.githubusercontent.com (gist.githubusercontent.com)... 185.199.109.133, 185.199.110.133, 185.199.111.133, ...
Connecting to gist.githubusercontent.com (gist.githubusercontent.com)|185.199.109.133|:443... connected.
HTTP request sent, awaiting response... 200 OK
Length: 7613 (7.4K) [text/plain]
Saving to: ‘user.js’
user.js                      100%[=============================================>]   7.43K  --.-KB/s    in 0.001s
2022-01-14 17:49:22 (8.53 MB/s) - ‘user.js’ saved [7613/7613]
Now back in Firefox go to about:config, click Show only modified preferences:
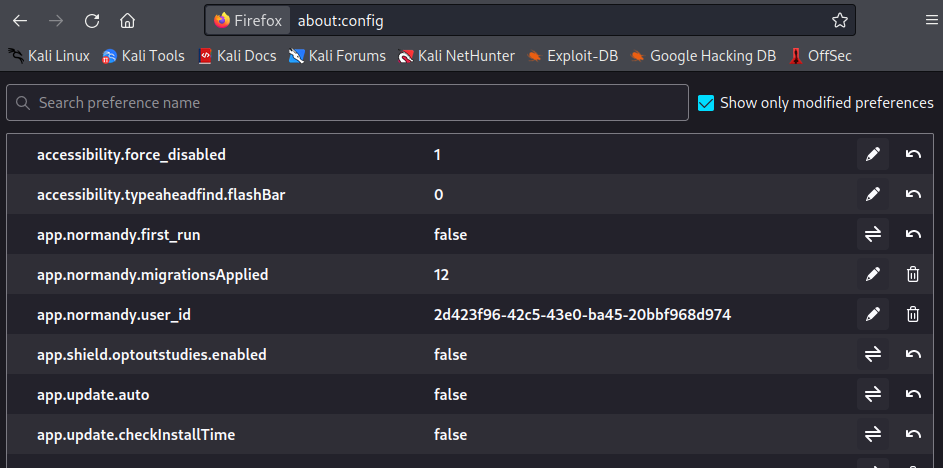
Be amazed at how much was changed!
Add Firefox Extensions
Also install any Extensions that I had:
┌──(kali㉿kali)-[~]
└─$ echo "https://addons.mozilla.org/firefox/downloads/file/3890260/wappalyzer-6.9.11-fx.xpi
https://addons.mozilla.org/firefox/downloads/file/3616824/foxyproxy_standard-7.5.1-an+fx.xpi
https://addons.mozilla.org/firefox/downloads/file/3755764/cookie_editor-1.10.1-an+fx.xpi
" > list.txt

┌──(kali㉿kali)-[~]
└─$ wget -i list.txt
--2022-01-17 21:48:02--  https://addons.mozilla.org/firefox/downloads/file/3890260/wappalyzer-6.9.11-fx.xpi
<SNIP>
--2022-01-17 21:48:04--  https://addons.mozilla.org/firefox/downloads/file/3616824/foxyproxy_standard-7.5.1-an+fx.xpi
<SNIP>
--2022-01-17 21:48:05--  https://addons.mozilla.org/firefox/downloads/file/3755764/cookie_editor-1.10.1-an+fx.xpi
<SNIP>
Downloaded: 3 files, 11M in 0.6s (18.7 MB/s)
Now start Firefox as user Kali and the extensions we’ve downloaded:
┌──(kali㉿kali)-[~]
└─$ firefox cookie_editor-1.10.1-an+fx.xpi foxyproxy_standard-7.5.1-an+fx.xpi wappalyzer-6.9.11-fx.xpi
You’ll be prompted to add each one.
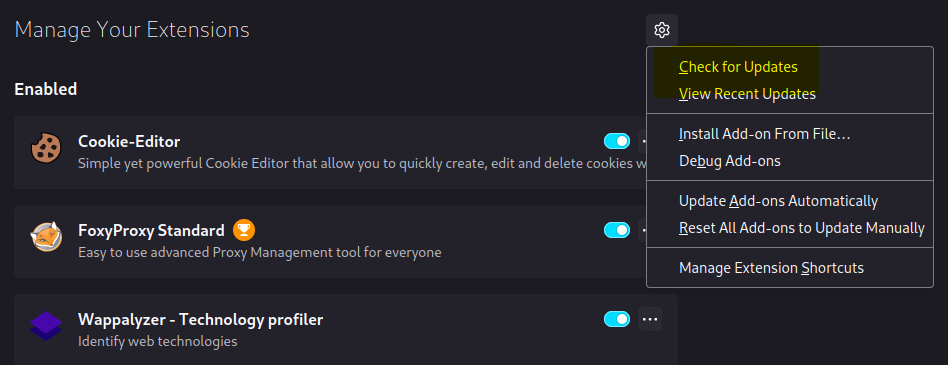
Now go to Add-ons and Themes (Ctrl+Shift+A) to see the Manage Your Extensions page, from their click the cog top right and chose Check for Updates:
For FoxyProxy we can import the settings from the old Kali to save doing them again. First go back to old Kali and export settings:
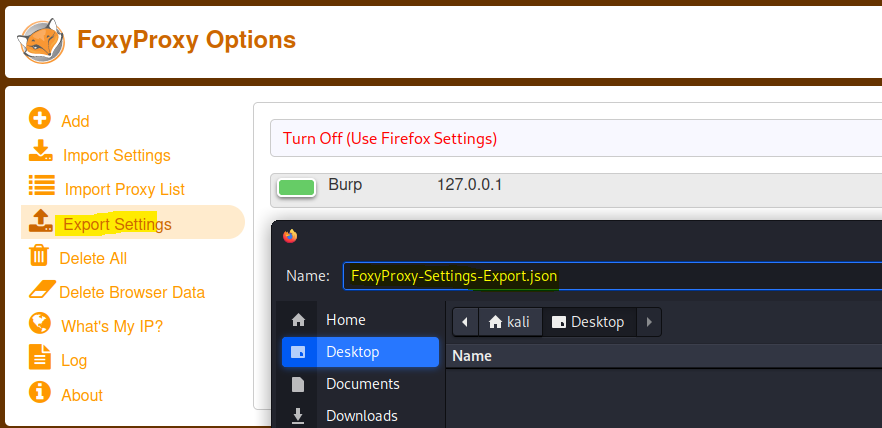
Copy that file over to new Kali then import settings:
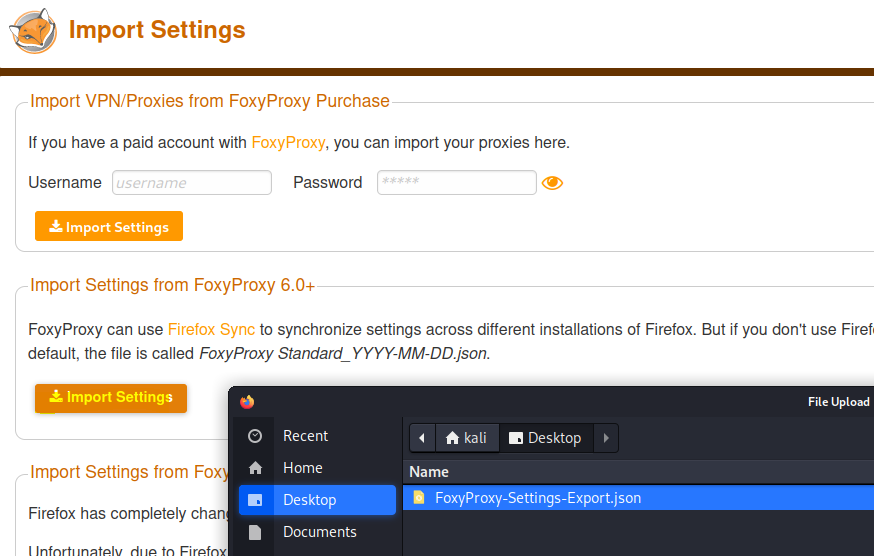
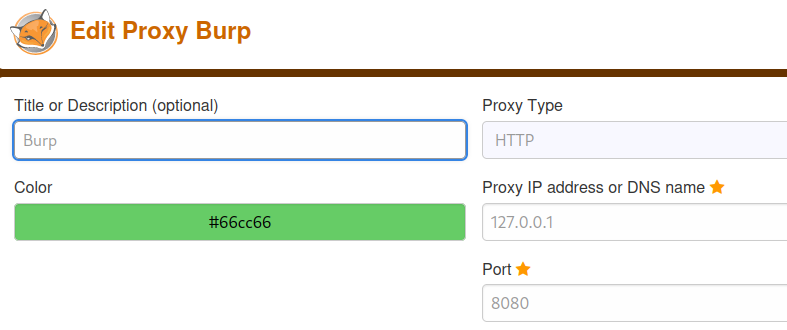
Or if you just have Burp set up then do that manually in your new Firefox:
We also want to install the Burp certificate. Start Burp and switch Intercept on:

Now back to firefox and go to the Burp local address:
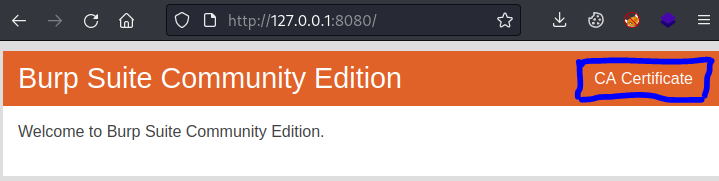
Click the CA Certificate link on the right to save the cert. Then go to Settings and Certificates:
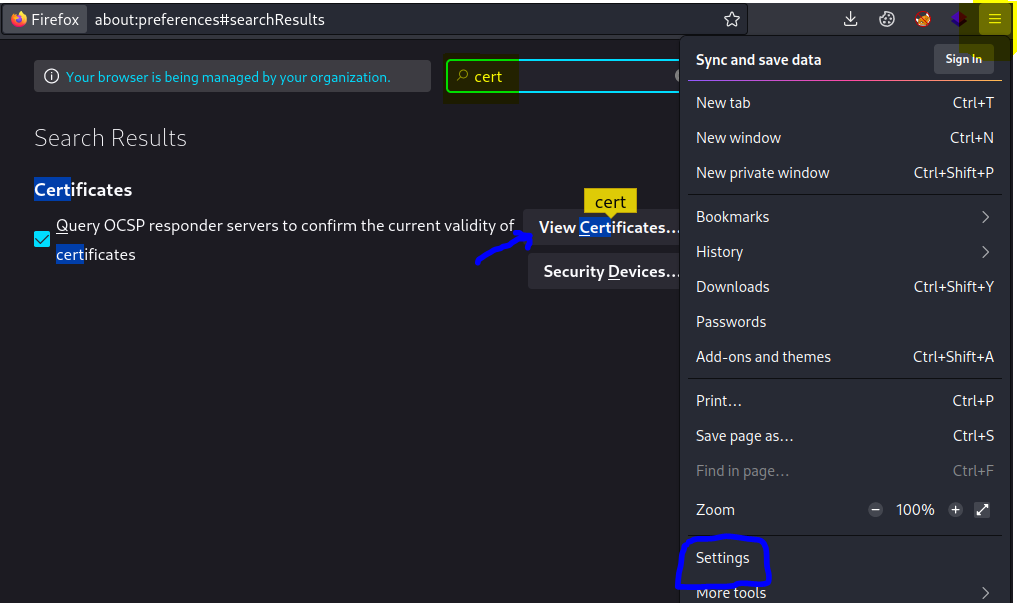
Click the View Certificates button, then on Authorities tab click import and go to Downloads:
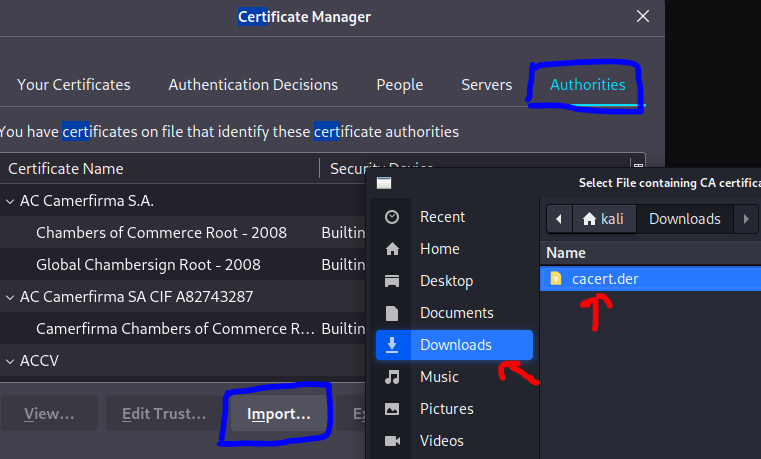
Select the .cer file we downloaded, make sure to tick the Trust websites control then click ok:
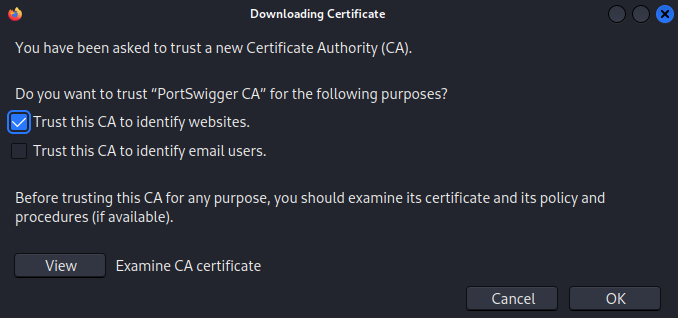
This guide by PortSwigger also has step by step for installing the cert if you need it.
We can check the certificate is working by making sure Intercept is off in Burp, proxy is enabled in Firefox, then visiting any https site:

If there’s no errors then it’s all good.
Find Installed Software
Now a quick look to see if I installed anything on my old host that I also want here. Boot my old Kali host and check it:
┌──(root💀kali)-[~]
└─# apt-mark showmanual
adduser
apt
apt-utils
aspnetcore-runtime-3.1
aspnetcore-targeting-pack-3.1
base-files
base-passwd
bash
bash-completion
bind9-dnsutils
<SNIP>
This is a list of packages manually installed via apt. It will most likely be a long list and many things on there you won’t remember installing. That’s because it’s not really a list of things you installed manually, more a list of what wasn’t installed automatically. Possibly a better way is to search your history:
┌──(root💀kali)-[~]
└─# history | grep "apt"
  126  sudo apt install seclists curl enum4linux feroxbuster impacket-scripts nbtscan nikto nmap onesixtyone oscanner redis-tools smbclient smbmap snmp sslscan sipvicious tnscmd10g whatweb wkhtmltopdf
  141  sudo apt install python3-venv
  235  sudo apt install poppler-utils
  324  apt-get install chrony
  343  apt install ntpdate
<SNIP>
That’s better, now go through that to see if there’s anything you need on the new VM. I’ve found it’s usually best to install things when you actually need them, instead of adding fifty packages you might not use.
Find My Stuff
Now let’s see if there’s anything I’ve used for CTF that I might want to take over:
┌──(root💀kali)-[~]
└─# du -shc *
2.0M    ContainerImages
1.3G    htb
48K     nc64.exe
175M    thm
4.0K    vpn.sh
Most of my stuff is in folders, htb for HackTheBox and thm for TryHackMe. I could look in htb:
┌──(root💀kali)-[~]
└─# du -sh htb/*
64K     htb/armageddon
40K     htb/backdoor
320M    htb/bolt
20K     htb/bountyhunter
492K    htb/cap
32K     htb/delivery
79M     htb/devzat
32K     htb/dynstr
<SNIP>
I’ll take some of my ovpn files over as well:
┌──(root💀kali)-[~]
└─# find . -name *.ovpn
./thm/pencer.ovpn
./thm/pencer-wreath.ovpn
./htb/pencer.ovpn
./htb/static/web.ovpn
./htb/jet/jet.ovpn
Enabled SSH Access
If there are files I want to move over to my new host then we’ll need to allow root to login so we can easily copy files. On old Kali:
┌──(root💀kali)-[~]
└─# grep PermitRootLogin /etc/ssh/sshd_config
#PermitRootLogin prohibit-password
# the setting of "PermitRootLogin without-password".

┌──(root💀kali)-[~]
└─# sed -i 's/#PermitRootLogin prohibit-password/PermitRootLogin yes/g' /etc/ssh/sshd_config

┌──(root💀kali)-[~]
└─# grep PermitRootLogin /etc/ssh/sshd_config
PermitRootLogin yes
# the setting of "PermitRootLogin without-password".
Set a password for root if not already done:
┌──(root💀kali)-[~]
└─# passwd
New password:
Retype new password:
passwd: password updated successfully
Start sshd service so we can connect from our new host:
┌──(root💀kali)-[~]
└─# systemctl start ssh.socket
On new Kali install sshpass to make it easier to copy files:
┌──(root💀kali)-[~]
└─# sshpass
Command 'sshpass' not found, but can be installed with:
apt install sshpass
Do you want to install it? (N/y)y
apt install sshpass
Reading package lists... Done
Building dependency tree... Done
Reading state information... Done
The following NEW packages will be installed:
  sshpass
0 upgraded, 1 newly installed, 0 to remove and 0 not upgraded.
Need to get 13.0 kB of archives.
After this operation, 38.9 kB of additional disk space will be used.
Get:1 http://http.kali.org/kali kali-rolling/main amd64 sshpass amd64 1.09-1+b1 [13.0 kB]
Fetched 13.0 kB in 1s (23.1 kB/s)
Selecting previously unselected package sshpass.
(Reading database ... 294334 files and directories currently installed.)
Preparing to unpack .../sshpass_1.09-1+b1_amd64.deb ...
Unpacking sshpass (1.09-1+b1) ...
Setting up sshpass (1.09-1+b1) ...
Processing triggers for man-db (2.9.4-4) ...
Processing triggers for kali-menu (2021.4.2) ...
Copy Data Across
Create folders to put the files in when I copy them here:
┌──(root💀kali)-[~]
└─# mkdir thm htb
Still on my new Kali we can use scp to pull files to us:
┌──(root💀kali)-[~]
└─# sshpass -p "SuperSecretPassword" scp root@192.168.0.14:/root/htb/pencer.ovpn htb/pencer.ovpn

┌──(root💀kali)-[~]
└─# sshpass -p "SuperSecretPassword" scp root@192.168.0.14:/root/thm/pencer.ovpn thm/pencer.ovpn

┌──(root💀kali)-[~]
└─# sshpass -p "SuperSecretPassword" scp -r root@192.168.0.14:/root/htb/jet htb/jet/

┌──(root㉿kali)-[~]
└─# sshpass -p "SuperSecretPassword" scp -r root@192.168.0.14:/root/htb ~/
I’m ready to switch to my new Kali install now, with everything set up and transferred across.


Comments